Metrohm 915 KF Ti-Touch Manual - Short Instructions Download Page 36

6.2 Fundamentals of operation

■■■■■■■■■■■■■■■■■■■■■■

30

■■■■■■■■

915 KF Ti-Touch

6.2.4 

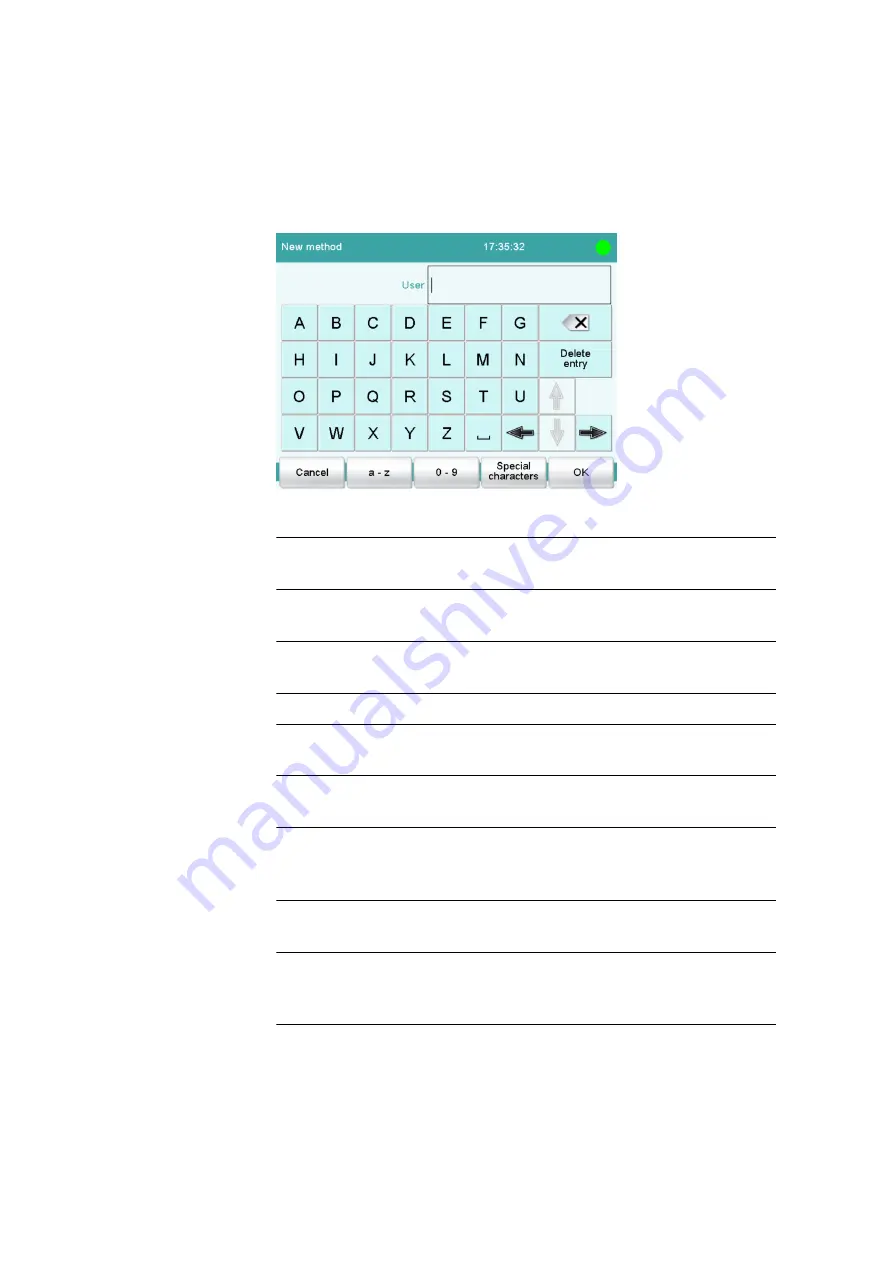
Entering text and numbers

In the editing dialog for text or numerical input, enter the individual char-
acters by tapping in the input field. The following functions are available:

Text editor

Table 4

Editing functions

[OK]

The modification is applied and the editing dialog
is exited.

[Cancel]

The editing dialog is exited without applying the
modification.

[Delete entry]

The content of the input field is deleted com-
pletely.

[

]

The character in front of the cursor is deleted.

[

]

The cursor within the input field is shifted to the
left by one character.

[

]

The cursor within the input field is shifted to the
right by one character.

[a…z]

The lower-case letters are displayed. The label
changes to 

[A…Z]

. The upper-case letters are

displayed again by tapping.

[0…9]

Numbers and mathematical characters are dis-
played.

[Special charac-
ters]

Special characters are displayed. You can use the
button 

[More]

 to navigate through all available

characters.

Summary of Contents for 915 KF Ti-Touch

Page 1: ...915 KF Ti Touch Manual Short Instructions 8 915 8004EN...

Page 2: ......

Page 3: ...Metrohm AG CH 9100 Herisau Switzerland Phone 41 71 353 85 85 Fax 41 71 353 89 01 info metrohm com www metrohm com 915 KF Ti Touch Manual Short Instructions 8 915 8004EN 04 2017...

Page 4: ...tation has been prepared with great care However errors can never be entirely ruled out Please send comments regarding possible errors to the address above Documentation in additional languages can be...

Page 5: ...disposal 8 4 Overview of the instrument 9 4 1 Front of the instrument 9 4 2 Rear of the instrument 10 5 Installation 11 5 1 Setting up the instrument 11 5 1 1 Packaging 11 5 1 2 Checks 11 5 1 3 Locati...

Page 6: ...ecting a polarizable electrode 21 5 7 3 Connecting the temperature sensor 22 5 8 Connecting the Ti Touch to a network 23 6 Operation 25 6 1 Switching the instrument on and off 25 6 2 Fundamentals of o...

Page 7: ...d manual In addition to an introduction safety instructions and an overview of the instruments you will also find information about the installation and operation of the 915 KF Ti Touch in addition to...

Page 8: ...r You manage titrants sensors methods etc conveniently in the internal memory of the 915 KF Ti Touch You can also save your files externally through the USB connector e g on a USB flash drive On this...

Page 9: ...ive or a USB hub Sensor connectors One connector each for Polarizable electrodes Temperature sensor Pt1000 or NTC Ethernet connector For connecting the Ti Touch to a network Two connection nipples For...

Page 10: ...refers to the figure number the sec ond to the instrument part in the figure Instruction step Carry out these steps in the sequence shown Method Dialog text parameter in the software File New Menu or...

Page 11: ...2 Introduction 915 KF Ti Touch 5 NOTE This symbol highlights additional information and tips...

Page 12: ...e electrical safety when working with the instrument is ensured as part of the international standard IEC 61010 WARNING Only personnel qualified by Metrohm are authorized to carry out service work on...

Page 13: ...ell by hand Avoid applying excessive force to tubing connections Damaged tubing ends lead to leakage Appropriate tools can be used to loosen connections Check the connections regularly for leakage If...

Page 14: ...U WEEE Waste from Electrical and Electronic Equipment The correct disposal of your old instrument will help to prevent negative effects on the environment and public health More details about the disp...

Page 15: ...help for the dialog dis played 5 Fixed key Print Opens the print dialog 6 Key Pressing the key pumps air into the solvent bottle The overpressure in the solvent bottle pushes solvent into the KF titr...

Page 16: ...RJ 45 For connecting to a network 3 Temperature sensor connector Temp For connecting temperature sensors Pt1000 or NTC Two B sockets 2 mm 4 Electrode connector Pol For connecting polarizable electrode...

Page 17: ...d may not be used in explosive environments Place the instrument in a location of the laboratory which is suitable for operation free of vibrations protected from corrosive atmosphere and contaminatio...

Page 18: ...tected against accidental disconnection of the cable by means of a pull out protection fea ture If you wish to pull out the plug you will first need to pull back the outer plug sleeve marked with arro...

Page 19: ...6 1415 250 KF titration cell with a 6 1903 020 or 6 1903 030 stirring bar inside on the vessel lid Fold back the holding bracket upwards while doing so The markings on the vessel lid and on the plasti...

Page 20: ...8 pin Mini DIN socket and be control led simultaneously by the Ti Touch In addition to the connection cable stirrers and the Remote Box are each equipped with their own MSB socket for this purpose NO...

Page 21: ...rking on the MSB connector see Figure 5 page 15 Figure 5 MSB connector CAUTION Switch off the Ti Touch before you plug in MSB devices When it is switched on the Ti Touch automatically recognizes which...

Page 22: ...e controlled via remote lines and or that send control signals via remote lines can be connected via the 6 2148 010 Remote Box In addition to Metrohm other instrument manufacturers also use similar co...

Page 23: ...the USB you can use a commercially avail able USB hub NOTE We recommend that the Ti Touch be switched off while you set up or disconnect connections between the devices 5 5 2 Connecting a USB hub Use...

Page 24: ...interface Balance Cables AND ER FR FX with RS 232 inter face OP 03 6 2125 020 6 2125 010 Mettler AB AG PR LC RS9 In the scope of delivery for the balance Mettler AM PM PE with interface option 016 or...

Page 25: ...for cable 3 Switch on the balance 4 If necessary switch on the RS 232 interface of the balance 5 Configure the RS 232 interface of the USB RS 232 adapter in the device manager of the Ti Touch 6 Enter...

Page 26: ...t match the setting in the device manager 3 Make sure that the barcode reader is set in such a way that Ctrl char acters ASCII 00 to 31 can be sent 4 Program the barcode reader in such a way that the...

Page 27: ...If you wish to pull out the plug you first need to pull back the outer plug sleeve marked with arrows 3 Configure the Sample Processor in the device manager 5 6 Setting up the titration vessel The tu...

Page 28: ...le by means of a pull out protection If you wish to pull out the plug again you first need to pull back the outer plug sleeve 5 7 3 Connecting the temperature sensor A temperature sensor of the Pt1000...

Page 29: ...cting the Ti Touch to a network The 915 KF Ti Touch has a network connection Ethernet This can be used to integrate your Ti Touch in your network You can for example store data on a PC within the netw...

Page 30: ...5 8 Connecting the Ti Touch to a network 24 915 KF Ti Touch Figure 8 Connecting the Ti Touch to a network...

Page 31: ...TE English is set as the default dialog language when the instrument is switched on for the first time Information about changing the dialog language can be found in the chapter Selecting the dialog l...

Page 32: ...nnected then a request appears to carry out the Prepare function All tubings and the cylinder are rinsed with the Prepare function The preparing of the buret unit is described in the chapter Manual co...

Page 33: ...2 Fundamentals of operation 6 2 1 Touch sensitive screen The entire 915 KF Ti Touch user interface is touch sensitive Simply touch a few of the buttons on the interface to learn how a touch sensitive...

Page 34: ...dialog displayed Print opens the printing dialog Manual opens the manual control Stop cancels the running determination Start starts a determination The file name of the loaded method the time and the...

Page 35: ...A check box can also be activated or deactiva ted by tapping on it 6 2 3 Status display The current status of the system is displayed in the upper right hand cor ner of the title bar Table 3 Status di...

Page 36: ...ng the modification Delete entry The content of the input field is deleted com pletely The character in front of the cursor is deleted The cursor within the input field is shifted to the left by one c...

Page 37: ...can be entered then the corresponding but tons will be shown to the right of the numerical keypad R1 For many parameters a result previously defined in the method can also be entered in place of a num...

Page 38: ...tive regarding the precise terms and conditions involved in concluding a corresponding maintenance agreement For detailed information on this topic please visit www metrohm com Cleaning Cleaning the s...

Page 39: ...ixed key 9 I Installation Set up instrument 11 Instrument Switch off 27 Switch on 25 K Keyboard Connect 19 KFT 2 M Magnetic stirrer Connect 16 Metrohm Serial Bus MSB see also MSB 14 MSB Connect device...

Reviews: