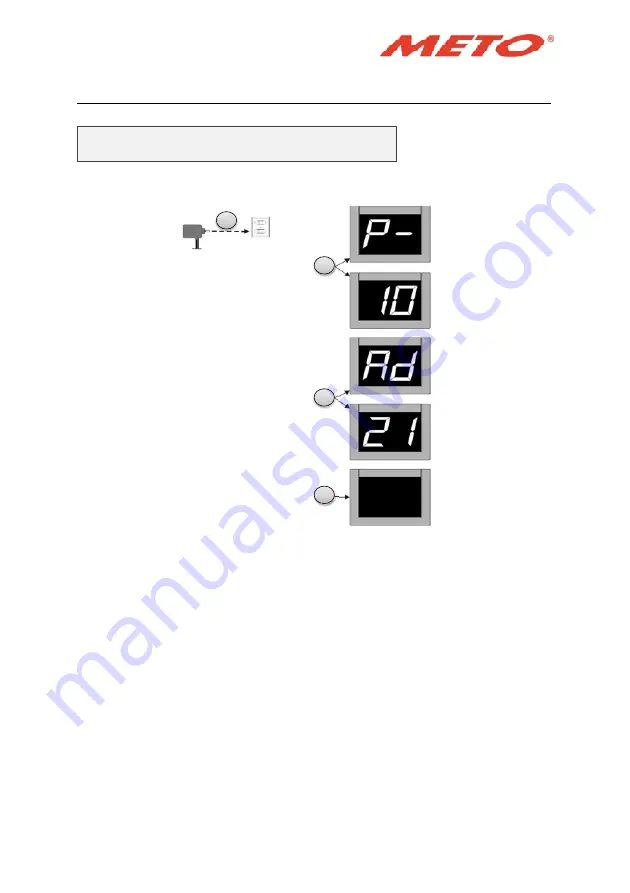
System Start
1) Schließen Sie den Display wieder an die Stromversorgung an (230V)
2) Display startet und zeigt die Programmversion an
3) Display zeigt die eingestellte Adresse an
4) Display wartet auf Eingangssignal
2
1
3
4
6
Page 1: ...Bedienungsanleitung Copyright 2019 Meto International GmbH Installation kabellose Taster RFv2 Seite 1 User Manual Installation wireless PushbuttonRFv2 Page 10 1...
Page 2: ...Inhalt 3 Funkfernbedienung mit aufklebbarem Klettverschluss 2 Halterung f r Display 1 Empf nger mit Anschlusskabel und aufklebbarem Klettverschluss 1 2 3 2...
Page 3: ...Austauschen der Displayhalterung 1 Abschrauben der alten Halterung 2 Anschrauben der neuen Halterung 1 2 3...
Page 4: ...tromfrei ist 2 Drehen Sie den Display um sodass die R ckseite zu sehen ist 3 Stecken sie den Stecker auf die rausstehenden Metallst be b ndig 4 Befestigen Sie den Empf nger mittels Klettverschluss im...
Page 5: ...ckt bis er blinkt Sollte er blinken halten Sie den Knopf ein zweites mal 3 Sekunden lang gedr ckt bis die Lampe erlischt Dies m ssen sie anschlie end mit dem Knopf 2 wiederholen Das einspeichern der F...
Page 6: ...rt 1 Schlie en Sie den Display wieder an die Stromversorgung an 230V 2 Display startet und zeigt die Programmversion an 3 Display zeigt die eingestellte Adresse an 4 Display wartet auf Eingangssignal...
Page 7: ...m 1 zu verringern 5 Ziehen Sie ein Ticket aus dem Ticketspender um die Startnummer festzustellen 6 Halten Sie den Druckknopf ndert sich die Zahl in 10er Schritten 7 Dr cken Sie den Druckknopf kurz um...
Page 8: ...ne neue Batterie Alkaline MN21 12V Austausch der Batterie 2 Entfernen Sie den wei en Aufkleber auf der R ckseite der Fernbedienung 3 Schrauben Sie die nun sichtbare Schraube raus 4 Tauschen Sie die Ba...
Page 9: ...GmbH Ersheimerstra e 69 69434 Hirschhorn 4962729280 Der Lieferant in Ihrer N he www meto com Alle Rechte vorbehalten Dieses Dokument darf weder komplett noch teilweise kopiert werden Weiters ist das b...
Page 10: ...3 Wireless Pushbutton with adhesive velco strip Content 1 Receiver with cabel for connecting and adhesive velco strip 2 Bracket for Dispenser 1 2 3 10...
Page 11: ...Change of bracket for Indicator 1 Remove the screws of the old one 2 Screw on the new one with more space between indicator and wall floor stand 1 2 11...
Page 12: ...e indicator is not under voltage 2 Turn the indicator to the back 3 Plug in the connecting cable from the receiver into the indicator 4 Fix the receiver with the velco strip at the right side on the b...
Page 13: ...s untill the green light is blinking When it blinks you need to push and hold the button 1 again untill the green light switches off You have to repeat this for the button 2 with For connecting a new...
Page 14: ...boots and shows the programm version 3 Indicator shows the adjusted address 4 Now the indicator is ready and wait for a input signal System Start 1 Connect the indicator to the electrical power 230V...
Page 15: ...ispenser for the start number 6 Push and hold the button or and the number will change in tenner steps 7 Push the button short and the number will chaneg one forward 8 Push the button short and the nu...
Page 16: ...Change of battery 1 Get a new battery Alkaline MN21 12V 2 Remove the white adhesive label from the back of the wireless pushbutton 3 Remove the screw on the back 4 Change the battery 3 4 16...
Page 17: ...ct us at this address Meto International GmbH Ersheimerstra e 69 is a registered trademark 69434 Hirschhorn 4962729280 www meto com All rights reserved This publication may not be copied in whole or i...