A
B
5
ASSEMBLY INSTRUCTIONS
Assembling the Halo Trainer
STOP! Read these instructions completely before beginning or refer to our online assembly video at: merrithew.com/eq-assembly
w
Place all parts from the box in a cleared area and position them on the floor in front of you.
w
Remove all packing materials from the area and place them back into the box.
Do not dispose of the packing materials until assembly is completed.
w
To prevent unsafe or improper use, please read each step carefully before beginning.
Standard assembly to fit 65 cm / 26" Stability Ball
1.
Place the long bar [2] assemblies down with the convex sides
facing outward, so they create a circular shape on the floor.
2.
Depress both pop-up buttons [3] on one end of a long bar [2]
and slide the connector at the end of the short handle [4] over
the bar until the pop-up buttons snap into the holes. Repeat with
the other end of the short handle over one end of the other long
bar, and then with the opposite short handle.
w
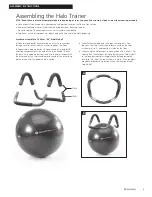
When fully assembled and resting on the long bars, from
top view, the Halo Trainer should form a circle on the floor
as shown in Fig. A, and should sit stable on the floor.
w
When using the Halo Trainer in conjunction with a 65 cm / 26"
Stability Ball, firmly mount the Halo Trainer to the Stability Ball
so the long bars conform snuggly to the Ball approximately
one-third (1/3) from the top as shown in Fig. B. If the long bars
are above or below this position, check the inflation of your
Stability Ball.
STEP 1
STEP 2


