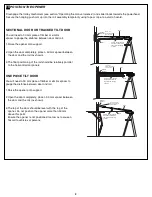
Merlin Commander Elite MS105MYQ Installation And Operating Instructions Manual Download Page 21

20

TROUBLE SHOOTING

7. Door opens but won't close:

• Check The Protector System™ (if you have installed

this accessory). If the light on the Beams are flashing,

correct the alignment.

• If opener light does not flash and it is a new installation,

repeat Programming the Travel Limits.

Repeat the safety reverse test after the adjustment is

complete.

8. Opener strains:

Door may be unbalanced or springs are broken. Close

door and use manual release rope and handle to

disconnect trolley. Open and close door manually. A

properly balanced door will stay in any point of travel

while being supported entirely by its springs. If it does

not, call for professional garage door service to correct

the problem.

9. Opener hums briefly, then won't work:

• Garage door springs are broken. SEE ABOVE.

• If problem occurs on first operation of opener, door is

locked. Disable door lock.

Repeat safety reverse test after adjustment is complete.

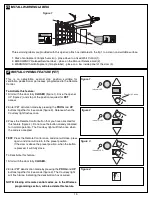
10. Opener won't activate due to power failure:

• Pull manual release rope and handle down once to

disconnect trolley. Door can be opened and closed

manually. When the power is restored, press the

“GREEN” button in the centre of the trolley assembly.

The next time the opener is activated, the trolley will re-

connect.

• The Outside Quick Release accessory (if fitted)

disconnects the trolley from outside the garage in case

of power failure.

11. The opener runs, but the carriage does not move:

• Check the carriage is not disengaged from the opener.

Operate the manual release to re-engage the opener.

• In a new installation, the preassembled Motor Shaft

Adapter may have fallen out of the belt sprocket

assembly. This adapter is installed during the

manufacturing process and may have dislodged.

• In older installations, especially on excessively heavy

doors, check the Motor Shaft Adapter has not stripped.

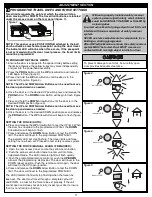
12. The Up and DOWN arrows on the control panel

are flashing in sequence:

Check the diagnostic code on next page.

1. Opener doesn't operate from either door control or

remote:

• Does the opener have electric power? Plug lamp into

outlet. If it doesn't light, check the fuse box or the circuit

breaker. (Some outlets are controlled by a wall switch.)

• Have you disengaged all door locks? Review installation

instruction warnings on page 1.

• Is there a build-up of ice or snow under door? The door

may be frozen to ground. Remove any obstruction.

• The garage door spring may be broken. Have it

replaced.

2. Door operates from door control but not from

remote:

• Replace batteries in the remote if necessary.

• If you have two or more remotes and only one operates,

review Program Your Opener, Remote and Keyless

Entry.

3. Remote has short range:

• Check the battery in the remote is fully charged.

• Change the location of the remote control in the car.

• A metal garage door, foil-backed insulation or metal

siding will reduce the transmission range.

4. Door reverses for no apparent reason and opener

light flashes 10 times:

• Check The Protector System™ (IR Beams) (if you have

installed this accessory). If the light is flashing, correct

alignment.

If the Protector System

TM

is installed and needs to be

removed, the Opener will need to be reprogrammed as

follows:

• Remove the IR Beam wiring from the Opener.

• Turn the power OFF for 5 seconds.

• Turn the power ON for 5 seconds.

• Again turn the power OFF for 5 seconds.

• Turn the power back on and test the opener for normal

operation.

5. The garage door opens and closes by itself:

Make sure remote push button is not stuck "on".

6. Door stops but doesn't close completely:

Repeat Programming the Travel Limits.

Repeat safety reverse test after any adjustment of door

arm length, close force or down limit adjustments.

35

Summary of Contents for Commander Elite MS105MYQ

Page 1: ...ence MS105MYQ Sectional and Tilt Garage Door Opener Installation and Operating Instructions This manual contains IMPORTANT SAFETY information DO NOT PROCEED WITH THE INSTALLATION BEFORE READING THOROU...

Page 2: ...alified persons in order to avoid hazard This opener should not be installed in a damp or wet space exposed to weather To avoid damage to very light doors such as fibreglass aluminium or steel doors a...

Page 3: ...door binds sticks or is out of balance call a trained door technician DOOR TYPES A Sectional Door with curved track B One Piece Door with Horizontal Track Only C One Piece Door without track D J Type...

Page 4: ...ains the opener its fitting hardware and accessories The rail carton contains the rail and some hardware Rails Different length rails 2 2 m 2 4 m are available for different height doors ensure you ha...

Page 5: ...Section 12 2 R clip Section 12 3 Hexagonal head screw Sections 14 16 4 Nut M8 Sections 14 16 5 Flat washer M8 Sections 14 16 6 Clevis Pin Section 16 7 R clip Section 16 8 Screw ST6 x 50 mm Section 11...

Page 6: ...where built in pedestrian doors are installed within a garage door Terminals 4 5 are normally linked If the link is removed the opener will not operate Remove the link and install a Safety switch to...

Page 7: ...his completes the assembly of the door opener to the rail FASTEN RAIL TO OPENER 8 9 Note The spring must be able to compress and bounce during operation Final tensioning can be performed after install...

Page 8: ...h the arrow pointing toward the ceiling Drill and secure the Header Bracket using the most suitable variation of holes 5 If using the wood screws provided 3 item 8 in the Hardware Provided Section 5 u...

Page 9: ...etely place a 50 mm spacer between the door and the rail as shown 3 The final positioning of the rail should be relatively parallel to the horizontal door panels ONE PIECE TILT DOOR You will need a 50...

Page 10: ...Section 5 Item 10 in Hardware Provided Section 5 fig 3 Item 8 in Hardware Provided Section 5 Item 10 in Hardware Provided Section 5 Item 3 in Hardware Provided Section 5 Item 4 in Hardware Provided S...

Page 11: ...an be assembled directly to the trolley assembly if required see figure 3 Unscrew the front two screws in the trolley assembly Remove the straight arm pivot and reassemble with the curved arm bracket...

Page 12: ...door is in the desired UP position press and release the PROG Button The DOWN Arrow Button will begin to flash figure 4 4 Press and hold the DOWN Arrow Button until the door is in the desired DOWN po...

Page 13: ...e door reverses off the 40 mm obstacle remove the obstacle and run the opener through a complete travel cycle Door must not reverse in closed position If it does repeat Program the Limits and Force th...

Page 14: ...THE PROTECTOR SYSTEMTM OPTIONAL To prevent entrapment install The Protector System no higher than 100 mm above the floor Disconnect power to the garage door opener before installing The Protector Sys...

Page 15: ...n Keep clear of the IR Beams and check the door closes after the preset time To Deactivate TTC 1 Enter into TTC Activation mode by pressing both PROG and DOWN buttons together for 3 seconds figure 2 R...

Page 16: ...gether for 3 seconds figure 3 The Courtesy light will flash twice indicating the deactivation has occurred NOTE Erasing all remote control codes as in the Wireless programming section will also delete...

Page 17: ...LEARN button on the garage door opener 2 Press and release the yellow LEARN button The LED indicator light will glow steadily 3 Enter a 4 digit personal identification number PIN of your choice on th...

Page 18: ...door If it is unbalanced or binding call a qualified door technician Check to be sure door opens closes fully Adjust limits and or force if necessary Repeat the safety reverse test Make any necessary...

Page 19: ...L HARDWARE 33 18 ACCESSORIES 6 5 7 4 E840M 760E E1702M 774ANZ E940M E943M E945M 8 9 3 E138M 1 2 E960M 10 11 827AU M BBU24V 32 NOTE Use of any Chamberlain Group accessories are approved to use with thi...

Page 20: ...wer Cord 026B0181 041A4004 Passpoint Assembly 041A4027 Transformer 041A0005 Logic Board PCB Housing Control Cover assembly 041A0006 LED Module 041A0008 Lens Cover 041A4034 Motor Assembly 041A4023 1 Po...

Page 21: ...tions especially on excessively heavy doors check the Motor Shaft Adapter has not stripped 12 The Up and DOWN arrows on the control panel are flashing in sequence Check the diagnostic code on next pag...

Page 22: ...ded Safety sensors are misaligned or were momentarily obstructed Realign both sensors to ensure both LEDs are steady and not flickering Make sure nothing is hanging or mounted on the door that would i...

Page 23: ...tic safety reverse in both UP and DOWN direction Electronic Automatic force adjustment Electrical Transformer overload protector and low voltage push button wiring Limit Device Mechanical Passpoint RP...

Page 24: ...mer protection laws with respect to major failures Chamberlain or its Professional Dealer will provide you with either repairs to the Unit or a replacement Unit Repairs and replacement parts provided...

Reviews: