COPYRIGHT © 2004 MERIT INDUSTRIES, INC.
Troubleshooting Information - Removal/Installation of Touchscreen -
The Vibe and Vibe w/ Coin
Megatouch FORCE Technical Reference Manual
ATTENTION:
OBSERVE PRECAUTIONS FOR HANDLING ELECTROSTATIC DEVICES
Removal/Installation of Touchscreen -
The Vibe and Vibe w/ Coin (cont’d)
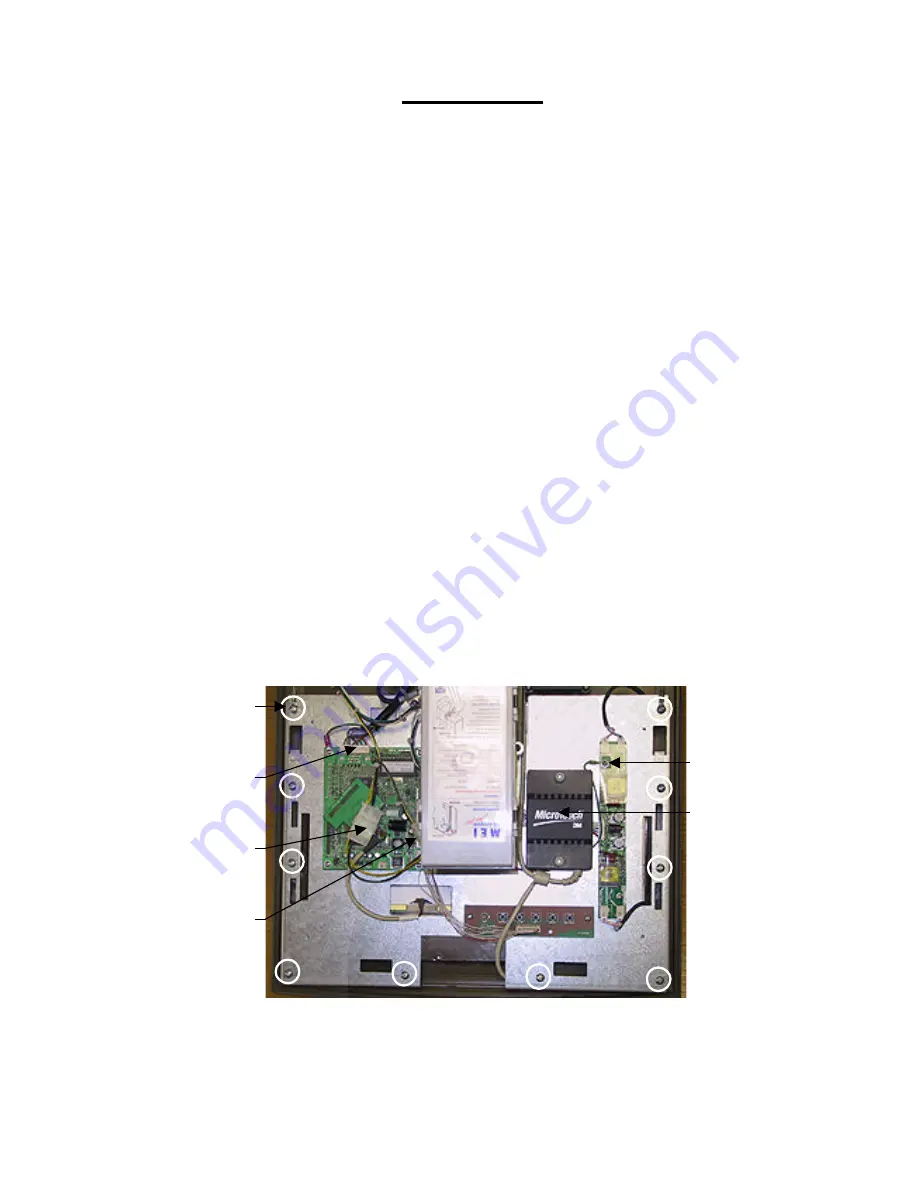
SCREWS
FASTENING
MONITOR TO
BEZEL
(10 PLACES)
TOUCHSCREEN
POWER
CONNECTOR
TOUCHSCREEN
CONTROLLER
GROUND
SCREW
MONITOR
POWER
CONNECTOR
VGA
MONITOR
CONNECTOR
FIGURE 1 - FORCE VIBE - MONITOR REMOVAL
the tape on the screen. After the tape is in place, repeat this step so there are two layers of
tape on the screen.
5. Connect the new touchscreen controller cable in the back of the controller and secure the
controller on the mounting screws in the game with the existing hardware. Also connect the
Molex connector (orange and gray wires) to the main power harness.
6. Replace the monitor assembly in the bezel, lining up the screw holes in the monitor with the
holes in the bezel, then replace the 10 screws. See Figure 1.
7. Reconnect the VGA monitor cable connector and the screw fastening the cable to the monitor
mounting plate, and also reconnect the ground screw. Then reconnect the monitor power
connector. See Figure 1.
8. Games with bill acceptors only: Replace the bill acceptor in the CPU section (make sure the
touchscreen controller cables do not interfere) and fasten it with the 4 screws and washers.
Then reconnect the 12-pin bill acceptor power connector. It is also recommended you use a
cable clamp to refasten the bill acceptor sensor and VGA monitor cables.
9. Plug in and turn on the game.
10. When the game is finshed booting, calibrate the touchscreen.
11. Close and lock the CPU section.


