background image

 94

CB241

2

3

74073

Summary of Contents for 7.4L Bravo Three

Page 1: ...OPERATION MAINTENANCE MANUAL 1995 Brunswick Corporation 90 805718960 595 7 4L Bravo Three ...

Page 2: ...ting your Authorized MerCruiser Dealer about service always specify model and serial numbers The description and specifications contained herein were in effect at the time this guide was approved for printing Mercury Marine whose policy is one of continuous improvement reserves the right to discontinue models at any time or to change specifications or designs without notice and without incurring o...

Page 3: ...1 CB2 71348 71352 71350 71360 ABC12345Z123 19 48 12345 1 2 3 4 5 6 7 71773 5 6 7 1 2 2 3 4 4 ...

Page 4: ... Drive Unit Impact Protection 17 Attention Required After Submersion 18 Trailering Boat 18 Launching And Boat Operation Care 19 Stolen Power Package 19 Replacement Service Parts 20 Do It Yourself Maintenance Suggestions 21 20 Hour Break In Period 22 After Break In Period 22 Operation 25 Instrumentation 25 Electrical System Overload Protection 29 Models With Mercathode System 29 Remote Controls Pan...

Page 5: ...Bottom Of Boat 91 Inspection And Maintenance 91 Cold Weather Or Extended Storage 92 Power Package Lay Up 92 Draining Instructions 95 Battery Winter Storage 102 Troubleshooting 103 Warranty Information 110 Owner Warranty Registration 110 International Owner Registration 111 Warranty Policies 112 Mercruiser Limited Warranty Gasoline Engines 112 Mercruiser International Warranty Gasoline Engines 114 ...

Page 6: ...any boating seasons To ensure maximum performance and carefree use we ask that you thoroughly read this manual The Operation and Maintenance Manual contains specific instructions for using and maintaining your product We suggest that this manual remain with the product for ready reference whenever you are on the water Thank you for purchasing one of our MerCruiser products We sincerely hope your b...

Page 7: ...structions while per forming the service plus common sense operation are major acci dent prevention measures WARNING WARNING Hazards or unsafe practices which could result in severe personal injury or death CAUTION CAUTION Hazards or unsafe practices which could result in mi nor personal injury or product or property damage IMPORTANT Indicates information or instructions that are necessary for pro...

Page 8: ...ble so as to minimize the likelihood of lanyard entangle ment with nearby objects It is made as long as it is in its stretched condition to minimize the likelihood of accidental activation should the operator choose to move around in an area close to the normal operator s position If for any reason it is desired to have a shorter functional lanyard this may be accomplished by using up length in th...

Page 9: ... cause any or all of the following poten tially hazardous situations 1 Loss of balance and falling forward of unstable boat passen gers a particular concern in bow rider type boats 2 Loss of power and directional control in heavy seas strong current or high winds 3 Loss of control when docking While activation of the lanyard stop switch will result in immedi ate power shut down a boat can continue...

Page 10: ...y Information booklet It lists regional sources of safety cruising and local naviga tion and is available at no charge by writing to Sources of Waterway Information National Marine Manufacturers Association 410 N Michigan Avenue Chicago IL 60611 U S A Perform safety checks and required maintenance Follow a regular schedule and ensure that all repairs are properly made Check safety equipment on boa...

Page 11: ... refer to your boat capacity plate When in doubt contact your dealer or the boats manufac turer Know your boat s operating and loading limitations Make sure everyone in the boat is properly seated Don t allow anyone to sit or ride on any part of the boat that was not intended for such use This includes backs of seats gunwales transom bow decks raised fishing seats any rotating fishing seat any whe...

Page 12: ...should always have the down skier in sight and never back up to the skier or anyone in the water Report accidents Boat operators are required by law to file a Boating Accident Report with their state boating law enforcement agency when their boat is involved in certain boating accidents A boating accident must be reported if 1 there is loss of life or probable loss of life 2 there is personal inju...

Page 13: ...e allowing people to swim or be in the water near your boat WARNING Stop your engine immediately whenever anyone in the water is near your boat Serious injury to the person in the water is likely if contacted by a rotating propeller a moving boat a moving gear case or any solid device rigidly attached to a moving boat or gear case CA283 High Speed And High Performance Boat Operation If your boat i...

Page 14: ...ming off plane Shifting weight to front bow will Improve ease of planing Improve rough water ride At extremes can cause boat to veer back and forth bow steer CA8 Bottom Of Boat To maintain maximum speed the following conditions of the boat bot tom should be observed A Clean free of barnacles and marine growth B Free of distortion nearly flat where it contacts the water C Straight and smooth fore a...

Page 15: ...und the propeller resulting in propeller speedup and a re duction in boat speed Excessive ventilation is annoying and usually caused by A Drive unit trimmed out too far B A missing propeller diffuser ring C A damaged propeller or gear housing which allows exhaust gases to escape between propeller and gear housing D Drive unit installed too high on transom CA294 Propeller Selection IMPORTANT Instal...

Page 16: ...he recommended range the propel ler must be changed to prevent loss of performance and possible en gine damage On the other hand operating an engine above the rec ommended operating RPM range will cause higher than normal wear and or damage Generally there is a 200 300 RPM change between propeller pitches After initial propeller selection the following common problems may require that the propelle...

Page 17: ...is speed for the boater but the coming of cool dry weather In pointing out the practical consequences of weather effects an en gine running on a hot humid summer day may encounter a loss of as much as 14 of the horsepower it would produce on a dry brisk spring or fall day With the drop in available horsepower this propel ler will in effect become too large Consequently the engine oper ates at less...

Page 18: ...timum performance and dependability and will keep your overall op erating expenses at a minimum See your Authorized MerCruiser Dealer for service aids CA14 DEALER RESPONSIBILITIES In general a dealer s responsibilities to the customer include prede livery inspection and preparation such as Make sure that the boat is properly equipped Prior to delivery make certain that the MerCruiser power package...

Page 19: ...tion preventing loss of steering control and engine overspeed Use extreme caution when operating in shallow water or where un derwater objects are known to be present Use extreme care to pre vent striking submerged object while operating in REVERSE No im pact protection is provided in REVERSE If drive unit should strike a submerged object stop engine as soon as possible and inspect drive unit for ...

Page 20: ... power package CA19 Trailering Boat Boat can be trailered with drive unit in up or down position Ade quate road clearance is required between road and gear housing skeg when trailering with drive unit in down position If adequate road clearance is a problem place drive unit in full trailer position and support with an optional trailer kit which is available from your Authorized MerCruiser Dealer ...

Page 21: ...In this instance water may enter the cylinders through the exhaust system When backing up rapidly the same situation may occur as stated in the preceding paragraph In any of these situations water entering the engine could cause se vere damage to internal parts Refer to Attention Required After Submersion CA21 Stolen Power Package If your power package is stolen immediately advise the local author...

Page 22: ... most of their life They are also expected to operate in both fresh and saltwater environments These conditions require numerous special parts Care should be exercised when replacing marine engine parts as specifications are quite different from those of the standard auto motive engine For example one of the most important and probably the least sus pected special replacement part is the cylinder ...

Page 23: ...u have these special tools and or equipment You can cause damage to the product in excess of the cost a dealer would charge you Also if you partially disassemble an engine or drive assembly and are unable to repair it the dealer s mechanic must reassemble the components and test to determine the problem This will cost you more than taking it to the dealer immediately upon having a prob lem It may ...

Page 24: ...ble 5 min utes at a time maximum Avoid full throttle acceleration from IDLE speed Do not operate at full throttle until engine reaches normal operat ing temperature Frequently check crankcase oil level Add oil if needed It is nor mal for oil consumption to be high during break in period After 20 hour break in period drain crankcase oil and replace oil filter see MAINTENANCE Fill crankcase with cor...

Page 25: ...maged parts Check shift and throttle cable adjustments and lubricate and in spect for loose damaged or missing parts Steering System Lubricate and inspect for loose damaged or missing parts Inspect all drive belts Check engine alignment Include proper lubrication of U joint and splined shaft Inspect Complete Engine Exhaust System Externally for dam age and deterioration check all hose clamps for a...

Page 26: ...24 CA26 70514 70515 70516 70523 70517 70522 70518 70521 70520 70519 1 2 3 4 5 6 7 8 9 10 ...

Page 27: ...ill ap pear on your style gauges 1 Speedometer Indicates boat speed 2 Tachometer Indicates engine RPM 3 Oil Pressure Gauge Indicates engine oil pressure 4 Battery Meter Indicates battery voltage 5 Water Temperature Gauge Indicates engine operating tempera ture 6 Fuel Gauge Indicates fuel tank volume 7 Power Trim Gauge Indicates drive unit angle trim up out and down in 8 Hour Meter Records engine r...

Page 28: ...26 CB218 70516 1A 1B 1C 71987 70518 ...

Page 29: ...on switch is first turned to the run position prior to cranking the engine Once the engine starts the buzzer should stop CAUTION Avoid engine damage Do not operate engine once the buzzer has sounded EXCEPT TO AVOID A HAZARDOUS SITUATION The Audio Warning System will not protect the engine from damage It is designed to warn the operator that a problem has occurred When the buzzer sounds with the en...

Page 30: ...28 CB125 71466 70525 70528 70527 70526 1 2 5 4 3 71773 ...

Page 31: ...er If breaker will not reset electrical overload has not been eliminated Further checks must be made on electrical sys tem 2 A 20 amp fuse may be located in ignition switch I terminal lead to protect electrical system Check for blown fuse if key Is turned to START and nothing happens and circuit breaker is not tripped 3 The Power Trim System is protected from overload by 110 amp fuse and a 20 amp ...

Page 32: ...30 CB181 1 4 5 2 3 6 7 ...

Page 33: ...ing procedures 4 Trailer Switch Used to raise drive unit for trailering launching breaching or shallow water operation See Power Trim for detailed trailer switch operation 5 Lanyard Stop Switch Turns ignition Off whenever the opera tor when attached to the lanyard moves far enough away from the operator s position to activate the switch See Lanyard Stop Switch at the front of this manual for safet...

Page 34: ...32 CB183 1 4 2 6 3 2 4 3 1 6 5 5 ...

Page 35: ...depressed only when the remote control handle is in the Neutral position and should only be used to assist in starting the engine 3 Control Handle Tension Adjustment Screw This screw can be adjusted to Increase or Decrease the tension on the control han dle cover must be removed to adjust This will help prevent Creep of the remote control handle Turn screw Clockwise to increase ten sion and Counte...

Page 36: ...34 CB185 3 4 70537 71339 1 2 ...

Page 37: ... be increased or decreased 3 FRICTION Screw adjusts control handle friction so motor speed can be set and driver does not have to hold handle Turn screw clockwise to increase friction Do not thread screw all the way out 4 DETENT Screw controls the effort needed to move control han dle out of NEUTRAL To increase tension turn screw clockwise to decrease turn screw counterclockwise Do not thread scre...

Page 38: ...36 CA34 71338 1 3 5 ...

Page 39: ...mance is obtained with the drive unit adjusted so the boat bottom will run at a 3 to 5 angle to the wa ter Trimming Drive Unit UP OUT Can Lower the bow Generally increase top speed Increase clearance over submerged objects or a shallow bottom Cause boat to accelerate and plane off slower In excess cause boat porpoising bouncing or propeller ventila tion Cause engine overheating if trimmed UP OUT t...

Page 40: ...38 CB187 1 3 2 6 4 5 73976 73977 ...

Page 41: ...er Position Press button until drive unit reaches desired height 2 Trim Up Out Press UP on Trim switch until drive unit reaches de sired trim position 3 Lower Drive Unit Press DOWN on Trim switch until drive unit reaches desired position CB189 POWER TRIM OPERATION CONSOLE MOUNT REMOTE CONTROL SINGLE ENGINE VERSION 4 Trailer Position Press button until drive unit reaches desired height 5 Trim Up Ou...

Page 42: ...40 CB190 4 2A 1 1 2B 3 73978 73979 ...

Page 43: ...on until drive unit reach es desired height for trailering drive units 2 Two Button Trim Control Dual Buttons in Handle used to contol both drive units from the handle Press UP on button s to trim drive unit UP OUT Press down on button s to trim drive unit DOWN IN A Forward Trim Button Used to trim the port drive unit B Rear Trim Button Used to trim the starboard drive unit 3 Three Button Trim Con...

Page 44: ...42 CB192 70540 70540 70540 1 2 3 ...

Page 45: ...release button s and allow motor to cool for about one minute Circuit breaker will reset and Power Trim operation may be resumed 1 Trailer Position Simultaneously press the UP button top along with the UP OUT button center until drive unit reaches desired trail er position 2 Trim Drive Unit UP OUT Press center UP OUT button until drive unit reaches desired trim position 3 Trim Drive Unit IN DOWN P...

Page 46: ...0 seconds When engine starts quickly reduce throttle setting to avoid exceeding 1500 RPM Never shift drive unit unless engine is at Idle RPM 1 Perform the following as appropriate A Check all items listed in OPERATION CHART B Perform any other necessary checks as indicated by your dealer or specified in your boat owner s manual C Place drive unit in full down in position D Place control handle in ...

Page 47: ...mediately and determine cause J Be sure charging system is functioning correctly K Observe power package for fuel oil water and exhaust leaks L To shift drive unit return control throttle lever to NEUTRAL Move control shift lever with a firm quick motion forward to shift to FOR WARD gear or backward to shift to REVERSE After shifting drive unit advance throttle to desired setting M Move control sh...

Page 48: ... if so equipped Check for fuel oil wa ter fluid and exhaust leaks etc Turn bat tery switch OFF if so equipped Operate bilge blowers if so equipped Check shift and throttle control op eration Close fuel valve Open fuel shutoff valve Check steering operation Close sea cock if so equipped Open seacock if so equipped Flush cool ing system if in saltwa ter area Place drive unit in full down in position...

Page 49: ...soline CA291 USING REFORMULATED OXYGENATED GASOLINES USA ONLY This type of gasoline is required in certain areas of the USA The two types of oxygenates used in these fuels is Alcohol Ethanol or Ether MTBE or ETBE If Ethanol is the oxygenate that is used in the gasoline in your area refer to Gasolines Containing Alcohol also These Reformulated Gasolines are acceptable for use in your Mer Cruiser en...

Page 50: ...uel lines fittings fuel filters and carburetors fuel in jection components should be inspected for leakage soften ing hardening swelling or corrosion Any sign of leakage or deterioration requires replacement before further engine oper ation Because of possible adverse effects of alcohol in gasoline it is rec ommended that only alcohol free gasoline be used where possible If only fuel containing al...

Page 51: ...osity with an API clas sification of CD or SG may be used The chart below is a guide to crankcase oil selection Oil filter should always be changed with oil In those areas where recommended straight weight oil is not avail able a multiviscosity 20W 40 SG or CD or as a second but less preferable choice 20W 50 SG or CD may be used IMPORTANT The use of non detergent oils multi viscosity oils other th...

Page 52: ...aximum RPM WOT 650 RPM 2 Idle RPM in Forward Gear 3 7 psi 21 48 kPa Fuel Pump Pressure 30 70 psi 207 483 kPa Oil Pressure 2000 RPM 4 psi 28 kPa Min Oil Pressure Idle Thermostat 160 F 71 C 1 Power Rated in Accordance with NMMA procedure using Marine Engine Rating Code SAE J1228 Technically Identical to ISO 3046 and ICOMIA 28 83 2 A special procedure must be followed for adjusting idle RPM in Neutra...

Page 53: ...ark Plug Gap Timing Idle RPM Minimum 450 cca 575 mca or 90Ah Firing Order Recommended Battery Rating 10 BTDC 1 1 8 4 3 6 5 7 2 12 Volt Negative Ground Electrical System 55 Amps Alternator 1 A special procedure must be followed to check or adjust Timing Consult your Authorized MerCruiser Dealer before attempting this procedure ...

Page 54: ...ts 2 9 L Drive Unit Oil Capacity w Reservoir 7 U S Qts 6 6 L Seawater Cooling System 2 20 U S Qts 18 9 L Closed Cooling System 28 U S Qts 26 5 L 1 Always use dipstick to determine exact quantity of oil required 2 Seawater Cooling System capacity information is for winterization use only ...

Page 55: ...hly NOTE Maintenance points are color coded for ease of identifica tion See the decal on engine for identification Maintenance Aids 1 Power Steering System Quicksilver Power Trim and Steering Fluid or Dexron III automatic transmission fluid ATF 2 All Pivot Points SAE 30W motor oil 3 Fogging Winterizing Engine Quicksilver Storage Seal or SAE 20W motor oil 4 Exposed portion of Steering Cable and Pro...

Page 56: ...stem Coolant 50 50 mixture of ethylene glycol antifreeze must meet GM specification 1825 M and tap water Areas where temperatures generally do not go below 32 F 0 C rust inhibitor and tap water is acceptable 11Gasoline Stabilizer Quicksilver Gasoline Stabilizer for Marine Engines 12Grease Fittings on Drive Shaft Extension Models Quicksilver U Joint and Gimbal Bearing Grease ...

Page 57: ...Crankcase Oil Check level Closed Cooling Coolant Check level Power Steering Fluid Check level Stern Drive Unit Oil Check level Battery Check level and inspect for damage Fuel Pump Sight Tube Check that no fuel is present Power Trim Pump Oil Check level Anodes Inspect for erosion Gear Housing Water Pickups Check for ma rine growth or debris Weekly TASK INTERVAL ...

Page 58: ... All Inspect condition and check tension Propeller Shaft Lubricate Power Package Exterior Surfaces Spray with rust preventative Power Package Exterior Surfaces Clean and paint Cooling System Flush seawater section INTERVAL Saltwater use Every 50 Hours of Operation or 60 Days Whichever Occurs First Freshwater use Every 100 Hours of Operation or 120 Days Whichever Occurs First Once a Year Saltwater ...

Page 59: ...an and inspect Stern Drive unit Oil Change Gimbal Ring Clamping Screws Retorque to 50 55 lb ft 67 74 N m Gimbal Bearing Lubricate Closed Cooling System Pressure Cap Clean Inspect and Test Every 100 Hours of Operation or Once Yearly Whichever Occurs First TASK INTERVAL At First 20 Hours of Operation Whenever Insufficient Seawater Flow is Suspected If Operating Tempera ture Exceeds Normal Range NOTE...

Page 60: ...spect for loose damaged or missing parts Electrical System Check for loose or damaged wiring Cooling System Hoses and Clamps Inspect for damage and deteriora tion Check clamps for tightness Continuity Circuit Check components for loose connections bro ken or frayed wires TASK INTERVAL Saltwater use Every 50 Hours of Operation or 60 Days Whichever Occurs First Freshwater use Every 100 Hours of Oper...

Page 61: ...l filters Replace Steering Head and Remote Control Inspect and lubricate Quicksilver MerCathode System Test output Closed Cooling Coolant Test for alkalinity Heat Exchanger Clean seawater section Carburetor Inspect and adjust Drive Unit Bellows and Clamps Inspect Closed Cooling Coolant Replace TASK INTERVAL Once a Year Every Two Years Saltwater use Every 50 Hours of Operation or 60 Days Whichever ...

Page 62: ...60 CB33 71773 1 2 3 4 4 5 6 70542 70543 71451 70548 70547 70546 70545 ...

Page 63: ...k 4 Remove FILLCAP DIPSTICK and observe level Add specified fluid if required Reinstall FILLCAP DIPSTICK IMPORTANT If fluid is not visible in pump contact your Autho rized MerCruiser Dealer CA56 CHECKING ENGINE COOLANT CLOSED COOLED MODELS ONLY WARNING Do not remove coolant cap when engine is hot Coolant may dis charge violently 5 Check coolant level in coolant recovery bottle Add specified cool a...

Page 64: ...62 CB207 2 A B 70979 70551 1 2 71987 71773 ...

Page 65: ...ill monitor a seal may be leaking Damage to drive unit may occur due to lack of lubrica tion Contact your Authorized MerCruiser Dealer for service CB41 CHECKING POWER TRIM PUMP FLUID Place drive unit in full down in position 2 Remove fill cap from reservoir and observe oil level Level must be up to but not over bottom of filler neck Add Quicksilver Power Trim and Steering Fluid or SAE 10W 30 motor...

Page 66: ...64 CB43 71773 1 2 3 70571 70572 71451 ...

Page 67: ...th engine at normal operating temperature remove dipstick In stall Quicksilver Crankcase Oil Pump onto dipstick tube Insert hose end of crankcase oil pump into an appropriate container and using pump handle pump until crankcase is empty Remove crankcase oil pump 2 Turn oil filter counterclockwise to left remove and discard old oil filter and old sealing ring Coat sealing ring on new filter with mo...

Page 68: ...66 CB46 71773 1 2 70570 72522 3 71987 ...

Page 69: ...IL FILL DRAIN hole with Specified Gear Lube until an air free stream of lubricant flows from OIL VENT hole Remove tube from OIL FILL DRAIN hole Quickly install sealing washer and OIL FILL DRAIN screw Tighten securely 3 Fill gear lube monitor with Specified Gear Lube When oil starts to run out the vent hole Monitor circuit completely filled reinstall vent plug and seal and tighten securely 4 Fill m...

Page 70: ...68 CB79 71773 70573 1 71169 2 ...

Page 71: ...ting bracket and discard Coat sealing rings on new filter with motor oil Thread filter clockwise onto bracket and tighten securely by hand Do not use a filter wrench Start and run engine Check filter connection for gasoline leaks If leaks exist recheck filter installation lf leaks continue stop engine immediately and contact your Authorized MerCruiser Dealer WARNING Make sure no leaks exist before...

Page 72: ...70 CB177 4 5 70556 71359 1 3 71903 71904 71901 2 ...

Page 73: ...ntrol NOTE If steering cable does not have grease fitting inner wire of cable cannot be greased 2 With steering cable fully extended lubricate exposed part of cable with Special Lubricant 101 3 Lubricate steering system pivot points with SAE 30W motor oil On dual engine boats lubricate all pivot points including tie bar pivot points with SAE 30W motor oil CA72 Shift Cable 4 Lubricate pivot points ...

Page 74: ...72 CB389 6 8 70558 70559 ...

Page 75: ...h Quicksilver U joint and Gimbal Bearing Grease Contact your Authorized MerCruiser Dealer for this service IMPORTANT Stern drive must be removed to lubricate U joints Contact your authorized MerCruiser dealer for this ser vice CAUTION Speedometer water hose must be disconnected from drive unit BEFORE removing drive unit Failure to do this will result in a broken fitting if drive unit is removed CB...

Page 76: ...74 CB373 4 2 72239 ...

Page 77: ...Periodically check propeller nut for tightness during boating season A minimum of 55 lbs ft 75 N m torque is required CB157 REMOVAL BRAVO THREE 1 Place wood block between propeller blades and anti ventilation plate to prevent rotation 2 Turn aft propeller shaft nut counterclockwise to remove nut 3 Slide propeller and thrust hub off propeller shaft 4 Turn front propeller shaft nut counterclockwise ...

Page 78: ...76 CB150 6 7 9 10 12 72239 11 8 ...

Page 79: ...eller on propeller shaft 9 Install propeller nut Tighten nut securely A minimum of 100 lbs ft 136 N m torque is required Check propeller at least after 20 hours of operation Do not operate with loose propeller 10Slide aft thrust hub onto propeller shaft with tappered side toward propeller hub Toward end of shaft 11Align splines and place propeller on propeller shaft 12Install propeller nut Tighten...

Page 80: ...78 CB64 1 2 3 70565 71353 70564 4 71170 ...

Page 81: ...ition install flushing attachment and lower drive unit to full down in position 1 Install Quicksilver flushing attachment or equivalent over water intake openings in gear housing 2 Connect hose between flushing attachment and water tap 3 With drive unit in normal operating position partially open water tap about 1 2 maximum Place remote control in NEUTRAL idle speed position and start engine Opera...

Page 82: ...80 CB68 5 70566 6 70567 ...

Page 83: ...ool ing efficiency is noticed HEAT EXCHANGER 5 Remove end plate s O rings and gaskets Inspect O rings and gaskets for deterioration and replace if necessary Install gaskets O rings and end plates Tighten screws securely OIL COOLER POWER STEERING COOLER 6 Remove end plates and gaskets Inspect gaskets for deterioration and replace if necessary Install gaskets and end plates Tighten screws securely S...

Page 84: ...82 CB75 5 1 3 2 4 70351 70562 70563 6 70353 70351 ...

Page 85: ...ment see your Authorized MerCruiser Dealer 1 Alternator Drive Belt Inspect drive belt for excessive wear or damage 2 Check belt tension by depressing upper strand of belt at point shown Belt should depress 1 2 in 13mm 3 Power Steering Pump Drive Belt Inspect drive belt for excessive wear or damage 4 Check belt tension by depressing upper strand of belt at point shown Belt should depress 1 4 in 6mm...

Page 86: ...84 CB88 70578 70577 70575 1 2 3 ...

Page 87: ...ion and if not controlled it will in time cause the need for replacement of power package components exposed to water IMPORTANT Replace sacrificial anodes if eroded 50 or more 1 Anodic Plate serves as a sacrificial anode Unscrew both at taching screws and remove Install a new anodic plate and tighten securely 2 MerCathode System System should be tested to ensure ade quate output Test should be mad...

Page 88: ...86 CB384 71966 1 71804 72029 2B 2A 2B ...

Page 89: ...all new anodes and tighten securely CB329 NOTE Bravo Three Models may be equipped with one or two pro peller anodes 2 Propeller Anodes Bravo Three Model are located in the splash plate just above the propellers To replace the propeller anodes A Remove the bolts that secure the anodes to the splash plate B Install new anodes and tighten securely ...

Page 90: ...88 CB392 1 2 74631 3 ...

Page 91: ...observe the following 2 Avoid any electrical interconnection between the MerCruiser Product Anodic Blocks or MerCathode System and the paint by allowing a minimum of 1 1 2 in 40mm UNPAINTED area on transom of the boat around these items 3 Painting Drive Unit or Transom Assembly Drive unit and tran som assembly should be painted with a good quality marine paint or an anti fouling paint that DOES NO...

Page 92: ...ries also produce hy drogen and oxygen gases when being charged This explosive gas escapes fill vent cell caps and may form an explosive atmo sphere around the battery for several hours after it has been charged Sparks or flames can ignite the gas and cause an ex plosion which may shatter the battery and could cause blind ness or other serious injury Safety glasses and rubber gloves are recommende...

Page 93: ... CA105 Inspection And Maintenance Inspect power package often and at regular intervals to help main tain its top operating performance and correct potential problems before they occur The entire power package should be checked carefully including all accessible engine parts Check for loose damaged or missing parts hoses and clamps tight en or replace as required Check plug leads and electrical lea...

Page 94: ...it may re sult IMPORTANT Before starting engine a water source must be attached to the seawater intake openings in gear housing Fol low all warnings and flushing attachments procedures stated in FLUSHING COOLING SYSTEM 1 Run engine sufficiently to bring it up to normal operating tempera ture Shut off engine and change oil and oil filter 2 Flush cooling system WARNING Be sure engine compartment is ...

Page 95: ...hol and a sufficient amount of Quicksilver Gasoline Stabilizer for Marine Engines to treat gasoline Follow instructions on container 5 If boat is to be placed in storage with fuel containing alcohol in fuel tanks carburetors must be run dry at idle RPM Fuel tanks should be drained completely and Quicksilver Gasoline Stabilizer for Marine Engines added to any fuel remaining in the tank Also refer t...

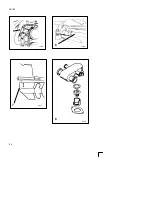
Page 96: ...94 CB241 2 3 74073 ...

Page 97: ...ION Seawater section of cooling system MUST BE COMPLETELY drained for winter storage or immediately after cold weather use if the possibility of freezing temperatures exist Failure to comply may result in trapped water causing freeze and or corro sion damage to engine 1 Ensure engine is as level as possible to ensure complete draining of cooling system 2 Remove drain plugs port and stbd from cylin...

Page 98: ...96 CB105 5 6 7 8 71448 71334 71217 71758 ...

Page 99: ...or ex tended storage Make sure that the propylene glycol antifreeze contains a rust inhibitor and is recommended for use in marine engines Be certain to follow the propylene glycol manufactur er s recommendations 8 For additional assurance against freezing and rust remove the thermostat cover and thermostat Fill the engine seawater cooling system with a mixture of antifreeze and tap water mixed to...

Page 100: ...98 CB111 2 70583 ...

Page 101: ...reezing temperatures exist Failure to com ply may result in trapped water causing freeze and or corrosion damage to engine IMPORTANT Closed cooling section must be kept filled year round with recommended coolant If engine will be exposed to freezing temperatures make sure closed cooling section is filled with an ethylene glycol antifreeze and water solution prop erly mixed to protect engine to low...

Page 102: ...100 CB114 71170 70584 6 70586 4 5 7 71217 ...

Page 103: ...nger Hose from Heat Ex changer 7 Make sure that speedometer pitot tube is unobstructed 8 Crank engine over slightly with starter motor to purge any water trapped in seawater pickup pump Do not allow engine to start After seawater section of cooling system has been drained com pletely coat threads of drain plugs with Quicksilver Perfect Seal and reinstall Reconnect hoses and tighten all hose clamps...

Page 104: ...is reversed electrical system damage will result 2 Install fully charged battery Clean battery cable clamps and ter minals and reconnect cables see CAUTION listed above Tighten each cable clamp securely when connecting 3 Coat terminal connections with a battery terminal anti corrosion agent 4 Perform all checks in OPERATION CHART in the BEFORE STARTING column CAUTION Refer to FLUSHING COOLING SYST...

Page 105: ...l connections or damaged wiring Bad battery Turn switch on Position control lever in neutral Check and reset circuit breaker or replace fuse Check all electrical con nections and wires espe cially battery cables Clean and tighten faulty connection Test and replace if bad 103 CB215 Troubleshooting Starter Motor Will Not Crank Engine Or Cranks Slow ...

Page 106: ...re Fill tank or open valve Check sight tube for fuel Have Authorized Mer Cruiser Dealer replace pump if fuel is present Check that choke is closed when engine is cold Check that it opens when engine warms up Do not attempt to start en gine for at least 5 minutes Refer to STARTING PRO CEDURES Service ignition system Replace filters If contaminated drain tank Fill with fresh fuel Replace kinked line...

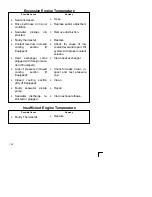
Page 107: ... if necessary Service ignition system Replace filters If contaminated drain tank Fill with fresh fuel Replace kinked line or blow out line with compressed air to remove obstruction Clean flame arrestor Poor Performance Possible Cause Remedy Throttle not fully open Damaged or improper pro peller Excessive bilge water Boat overloaded or load improperly distributed Boat bottom fouled or dam aged Flam...

Page 108: ...sure in closed cooling section If Equipped Closed cooling section dirty If Equipped Faulty seawater pickup pump Seawater discharge re stricted or plugged Open Replace and or adjust belt Remove obstruction Replace Check for cause of low coolant level and repair Fill system with proper coolant solution Clean heat exchanger Check for leaks Clean in spect and test pressure cap Clean Repair Clean exhau...

Page 109: ...rade and vis cosity oil Determine cause for dilution excessive id ling faulty fuel pump etc Battery Will Not Come Up On Charge Possible Cause Remedy Excessive current draw from battery Loose or dirty electrical connections or damaged wiring Alternator drive belt loose or in poor condition Unacceptable battery condition Turn off non essential ac cessories Check all associated elec trical connection...

Page 110: ...ized MerCruiser Dealer immediately Remove obstruction Straighten cable or have dealer replace cable if damaged beyond repair Steering Wheel Turns Hard Or Jerky Possible Cause Remedy Low power steering pump fluid level Drive belt loose or in poor condition Insufficient lubrication on steering system compo nents Loose or missing steering fasteners or parts Contaminated power steering fluid Refill sy...

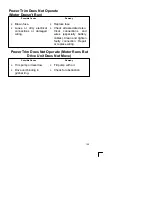
Page 111: ...eplace fuse Check all associated elec trical connections and wires especially battery cables Clean and tighten faulty connection Repair or replace wiring Power Trim Does Not Operate Motor Runs But Drive Unit Does Not Move Possible Cause Remedy Trim pump oil level low Drive unit binding in gimbal ring Fill pump with oil Check for obstruction ...

Page 112: ...anty claims will not be accepted without presentation of this card A temporary Owner Warranty Registration Card will be presented to you when you purchase the product It is valid only for 30 days from date of sale while your plastic Owner Warranty Registration Card is being processed Should your product need service dur ing this period present the temporary registration card to the deal er He will...

Page 113: ...aler may ask you for the Warranty Registration Card to verify date of purchase and to use the information on the card to prepare the warranty claim form s In some countries the Marine Power Service Center will issue you a permanent plastic Warranty Registration Card within 30 days after receiving the Factory Copy of the Warranty Registra tion Card from your distributor dealer If you receive a plas...

Page 114: ...orkman ship it does not apply to normal worn parts adjustments tune ups or to damage caused by 1 Neglect lack of mainte nance accident abnormal operation or improper installation or service 2 Use of an accessory or part not manufactured or sold by us 3 Operation with fuels oils or lubricants which are not suitable for use with the Product 4 Participating in or preparing for racing or other competi...

Page 115: ... Warranty claims will not be accepted without presentation of the Warranty Registration Card VI Our obligation under this Warranty shall be limited to repairing a defective part or at our option refunding the purchase price or replacing such part or parts as shall be necessary to remedy any malfunction resulting from defects in material or workman ship as covered by this Warranty We reserve the ri...

Page 116: ...val of parts or 6 Water entering engine cylinder s through exhaust system or carbure tor s III Reasonable access must be provided to the Product for war ranty service This warranty will not apply to 1 Haul out launch towing and storage charges telephone or rental charges of any type inconvenience or loss of time or income or other consequential damages or 2 Removal and or replace ment of boat part...

Page 117: ...l be necessary to remedy any malfunction resulting from defects in material or workmanship as covered by this Warranty We reserve the right to improve the design of any Product without assuming any obli gation to modify any Product previously manufactured VII ALL INCIDENTAL AND OR CONSEQUENTIAL DAMAGES ARE EXCLUDED FROM THIS WARRANTY WARRANTIES OF MERCHANTABILITY AND FITNESS ARE EXCLUDED FROM THIS...

Page 118: ...of sacrificial anodes specified lubrication and touch up of nicks and scratches have been implemented on a timely basis 2 Recommended corrosion prevention devices have been employed details below II This warranty shall become effective upon receipt of a com pleted standard Product warranty registration card and shall re main effective for a period of three years from the date of pur chase III This...

Page 119: ...ghts and you may also have other legal rights which vary from state to state or country to country VI Other details of this warranty are contained in paragraphs IV V and VI of the United States and Canada Product Warranty and paragraphs III IV V and VI of the International Product Warranty contained in this manual which paragraphs are in corporated herein by reference Mercury Marine products are b...

Page 120: ...on damage that results from the improper application of copper base paint will not be covered by this limited warranty TRANSFER OF WARRANTY This Limited Warranty is transferable to subsequent purchasers for the remainder of the unused portion of the 3 year limited warranty Warranty Coverage The purpose of this section is to help eliminate some of the more common misunderstandings regarding warrant...

Page 121: ...omer other than that necessary to satisfy the warranty obligation Labor performed by other than an Authorized Dealer may be cov ered only under following circumstances When performed on emergency basis providing there are no Authorized Dealers in area who can perform the work required or have no facilities to haul out etc and prior factory approval has been given to have the work performed at this...

Page 122: ...here lead is thrown out of commutator because of ex cess cranking Valve or valve seat grinding required because of wear Failure of any parts caused by lack of cooling water which results from starting power package out of water foreign material block ing inlets or power package being mounted too high Use of fuels and lubricants which are not suitable for use with or on the product Our limited warr...

Page 123: ...a copy of the bill of sale to show proof of ownership In the United States and Canada mail to Mercury Marine Attn Warranty Registration Department W6250 West Pioneer Road P O Box 1939 Fond du Lac WI 54936 1939 A new Owner Warranty Registration Card will be issued with the new owner s name and address Registration records will be changed on the factory computer registration file There is no charge ...

Page 124: ...ion Plan provides cov erage against unexpected mechanical and electrical breakdowns that may occur beyond the standard limited warranty The optional Q Guard Product Protection Plan is the only Factory Plan available for your engine Two three or four year term plans can be purchased up to 180 days after the original engine purchase date See your participating MerCruiser dealer for complete program ...

Page 125: ...uthorized Dealer Refer to the Yellow Pages of the telephone directory If for any reason you cannot obtain service contact the nearest Regional Service Center Outside the United States and Canada contact the nearest Marine Power International Service Center Parts And Accessories Inquiries All inquiries concerning Quicksilver replacement parts and accesso ries should be directed to your local Author...

Page 126: ...P ONE DISCUSS YOUR PROBLEM WITH ONE OF THE DEALERSHIP MANAGEMENT PERSONNEL Misunderstandings or complaints can be quickly resolved by the dealer If you are unable to obtain satisfaction contact the dealer ship s owner STEP TWO IF YOU REQUIRE ADDITIONAL ASSISTANCE TO RESOLVE YOUR CONCERN CONTACT YOUR NEAREST MERCRUISER SERVICE CENTER Provide the following important information Your name address and...

Page 127: ... SOLVED STEP THREE CONTACT CONSUMER AFFAIRS DEPARTMENT United States MERCRUISER 3003 N Perkins Road Stillwater OK 74075 2299 Telephone 405 743 6515 Canada Contact Nearest Regional Service Center Other Countries Contact the Nearest Marine Power International Service Center The customer service representatives will review all the facts in volved If they feel some further action can be taken they wil...

Page 128: ...uga Ontario L4Y 2C2 Canada Telephone 416 270 4481 Fax 905 270 4510 MEXICO CENTRAL AMERICA SOUTH AMERICA CARIBBEAN Marine Power International 9350 SW 72nd St Sunset Dr Suite 100 Miami FL 33173 U S A Telephone 305 596 9606 Fax 305 596 3869 EUROPE MIDDLE EAST AFRICA Marine Power Europe Inc Parc Industriel de Petit Rechain B 4822 Verviers Belgium Telephone 0 87 32 32 11 Fax 32 87 31 19 65 ...

Page 129: ... Fax 61 3 791 5880 ASIA Marine Power International Ltd Block 1002 Jalan Bukit Merah 07 08 Redhill Industrial Estate JTC Flatted Factories Singapore 0315 Telephone 65 270 7680 Fax 65 270 7898 JAPAN Marine Power International Japan No 27 2 Muramatsu Chisaki Shinden Shimizu City Shizuoka Prefecture Japan 424 Telephone 81 543 34 2500 Fax 81 543 34 2022 ...

Page 130: ...d P O Box 1939 Fond du Lac WI 54936 1939 Outside the United States and Canada contact the nearest Ma rine Power International Service Center for further information When ordering be sure to 1 List your product model year and serial number s 2 Check the literature and quantities you want 3 Enclose full remittance in check or money order NO C O D s ...

Page 131: ... 807252 2 Thermostat Gaskets 27 33179 2 27 53045 1 Alternator Belt 57 48122 Power Steering Belt 57 816295T 7 Pulley 57 13458T 5 1 2 Pulley Sea Water Pump Belt 57 13457T Water Separating Filter 35 805269 1 Quicksilver Motor Oil 92 816096A12 Storage Seal 92 86145A12 Valvtane Plus 92 17955A12 Gasoline Stabilizer for Marine Engines 92 817529A12 Fuel System Cleaner 92 17885A12 Corrosion Guard Spray 92 ...

Page 132: ...bal Housing Anode 821631A1 Drain Screw 10 14834A1 Drain Screw O Ring 25 805726 Vent Screw 10 79953 Vent Screw O ring 25 805726 Bell Housing to D S H Seal 16755 Drive Mounting O ring 25 45710 Trim Pump 20 Amp Fuse 88 79091 Trim Pump 10 Amp Fuse 88 79023A10 2 4 C Marine Lubricant with Teflon 92 825407A2 U Joint and Gimbal Bearing Grease 92 828052A2 Engine Coupler Spline Grease 92 816391A4 High Perfo...

Page 133: ...sembly of the engine or stern drive Parts Manual shows the exploded view of the engine or stern drive with corresponding part number Operation and maintenance manual Owner s Guide explains basic operation and maintenance Manual Part Number Official Use Only Qty Price Each Total Price Service Manual Engine 90 30 00 Service Manual Drive 90 30 00 Service Manual Remote Control 90 30 00 Parts Manual En...

Page 134: ...se Return with Payment to Mercury Marine Attn Publications Dept P O Box 1939 Fond du Lac WI 54936 1939 Ship To Please Print or Type This is your Shipping Label Name Address City State Zip METHOD OF PAYMENT NO CASH OR C O D Personal Check Cashiers Check Money Order Visa MasterCard ...

Reviews: