background image

Section 5 - Maintenance 

Page  66

90-8M0070851   

eng

  AUGUST  2012

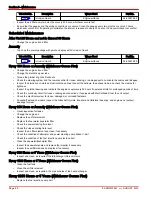
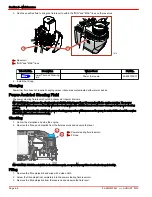
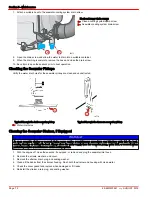
4. If the coolant level is low, stop the engine and allow the engine to cool.

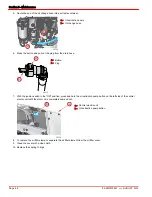
a. Inspect the coolant recovery system for leaks.
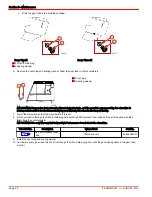
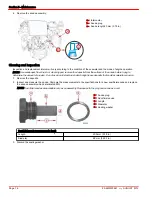
b. Inspect the O‑ring in the pressure cap for damage and replace if necessary.

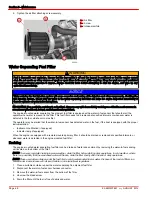
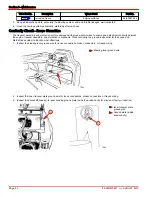
a -

Pressure cap

b -

Over pressure valve

c -

O‑ring

c. The pressure cap maintains pressure on the cooling system and may not be holding pressure properly. To have the

cap tested, contact your Mercury Diesel authorized repair facility.

d. Refer to 

Filling 

and add the specified coolant as necessary.

IMPORTANT: When installing the pressure cap, be sure to tighten it securely until it clicks to prevent coolant loss.

5. If the coolant level is correct, install the pressure cap and tighten securely until it clicks.

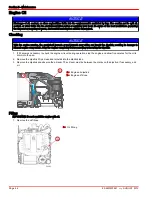
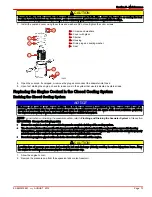
Filling

1. Allow the engine to cool.
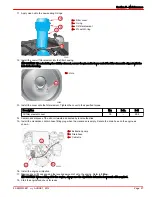
2. Remove the pressure cap from the coolant expansion tank.
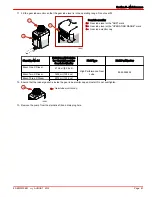
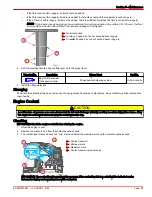
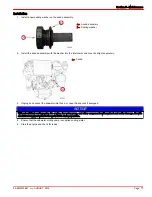
3. If the coolant is low in the coolant expansion tank, add the specified coolant as necessary to bring the level between the

"min" mark and the maximum mark.

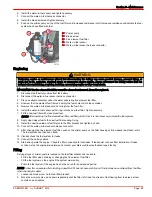
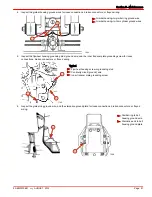
a -

Coolant reservoir

b -

Minimum mark

c -

Maximum mark

d -

Coolant reservoir pressure cap

Description

Where Used

Part Number

Marine Engine Coolant ‑ 60%

water and 40% G12/G12+

antifreeze (lilac colored) as per

TL VW 774D

(Only available in Europe)

Closed cooling system

92‑813054A2

Fleetguard Compleat with DCA4

Fleetguard part number: CC2825

8M0070979

IMPORTANT: When installing the pressure cap, be sure to tighten it securely until the cap clicks to prevent coolant loss.

4. Install the pressure cap. Tighten securely until the cap clicks.

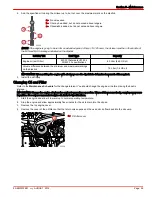
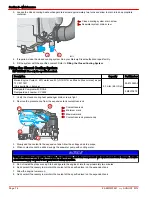
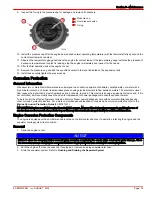
Changing

Change (replace) the engine coolant at the prescribed interval. Refer to 

Replacing the Engine Coolant in the Closed

Cooling System

.

a

b

c

50656

50644

a

b

c

d

Summary of Contents for Sterndrive TDI 3.0L

Page 1: ...Bruxelles Post Code B 1040 Country Belgium ID Number 0609 Conformity assessment module used for exhaust emissions B C B D B E B F G H Conformity assessment module used for noise emissions A Aa G H Other Community Directives applied Electromagnetic Compatibility Directive 2004 108 EC Description of Engines and Essential Requirements Engine Type Fuel Type Combustion Cycle z or sterndrive with integr...

Page 2: ...oved for printing Mercury Marine whose policy is one of continuous improvement reserves the right to discontinue models at any time or to change specifications or designs without notice and without incurring obligation Mercury Marine Fond du Lac Wisconsin USA Printed in USA 2012 Mercury Marine Mercury Mercury Marine MerCruiser Mercury MerCruiser Mercury Racing Mercury Precision Parts Mercury Prope...

Page 3: ... Notice Throughout this publication and on your power package dangers warnings cautions and notices accompanied by the International Hazard Symbol may be used to alert the installer and user to special instructions concerning a particular service or operation that may be hazardous if performed incorrectly or carelessly Observe them carefully These safety alerts alone cannot eliminate the hazards t...

Page 4: ......

Page 5: ...Under Australian Consumer Law 8 Duration of Coverage for This Limited Warranty 8 Warranty Period for Recreational Use 8 Warranty Period for Commercial Use 8 Transfer of Coverage 8 Termination of Coverage 8 Conditions That Must Be Met to Obtain Warranty Coverage 9 What Mercury Will Do 9 How to Obtain Warranty Coverage Under This Limited Warranty 9 What is Not Covered 9 Expense of Claiming This Limi...

Page 6: ... Sterndrive 10 Hour Break In Period New or With Replacement Gears 40 Engine Break In 40 20 Hour Break In Period 40 After the 20 Hour Break In Period 40 End of First Season Checkup 41 Section 4 Specifications Fuel Requirements 44 Nonferrous Metals and the Fuel System 44 Winter Operation and Biodiesel 44 Diesel Fuel in Cold Weather 44 Antifreeze Coolant 44 Engine Oil 45 General Engine Specifications...

Page 7: ...ive Propeller Removal 90 Bravo One Models 90 Bravo Two Models 91 Bravo Three Models 92 Bravo Sterndrive Propeller Installation 93 Bravo One Models 93 Bravo Two Models 94 Bravo Three 95 Drive Belt 96 Drive Belt Failure Identification 96 Battery 98 Battery Precautions for Multiple Engines 98 Section 6 Storage Cold Weather Freezing Temperature Seasonal Storage and Extended Storage 100 Preparing Your ...

Page 8: ...anguages 109 Andre sprog 109 Andere talen 109 Muut kielet 109 Autres langues 109 Andere Sprachen 109 Altre lingue 109 Andre språk 109 Outros Idiomas 110 Otros idiomas 110 Andra språk 110 Allej glþssej 110 Ordering Literature 110 United States and Canada 110 Outside the United States and Canada 110 ...

Page 9: ...arine Will Do 5 How to Obtain Warranty Coverage 5 Termination of Coverage 5 What Is Not Covered 5 3 Year Limited Warranty Against Corrosion Diesel Models Recreational Use Only 6 What Is Covered 6 Duration of Coverage 6 Conditions That Must Be Met to Obtain Warranty Coverage 6 What Mercury Will Do 7 How to Obtain Warranty Coverage 7 What Is Not Covered 7 Transfer of Warranty 7 Warranty Policy Austr...

Page 10: ...epresents your factory registration identification and should be retained by you for future use when required Should you ever require warranty service on this product your dealer may ask you for the Warranty Registration Card to verify date of purchase and to use the information on the card to prepare the warranty claim forms 4 In some countries the Marine Power Service Center will issue you a per...

Page 11: ...0 hours or fewer per year Conditions That Must Be Met to Obtain Warranty Coverage Warranty coverage is available only to retail customers that purchase from a Dealer authorized by Mercury Marine to distribute the product in the country in which the sale occurred and then only after the Mercury Marine specified pre delivery inspection process is completed and documented Warranty coverage becomes av...

Page 12: ... owner of the product voids the warranty Expenses related to haul out launch towing storage telephone rental inconvenience slip fees insurance coverage loan payments loss of time loss of income or any other type of incidental or consequential damages are not covered by this warranty Also expenses associated with the removal or replacement of boat partitions or other material in order to gain acces...

Page 13: ...mes available upon proper registration of the product by the authorized dealer Routine maintenance outlined in the Operation Maintenance Warranty Manual must be timely performed in order to obtain warranty coverage Mercury Marine reserves the right to make any warranty coverage contingent upon proof of proper maintenance What Mercury Marine Will Do Mercury Marine s sole and exclusive obligation un...

Page 14: ...E EXCLUDED FROM COVERAGE UNDER THIS WARRANTY SOME STATES COUNTRIES DO NOT ALLOW FOR THE DISCLAIMERS LIMITATIONS AND EXCLUSIONS IDENTIFIED ABOVE AS A RESULT THEY MAY NOT APPLY TO YOU THIS WARRANTY GIVES YOU SPECIFIC LEGAL RIGHTS AND YOU MAY ALSO HAVE OTHER LEGAL RIGHTS WHICH VARY FROM STATE TO STATE AND COUNTRY TO COUNTRY 3 Year Limited Warranty Against Corrosion Diesel Models Recreational Use Only...

Page 15: ...ss than a one year limited product warranty replacement parts parts purchased by the Customer products used in a commercial application Commercial use is defined as any work or employment related use of the product or any use of the product which generates income for any part of warranty period even if the product is only occasionally used for such purposes DISCLAIMERS AND LIMITATIONS THE IMPLIED ...

Page 16: ...ht commercial MerCruiser Tow Sport Engines 3 year product warranty 3 year corrosion warranty 1 year 500 hours product warranty light commercial Warranty Period for Recreational Use The warranty period begins on the date the product is first sold to a recreational use retail purchaser or the date on which the product is first put into service whichever occurs first The repair or replacement of part...

Page 17: ... to a Mercury Marine dealer authorized to service the product A list of dealers and their contact details is available at www mercurymarine com au If the purchaser cannot deliver the product to such a dealer written notice must be given to Mercury Marine at the address shown above Mercury Marine will then arrange for the inspection and any covered repair This Limited Warranty will not cover the pu...

Page 18: ...the warranty DISCLAIMERS AND LIMITATIONS EXCEPT FOR APPLICABLE GUARANTEES AND OTHER RIGHTS AND REMEDIES THAT A CONSUMER MAY HAVE UNDER THE AUSTRALIAN CONSUMER LAW OR OTHER LAW IN RELATION TO WHICH THE PRODUCTS RELATE THE IMPLIED WARRANTIES OF MERCHANTABILITY AND FITNESS FOR A PARTICULAR PURPOSE ARE EXPRESSLY DISCLAIMED TO THE EXTENT THAT THEY CANNOT BE DISCLAIMED THE IMPLIED WARRANTIES ARE LIMITED...

Page 19: ...ures of the Information Panel 18 Coolant Temperature Gauge 18 Voltmeter Gauge 19 Engine Oil Pressure 19 Ignition Lock Switch 20 Optional Instrumentation Panel 21 Emergency Stop Switch 21 Remote Control 22 Remote Control Function 22 Power Trim 22 Single Engine Trim and Trailer 23 Dual Engine Trim and Trailer 23 Engine Electrical System Overload Protection 23 Fuses 23 Electrical Control Unit Fuse Re...

Page 20: ...ipstick b Engine coolant expansion tank c Power steering oil reservoir d Charge air cooler intercooler e Sacrificial anode f Seawater inlet connection g Seawater pump h Heat exchanger i Engine oil drain hose j Oil extraction pump k Fuel filter with water sensor l Alternator m Manual fuel primer n Central electrical unit a b c d e f g h i j k l m n 50725 ...

Page 21: ...13 3 0 Liter TDI Starboard View Components a Oil extraction pump button b Central electrical unit housing and shift bracket c Manual fuel primer d Fuel supply connection e Fuel filter with water sensor f Engine oil sump g Starter h Air filter i Turbocharger a b c d e f g h i 50726 ...

Page 22: ...I Port View Components a Engine cover b Exhaust pipe c Bell housing d Power steering connection e Power steering gearbox oil cooler f Engine speed sender g Gearbox neutral switch connection h Optional accessory connection i Power steering pump j Throttle position sender a b c d e f g h i j 50729 ...

Page 23: ...urbine geometry Two separate cooling circuits Seawater cooled circuit runs through the oil cooler the main heat exchanger and the exhaust manifold Closed cooling circuit runs coolant as a closed pressurized system through the engine block oil cooler exhaust collector and after reaching the operating temperature via the main heat exchanger Refer to Specifications for additional details Lanyard Stop...

Page 24: ...e velocity and degree of any turn at shut down However the boat will not complete a full circle While the boat is coasting it can cause injury to anyone in the boat s path as seriously as the boat would when under power We strongly recommend that other occupants be instructed on proper starting and operating procedures should they be required to operate the engine in an emergency e g if the operat...

Page 25: ...ndicates a fault has occurred and is being stored in the control unit memory e Instrument lighting button The brightness of the instrument lighting can be adjusted by pressing the button f Confirmation button for warning horn Deactivates warning horn after fault has occurred g Tachometer display button Advances through various pages displayed on the tachometer window each time the button is pushed...

Page 26: ...ailure engine speed may be automatically reduced c Instrument lighting button The brightness of the instrument lighting can be adjusted by pressing the button d Confirmation button The warning horn for a fault message can be acknowledged with this button e Tachometer display button Advances through various pages displayed on the tachometer window each time the button is pushed f Ignition lock swit...

Page 27: ...uld go out after the engine starts a Voltmeter b Warning lamp If the warning lamp illuminates while the engine is running check the following Immediately turn the engine off and check the condition of the ribbed alternator V belt If the V belt is in good condition check for loose connections on the alternator If all connections appear to be proper contact your authorized MerCruiser service center ...

Page 28: ...The ignition lock switch has three positions In the OFF position all electrical circuits are off and the engine cannot be started The engine is stopped when the key switch is turned to the OFF position In the ON or run position all electrical circuits indicator lamps automatic preheating if equipped and all instruments are operational In the START position the engine can be started NOTE The key ca...

Page 29: ...fter fault has occurred h Tachometer display button Advances through various pages displayed on the tachometer window each time the button is pushed i Tachometer display window Displays current faults occurring within the engine operating systems j Ignition switch Must be turned to the ON position to start the engine with the START button Turns the engine off when the switch is turned to the OFF p...

Page 30: ... to provide the ideal boat angle for varying load and water conditions Also the trailering feature allows the operator to raise and lower the sterndrive for trailering beaching launching low speed below 1200 RPM engine speed and shallow water operation WARNING Excessive trim can cause serious injury or death at high speeds and single ram trim systems do not provide a trim out limiting device or tr...

Page 31: ...position Some controls also have a trailer button that trims the sterndrive to a position suitable for trailer purposes only Dual Engine Trim and Trailer NOTICE If using external tie bars raising or lowering the drives independently of each other can damage the drive and steering systems If using an external tie bar raise and lower all drives together as a unit Dual engine applications may have a ...

Page 32: ...electrical control unit a Electrical control unit b Emergency stop switch 3 Remove the screws securing the electrical control unit cover and remove the cover a Cover b Screws 8 4 Determine which fuse belongs to the failed circuit using the fuse table a b c d e f g 50433 Location Description Ampere Value color a Oil pump 5 A orange b Accessory 5 A orange c Actuators 15 A blue d Accessory 5 A orange...

Page 33: ... to the OFF position 2 Press down on the emergency stop switch on the electrical control unit a Electrical control unit b Emergency stop switch 3 Remove the screws from the instrument panel cover and remove the cover a Instrument panel cover b Screws 6 4 Determine which fuse belongs to the failed circuit using the fuse table a Instrument panel circuit card b Ignition circuit fuse c Constant positi...

Page 34: ...he fuse If the fuse burns out the electrical overload has not been eliminated Further checks must be made on the electrical system Contact your Mercury Diesel authorized repair facility 1 The power trim system is protected from overload by a 110 amp fuse and a 20 amp in line fuse on the power trim pump a 20 amp in line fuse holder b 110 amp fuse 2 The Quicksilver three button power trim control pa...

Page 35: ...e Audio Warning System 1 Turn the ignition switch to the RUN position do not start the engine 2 Push the audio test switch toggle lever down and hold 3 Listen for the audio alarm The alarm will sound if the system is functioning correctly Emissions Information Exhaust Gas Emissions Certificate Europe Only A tamper resistant label is affixed to the engine at time of manufacture In addition to the r...

Page 36: ...Section 2 Getting to Know Your Power Package Notes Page 28 90 8M0070851 eng AUGUST 2012 ...

Page 37: ...he Boat 35 Freezing Temperature and Cold Weather Operation 36 Drain Plug and Bilge Pump 36 Protecting People In The Water 36 While You Are Cruising 36 While Boat Is Stationary 36 High Speed and High Performance 37 Passenger Safety In Pontoon Boats And Deck Boats 37 Boats Having An Open Front Deck 37 Boats With Front Mounted Raised Pedestal Fishing Seats 37 Wave and Wake Jumping 37 Impact With Unde...

Page 38: ...hile in the boat Prepare other boat operators Instruct at least one person aboard in the basics of starting and operating the engine and handling the boat in case the driver becomes disabled or falls overboard Do not overload your boat Most boats are rated and certified for maximum load weight capacities Refer to your boat capacity plate Know your boat s operating and loading limitations Know if y...

Page 39: ...carbon monoxide poisoning which can lead to unconsciousness brain damage or death Avoid exposure to carbon monoxide Stay clear from exhaust areas when engine is running Keep the boat well ventilated while at rest or underway Stay Clear of Exhaust Areas 41127 Engine exhaust gases contain harmful carbon monoxide Avoid areas of concentrated engine exhaust gases When engines are running keep swimmers ...

Page 40: ...ate at wide open throttle WOT at the rated engine RPM The power package must also be applied in accordance with recommendations indicated in the appropriate applications manual Use of Mercury Diesel engines in other than the applications indicated by the following information and in the appropriate applications manual requires written approval from an authorized Mercury Diesel application engineer...

Page 41: ...quipped Open the fuel shut off valve if equipped Close the fuel shut off valve if equipped Open the seacock if equipped Close the seacock if equipped Prime the fuel injection system if necessary Flush the seawater cooling circuit if operating in saltwater brackish water or polluted water Turn the key switch to RUN position and check that the lights and indicator lamps come on Turn the key switch t...

Page 42: ... plunger or the priming lever on the fuel delivery pump up and down four or five strokes Attempt to start the engine following the normal procedure 5 Turn the key switch to the RUN position Observe the indicator lamp for the glow plugs if equipped When the cylinder temperature is great enough to sustain combustion the indicator lamp will go off and the engine can be started NOTICE Engaging the sta...

Page 43: ...irection during shifting 1 Ensure that the remote control shift lever is in Neutral 2 To shift the sterndrive move the remote control shift lever with a firm quick motion forward to shift to forward gear or backward to shift to reverse 3 After shifting the sterndrive advance the throttle to the desired setting IMPORTANT Avoid stopping the engine if the sterndrive is in gear If the engine does stop...

Page 44: ... Be sure to use proper cold weather lubrication oil and be sure the crankcase contains a sufficient amount Make certain that the battery is of sufficient size and is fully charged Check that all other electrical equipment is in optimum condition At temperatures of 20 C 4 F and below use a coolant heater to improve cold starting If operating in arctic temperatures of 29 C 20 F or lower consult your...

Page 45: ...wo pontoons will position them to be run over Boats Having An Open Front Deck No one should ever be on the deck in front of the rail while the boat is in motion Keep all passengers behind the front rail or enclosure Persons on the front deck could easily be thrown overboard or persons dangling their feet over the front edge could get their legs caught by a wave and pulled into the water mc79555 1 ...

Page 46: ...derwater object could result in an infinite number of situations Some of these situations could result in the following Part of the sterndrive or the entire sterndrive could break loose and cause serious injury or damage to the boat The boat could move suddenly in a new direction Such a sharp change in direction can cause occupants to be thrown out of their seats or out of the boat A rapid reducti...

Page 47: ...it installed too high on transom Elevation and Climate NOTE Engines equipped with an Engine Control Module ECM reduce the effects of changes in elevation and climate by automatically adjusting fuel flow for weather conditions and elevation ECM controlled engines however do not compensate for increased loading or hull conditions Elevation and climate changes affect the performance of your power pac...

Page 48: ...ch of the following RPM 1800 RPM 3000 RPM and Maximum Rated Full Throttle RPM Sterndrive 10 Hour Break In Period New or With Replacement Gears It is important that the following procedure be used on new sterndrives and rebuilt sterndrives with new replacement gears This break in procedure allows the proper seating of the sterndrive gears and related components which greatly reduces the likelihood ...

Page 49: ...le RPM End of First Season Checkup At the end of the first season of operation contact a Mercury Diesel authorized repair facility to discuss or perform scheduled maintenance items If you are in an area where the product is operated continuously year round you should contact your dealer at the end of the first 100 hours of operation or once yearly whichever occurs first ...

Page 50: ...Section 3 On The Water Notes Page 42 90 8M0070851 eng AUGUST 2012 ...

Page 51: ...uel System 44 Winter Operation and Biodiesel 44 Diesel Fuel in Cold Weather 44 Antifreeze Coolant 44 Engine Oil 45 General Engine Specifications 45 Fluid Specifications 46 Engine 46 Bravo Sterndrive Fluid Specifications Diesel 46 Power Steering and Power Trim Fluids 47 Approved Power Steering Fluids 47 Approved Power Trim Fluids 47 Approved Paints 47 4 ...

Page 52: ... metals must not be used in the fuel system components The use of items such as copper lines brass nipples or galvanized tanks may result in an engine power loss or a failure of the injection nozzles Winter Operation and Biodiesel Biodiesel fuel must not be used Diesel Fuel in Cold Weather Unaltered diesel fuels thicken and gel in cold temperatures unless treated Virtually all diesel fuels are cli...

Page 53: ...ed in the following table Refer to Maintenance Schedules for respective change intervals Description Availability Part Number Marine Engine Coolant Quantity 3 3 4 liters 1 US gal Europe only 92 813054A2 Fleetguard Compleat with DCA4 Quantity 3 3 4 liters 1 US gal Worldwide Fleetguard part number CC2825 Engine Oil NOTICE Discharge of oil coolant or other engine drive fluids into the environment is ...

Page 54: ...negative ground Alternator rating 2160W 12 V 180 A Recommended battery rating 750 CCA 950 MCA or 180 mAh Fluid Specifications IMPORTANT All capacities are approximate fluid measures Engine IMPORTANT It may be necessary to adjust oil levels depending on installation angle and cooling systems heat exchanger and fluid lines All models Capacity Fluid type Part Number Engine oil with filter 8 0 Liter 8...

Page 55: ...rt Number Power Trim and Steering Fluid 92 858074K01 Dexron III Automatic Transmission Fluid Obtain Locally Approved Power Trim Fluids Description Part Number Power Trim and Steering Fluid 92 858074K01 Approved Paints Description Part Number Mercury Light Gray Primer 92 802878 52 Mercury Phantom Black 92 802878Q 1 Mercury Diesel White 8M0071082 ...

Page 56: ...Section 4 Specifications Notes Page 48 90 8M0070851 eng AUGUST 2012 ...

Page 57: ...9 Filling 69 Fuel System 70 Priming 70 Filling the Fuel System 70 Winterization of Fuel System 70 Seawater System 70 Seawater Pump Impeller Inspection 70 Sterndrive Water Inlets Check 71 Flushing and Draining the Seawater System 71 Checking the Seawater Pickups 72 Cleaning the Seawater Strainer if Equipped 72 Replacing the Engine Coolant in the Closed Cooling System 73 Draining the Closed Cooling ...

Page 58: ...n be done by the owner or operator while others should be performed by a Mercury Diesel authorized repair facility Before attempting maintenance or repair procedures not covered in this manual we recommended that you purchase the appropriate Mercury Diesel or Mercury MerCruiser service manual and read it thoroughly Do It Yourself Maintenance Suggestions Present day marine equipment such as your Me...

Page 59: ...r over the mounts and press the cover down in the mount areas to reattach the engine cover Maintenance Schedule Sterndrive Models Routine Maintenance Each Day Start Check the engine oil level Check the engine coolant level Check the power assisted steering fluid level Check the sterndrive gear lubricant level in the gear lube monitor Each Day End If operating in saltwater brackish water or pollute...

Page 60: ...ing and lubricate the engine coupler every 50 hours if operated at idle for prolonged periods of time Check the continuity circuit for loose or damaged connections If equipped with MerCathode test the unit output Check the electrical system for loose damaged or corroded fasteners Driveshaft extension models inspect the driveshaft U joints transom end tailstock bearings and engine end output bearin...

Page 61: ... Maintenance 90 8M0070851 eng AUGUST 2012 Page 53 Maintenance Log Record all maintenance performed on your power package here Be sure to save all work orders and receipts Date Maintenance Performed Engine Hours ...

Page 62: ...ls or rod journals may strike and break the dipstick resulting in damage to internal engine components Stop the engine completely before removing or inserting the dipstick 1 If it becomes necessary to check the engine oil level during operation stop the engine and allow five minutes for the oil to drain into the pan 2 Remove the dipstick Wipe clean and reinstall into the dipstick tube 3 Remove the...

Page 63: ...stick 1 3 Liter 1 4 US qt IMPORTANT When refilling the engine with oil always use the dipstick to determine how much oil is required 3 Install the oil fill cap Changing Oil and Filter Refer to the Maintenance Schedule for the change interval You should change the engine oil before placing the boat in storage IMPORTANT Change the engine oil when the engine is warm from operation Warm oil flows more...

Page 64: ... b Plug 7 With the ignition switch in the ON position press and hold the oil extraction pump button on the left side of the central electric unit until the motor oil is completely pumped out a Central electric unit b Oil extraction pump button 8 To replace the oil filter element separate the oil filter element from the oil filter cover 9 Clean the cover with a clean cloth 10 Replace the sealing O ...

Page 65: ...ver to the specified torque Description Nm lb in lb ft Oil filter element cover 35 25 8 14 Contain and dispose of the oil or oil waste as directed by local authorities 15 Install the crankcase oil drain hose fitting plug when the crankcase is empty Secure the drain hose on the engine as shown a Extraction pump b Drain hose c Cable tie 16 Install the engine oil dipstick 17 Remove the oil fill cap a...

Page 66: ... visible at the bottom of the gear lube monitor or appears at the fill and drain plug hole or if the gear lube appears discolored contact your Mercury Diesel authorized repair facility immediately Both conditions may indicate a water leak in the sterndrive Filling IMPORTANT If more than 59 ml 2 fl oz of High Performance Gear Lube is required to fill the gear lube monitor a seal may be leaking Dama...

Page 67: ...Retaining strap 2 Empty the contents of the gear lube monitor into a suitable container 3 Install the gear lube monitor in the bracket 4 Bravo One X Models a Remove the propeller b Lower the sterndrive to the full down in position c Remove the gear lube fill and drain plug and sealing washer d Drain the gear lube into a suitable container a Fill and drain plug b Sealing washer 5 Bravo Two X models...

Page 68: ... Mercury Diesel authorized repair facility 7 Lower the sterndrive so that the propeller shaft is level 8 Fill the sterndrive through the fill and drain plug hole with High Performance Gear Lube until an air free stream of lube flows from the vent plug hole IMPORTANT Use only Mercury Quicksilver High Performance Gear Lube in the sterndrive Tube Ref No Description Where Used Part No 87 High Performa...

Page 69: ...tor cap Sterndrive Model Fluid Capacity includes the Sterndrive and the Gear Lube Monitor Fluid Type Fluid Part Number Bravo One X Diesel 2736 ml 92 5 oz High Performance Gear Lube 92 802854A1 Bravo Two X Diesel 3209 ml 108 5 oz Bravo Three X Diesel 2972 ml 100 5 oz 12 Ensure that the rubber gasket is inside the gear lube monitor cap and install Do not overtighten a Gear lube monitor cap 13 Remove...

Page 70: ...terndrive propeller Refer to Propellers 16 Check the gear lube level at the gear lube monitor after the first use IMPORTANT The gear lube level in the gear lube monitor will rise and fall during sterndrive operation always check the gear lube level when the sterndrive is cool and the engine is not running Power Trim Fluid Checking IMPORTANT Check the fluid level with the sterndrive in the full dow...

Page 71: ...he specified fluid Refer to Filling Tube Ref No Description Where Used Part No 114 Power Trim and Steering Fluid Power trim pump 92 858074K01 Filling 1 If the fluid level is below the MIN line the specified fluid must be added 2 Remove the fill cap from the reservoir NOTE Fill cap is vented Power trim pump reservoir shows the fluid level is below MIN line a Fill cap assembly b Fill cap installed a...

Page 72: ... power steering fluid will heat up considerably when the steering wheel is at full lock and could cause damage to the power steering system When the steering wheel is at full lock power steering pump noise will increase as the pump is under full load and the engine idle RPM will be reduced momentarily Checking 1 Center the sterndrive and stop the engine 2 Remove the fill cap and dipstick from the ...

Page 73: ...matic Transmission Fluid Power assisted steering system Obtain Locally 5 Install the fill cap dipstick Changing Power assisted steering fluid does not require changing unless it becomes contaminated See your Mercury Diesel authorized repair facility Engine Coolant CAUTION A sudden loss of pressure can cause hot coolant to boil and discharge violently resulting in serious injury from burns Allow th...

Page 74: ...til it clicks Filling 1 Allow the engine to cool 2 Remove the pressure cap from the coolant expansion tank 3 If the coolant is low in the coolant expansion tank add the specified coolant as necessary to bring the level between the min mark and the maximum mark a Coolant reservoir b Minimum mark c Maximum mark d Coolant reservoir pressure cap Description Where Used Part Number Marine Engine Coolant...

Page 75: ...ceed the air pressure specification CAUTION Using compressed air can cause serious injury Always wear eye protection when working with compressed air to prevent injury from ruptured hoses or flying debris a Air filter b Compressed air nozzle Air Filter Cleaning Maximum air pressure 2 0 bar 29 psi IMPORTANT Do not use petroleum products for cleaning the air filter as the filter element may be damag...

Page 76: ...s fuel filter needs to be replaced at specified intervals or whenever water is detected in the fuel whichever comes first The operator may be alerted that the water in fuel sensor has detected water in the fuel if the boat is equipped with the proper instrumentation Instrument notification if equipped Indicator lamp if equipped When the engine is equipped with a remote mounted primary filter it sh...

Page 77: ...er Tighten securely 7 Fill the new fuel filter with clean diesel fuel NOTE After replacing the fine element fuel filter and filling it with fuel it is not necessary to bleed the fuel system 8 Apply clean diesel fuel to the new fuel filter sealing O ring 9 Install the new fine element fuel filter onto the filter bracket and tighten by hand 10 Connect the water in fuel sensor harness connector 11 Af...

Page 78: ...er bracket up and down several times to fill the fuel filter 2 Check the filter for fuel leaks Ensure that the bleed screw on the fuel filter bracket is closed Winterization of Fuel System 1 Fill the fuel tank to prevent condensation from forming 2 Inspect the fuel system for leaks 3 Drain the water from the circulation filter 4 Replace the fine element fuel filter Seawater System Seawater Pump Im...

Page 79: ... cover screws 4 0 35 4 10 Open the seacock 11 Start the engine and check the cooling system for leaks Sterndrive Water Inlets Check 1 Obtain a piece of wire the appropriate size to insert into the water inlets holes 2 Insert the wire in and out of the sterndrive water inlets to ensure that they are open and to remove debris or marine growth Do not scrape the sterndrive paint 3 Remove the wire from...

Page 80: ... transom seawater pickup a Water inlet holes Cleaning the Seawater Strainer if Equipped NOTICE An open seawater strainer or seacock during some service or maintenance procedures can introduce water into the boat causing damage or sinking the boat Always close the water supply from the seawater pump water inlet or seacock when performing service or maintenance on the cooling system 1 With the engin...

Page 81: ...vironment when using or servicing your boat Be aware of the local restrictions governing the disposal or recycling of waste and contain and dispose of fluids as required NOTE For instructions on draining the seawater section refer to Flushing and Draining the Seawater System in this section IMPORTANT Observe the following points Ensure the engine is as level as possible to promote complete drainin...

Page 82: ...rt number CC2825 8M0070979 1 Verify the closed cooling heat exchanger drain screw is tight 2 Remove the pressure cap from the expansion tank coolant reservoir a Coolant reservoir b Minimum mark c Maximum mark d Coolant reservoir pressure cap 3 Slowly add the coolant to the expansion tank Allow the entrapped air to escape 4 When coolant cannot be added supply the seawater pump with cooling water NO...

Page 83: ...sion is known as galvanic corrosion and if it is not controlled it will eventually cause the need for replacement of power package components exposed to water To help control the effects of galvanic corrosion Mercury Diesel power packages come with several sacrificial anodes and other corrosion protection devices For a more comprehensive explanation of corrosion and corrosion protection refer to t...

Page 84: ...g to determine the amount of erosion Do not use a mild steel brush which might leave deposits that could accelerate corrosion 1 Remove the deposits 2 Inspect and measure the anode Compare the measurements to the specifications for a new sacrificial anode and replace the anode assembly when deteriorated 50 NOTE Sacrificial anodes are available only as an assembly Replace both the plug and anode as ...

Page 85: ...d cover and tighten securely a Anode 3 Unplug and connect the seawater inlet hose or open the seacock if equipped NOTICE Without sufficient cooling water the engine the water pump and other components will overheat and suffer damage Provide a sufficient supply of water to the water inlets during operation 4 Ensure that the seawater pickup pump is supplied cooling water 5 Start the engine and check...

Page 86: ...bly Do not pressure wash the MerCathode assembly Doing so will damage the coating on the reference electrode wire and decrease the corrosion protection MerCathode mounted to the underside of the gimbal housing a MerCathode reference electrode b Do not paint c Do not pressure wash Anodes and MerCathode System Locations IMPORTANT Replace sacrificial anodes if eroded 50 percent or more The following ...

Page 87: ...ess 20340 Anode kit if equipped Mounted to the boat transom 20341 Trim cylinder anodes Mounted on each of the trim cylinders 20342 Bearing carrier anode Bravo One Located in front of the propeller between the front side of the propeller and the gear housing 20343 Propeller shaft anode Bravo Three Located behind the aft propeller 20344 In addition to the corrosion protection devices take the follow...

Page 88: ...s to ensure good electrical continuity between the engine transom assembly and sterndrive components Good continuity to a ground is essential for the anode and MerCathode system to function most effectively 1 Inspect the steering lever ground wire for loose connections broken connectors or frayed wiring a Steering lever ground wire 2 Inspect the inner transom plate ground wire for loose connection...

Page 89: ...ing stud ground wire and the inner transom plate grounding screw for loose connections broken connectors or frayed wiring Typical a Flywheel housing screw or grounding stud b Continuity circuit ground wire c Inner transom plate grounding screw 6 Inspect the gimbal ring ground wire and the sterndrive ground plate for loose connections broken connectors or frayed wiring a Gimbal ring to bell housing...

Page 90: ...Meter Reference Electrode 91 76675T 1 9188 Senses and electrical current in the water when testing the MerCathode system Use to check hull potential Refer to the appropriate Mercury MerCruiser sterndrive service manual for testing procedures Painting Your Power Package IMPORTANT Corrosion damage that results from the improper application of anti fouling paint will not be covered by the limited war...

Page 91: ...Do not paint drain holes anodes MerCathode system or items specified by the boat manufacturer Lubrication Steering System WARNING Incorrect cable lubrication can cause hydraulic lock leading to serious injury or death from loss of boat control Completely retract the end of the steering cable before applying lubricant NOTE If the steering cable does not have a grease fitting the inner wire of the c...

Page 92: ...ering pin a Steering pin Tube Ref No Description Where Used Part No Synthetic Blend MerCruiser Engine Oil SAE25W 40 Steering pin 92 883725K01 4 On dual engine boats Lubricate the tie bar pivot points Tube Ref No Description Where Used Part No Synthetic Blend MerCruiser Engine Oil SAE25W 40 Tie bar pivot points 92 883725K01 5 Upon first starting the engine turn the steering wheel several times to s...

Page 93: ...iption Where Used Part No 80 SAE Engine Oil 30W Ball pin and throttle cable end contact surfaces Obtain Locally Shift Cable 1 Lubricate the pivot points and guide contact surfaces Typical sterndrive model shift cable a Pivot points b Guide contact surface Tube Ref No Description Where Used Part No 80 SAE Engine Oil 30W Shift cable pivot points and guide contact surfaces Obtain Locally a b 8 0 5121...

Page 94: ...of the following lubricants to the propeller shaft a Propeller shaft Tube Ref No Description Where Used Part No 94 Anti Corrosion Grease Propeller shaft 92 802867Q 1 34 Special Lubricant 101 Propeller shaft 92 802865Q02 95 2 4 C Marine Lubricant with PTFE Propeller shaft 92 802859A 1 Engine Coupler IMPORTANT These engines are equipped with a sealed engine coupler The sealed coupler and the shaft s...

Page 95: ...ately 10 12 pumps of grease from a typical hand operated grease gun 2 Lubricate the driveshaft grease fittings by applying approximately 3 4 pumps of grease from a typical hand operated grease gun a Driveshaft grease fittings b Transom end grease fitting c Engine end grease fitting Tube Ref No Description Where Used Part No 42 U Joint and Gimbal Bearing Grease Transom end grease fitting engine end...

Page 96: ...ine Grease U joint shaft splines and O rings 92 802869A 1 2 Inspect the U joint bellows for cracks or other signs of deterioration Ensure that the bellows clamps are tight 3 Rotate the bell housing in the upward and side to side directions to inspect the exhaust tube shift cable bellows and clamps a U joint bellow b Exhaust tube c Bell housing d Gimbal ring e Gimbal housing f Shift cable bellows b...

Page 97: ...3 Used to align the engine to the Standard Bravo Transom Assembly for sterndrive installation Maintaining Torques Gimbal Ring U bolt Nuts NOTE The gimbal ring is a component of the transom assembly Tighten the gimbal ring U bolts to the specified torque a Transom assembly b Gimbal ring U bolt nuts Description Nm lb in lb ft Gimbal ring U bolt nuts for 3 8 in U bolt 72 53 Gimbal ring U bolt nuts fo...

Page 98: ...oval WARNING Rotating propellers can cause serious injury or death Never operate the boat out of the water with a propeller installed Before installing or removing a propeller place the drive unit in neutral and engage the lanyard stop switch to prevent the engine from starting Place a block of wood between the propeller blade and the anti ventilation plate Bravo One Models 1 Straighten the bent t...

Page 99: ...e models a Propeller shaft splines b Forward thrust hub c Flo Torque II drive hub d Propeller e Drive sleeve adapter f Tab washer g Propeller nut Bravo Two Models 1 Straighten the bent tabs of the tab washer on the propeller shaft a Propeller b Tab washer c Drive sleeve adapter d Tab bent down e Propeller nut 2 Place a block of wood between the propeller blade and the sterndrive s anti ventilation...

Page 100: ...aft anode screw e Flat washer f Star washer 4 Turn the aft propeller shaft nut counterclockwise to remove the nut 5 Slide the propeller and thrust hub off of the propeller shaft 6 Using the propeller nut tool turn the front propeller shaft nut counterclockwise and remove the nut Propeller Nut Tool 91 805457T 1 10677 Aids in the removal and installation of the front propeller nut 7 Slide the propel...

Page 101: ...to the propeller shaft spline Tube Ref No Description Where Used Part No 34 Special Lubricant 101 Propeller shaft splines 92 802865Q02 95 2 4 C with PTFE Propeller shaft splines 92 802859A 1 94 Anti Corrosion Grease Propeller shaft splines 92 802867Q 1 NOTE Anti corrosion grease is for saltwater applications only 2 Install the propeller with the attaching hardware as shown 3 Tighten the propeller ...

Page 102: ... 802865Q02 95 2 4 C with PTFE Propeller shaft splines 92 802859A 1 94 Anti Corrosion Grease Propeller shaft splines 92 802867Q 1 NOTE Anti corrosion grease is for saltwater applications only 2 Install the propeller with the attaching hardware as shown 3 Tighten the propeller nut to the specified torque Bravo Two a Propeller shaft splines b Forward thrust hub c Propeller d Spline washer e Tab washe...

Page 103: ...2 Slide the forward thrust hub onto the propeller shaft with the tapered side toward the propeller hub 3 Align splines and place front propeller on propeller shaft 4 Install the front propeller locknut and tighten to the specified torque with the propeller nut tool Propeller Nut Tool 91 805457T 1 10677 Aids in the removal and installation of the front propeller nut Description Nm lb in lb ft Bravo...

Page 104: ...death Turn off the engine and remove the ignition key before inspecting the belts In the event that the drive belt requires replacement it is recommended the drive belt replacement be performed by a Mercury Diesel authorized repair facility Drive Belt Failure Identification Appearance Description Cause Solution 40791 Abrasion Each side of the belt appears shiny or glazed Severe condition Fabric is...

Page 105: ... pulley Pulley misalignment Misalignment forces the belt to kink or twist while running causing premature wear Replace the belt and verify the alignment of the pulley 40797 Chunk out Pieces or chunks of rubber material have broken off the belt When chunk out has occurred a belt can fail at any moment Chunk out can happen when several cracks in one area move parallel to the cord line Heat age and s...

Page 106: ...ine operation an onboard electrical device may cause a sudden drain of voltage at the engine s battery The voltage may go below the ECM s minimum required voltage Also the alternator on the other engine may now start charging This could cause a voltage spike in the engine s electrical system In either case the ECM could shut off When the voltage returns to the range that the ECM requires the ECM w...

Page 107: ...ge Table of Contents Cold Weather Freezing Temperature Seasonal Storage and Extended Storage 100 Preparing Your Power Package for Seasonal or Extended Storage 100 Seasonal Storage Instructions 100 Extended Storage Instructions 102 Battery Storage 102 Recommissioning 102 6 ...

Page 108: ...peratures exists Likewise cold weather freezing temperature storage refers to whenever the boat is not being operated and the possibility of freezing temperatures exists The seawater section of the cooling system must be completely drained immediately after operation Seasonal storage refers to when the boat is not being operated for one month or more The length of time varies depending on the geog...

Page 109: ...he container of propylene glycol antifreeze and tap water a Seawater pump b Temporary hose c Container of propylene glycol antifreeze and tap water NOTE Discharge of propylene glycol antifreeze into the environment may be restricted by law Dispose of propylene glycol antifreeze in accordance with federal state and local laws and guidelines 5 Start the engine and operate at idle speed until the ant...

Page 110: ... the propylene glycol antifreeze into a suitable container Refer to Flushing and Draining the Seawater System Dispose of the propylene glycol antifreeze in accordance with federal state and local laws and guidelines 3 Ensure that all cooling system hoses are in good condition connected properly and clamped tightly Verify that all drain valves and drain plugs are installed and tight 4 Inspect all d...

Page 111: ...d to Start 104 Engine Runs Rough Misses or Backfires 104 Poor Performance 105 Excessive Engine Temperature 105 Insufficient Engine Temperature 105 Low Engine Oil Pressure 105 Battery Will Not Charge 106 Remote Control Operates Hard Binds Has Excessive Free play or Makes Unusual Sounds 106 Steering Wheel Turns Hard or Jerky 106 Power Trim Does Not Operate Electric Motor Operates but Sterndrive Unit...

Page 112: ...lve closed Fill tank or open valve Faulty mechanical fuel delivery pump Have pump replaced by a Mercury Diesel authorized repair facility if fuel is present Throttle not operating properly Check the throttle for freedom of movement Faulty electrical stop circuit Have a Mercury Diesel authorized repair facility service the electrical stop circuit Clogged fuel filters Replace the filters Stale or co...

Page 113: ...ll system with proper coolant solution Heat exchanger cores plugged with foreign material Clean heat exchanger See a Mercury Diesel authorized repair facility Loss of pressure in closed cooling section Check for leaks Clean inspect and test pressure cap See a Mercury Diesel authorized repair facility Faulty seawater pickup pump Repair See a Mercury Diesel authorized repair facility Seawater discha...

Page 114: ...damaged beyond repair Improper shift cable adjustment Have adjustment checked by a Mercury Diesel authorized repair facility Steering Wheel Turns Hard or Jerky Possible Cause Remedy Low power steering pump fluid level Check for leak Refill the system with fluid Drive belt loose or in poor condition Replace and or adjust Insufficient lubrication on the steering components Lubricate Loose or missing...

Page 115: ...ter Submersion 108 Replacement Service Parts 108 Parts and Accessories Inquiries 108 Resolving a Problem 108 Customer Service Literature 109 English Language 109 Other Languages 109 Andre sprog 109 Andere talen 109 Muut kielet 109 Autres langues 109 Andere Sprachen 109 Altre lingue 109 Andre språk 109 Outros Idiomas 110 Otros idiomas 110 Andra språk 110 Allej glþssej 110 Ordering Literature 110 Un...

Page 116: ...ions require numerous special parts Exercise care when replacing marine engine parts as specifications are quite different from those of the standard automotive engine Since marine engines must be capable of running at or near maximum RPM much of the time special pistons camshafts and other heavy duty moving parts are required for long life and peak performance These are but a few of the many spec...

Page 117: ... met het dichtstbijzijnde internationale servicecentrum van Mercury Marine of Marine Power voor informatie hierover Een lijst met onderdeelnummers voor andere talen wordt bij uw motorinstallatie geleverd Muut kielet Saadaksesi Käyttö ja huolto ohjekirjoja muilla kielillä ota yhteys lähimpään Mercury Marine tai Marine Power International huoltokeskukseen josta saat lähempiä tietoja Moottorisi mukan...

Page 118: ...rhshj se Üllh glþssa epikoinwnÞste me to plhsiÝstero DieqnÝj KÝntro SÝrbij thj Mercury Marine Þ thj Marine Power gia plhroforßej To pakÝto isxýoj saj sunodeýetai apü Ýnan katÜlogo ariqmþn paraggelßaj gia Üllej glþssej Ordering Literature Before ordering literature please have the following information about your power package available Model Serial Number Horsepower Year United States and Canada F...

Page 119: ...Section 8 Customer Assistance Information 90 8M0070851 eng AUGUST 2012 Page 111 Quantity Item Stock Number Price Total Total Due ...

Reviews: