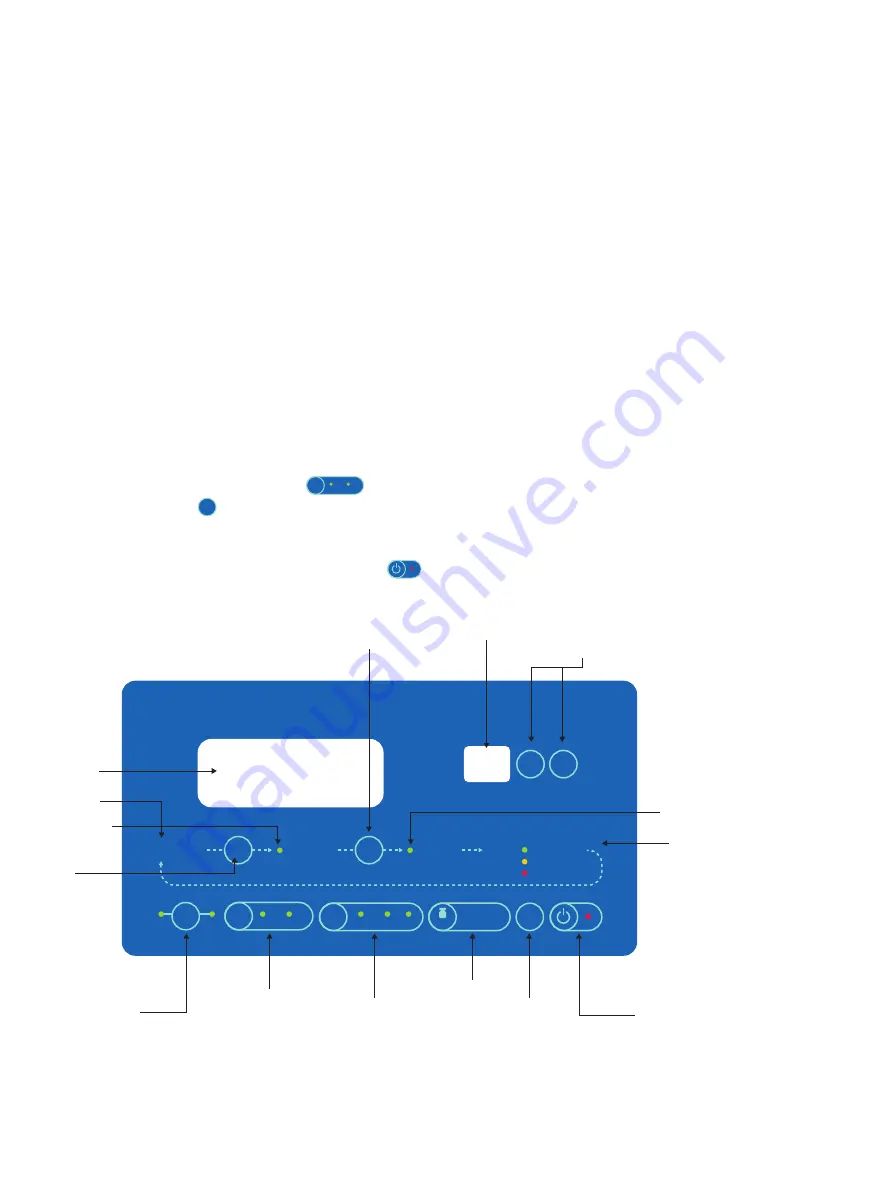
Merck DiluCult User Manual Download Page 11


Page 11 of 20

DiluCult™

Place bag

left

right

Tare

Speed

STOP

Pump

Go

Place sample

In progress

Finished

Accuracy:

g

1/

– +

high >98%
medium >95%
low <95%

accurate standard

500g

Calibration: instructions 

at the back of the unit

fast

Mode

dilution distribution

Start dilution/

distribution

Weight (g)

Bag

insertion

indicator

Tare

Place sample

LED

Pump selection

(right/left)

Mode selection

(Dilution/

Distribution)

Weight calibration

(see back of

instrument for

instructions)

On/Off/Standby

Accuracy

In progress

LED

Speed 

selection

Emergency 

stop

Dilution rate

Dilution factor or

dispensing weight

adjustment

Operating the Instrument

Powering the Instrument On

1.  Plug the power cord into the electrical power  

source (from 100 V~ to 240 V~).

2.  Turn the main switch to the “|” position.
3.  Press the power button on the digital display/

control panel. A green light glows under the 

instrument, indicating that it is ready to function. 

The arm of the DiluCult™ 2 instrument is initialized.

Ensuring the Accuracy  

of the Weighing Platform

To ensure greater accuracy of the weighing platform, 

wait 10 minutes before the first use until the weighing 

cell reaches room temperature.
When the weighing cell is at room temperature,  
select dilution mode by pressing the 

Mode

dilution distribution

 button.  

Tare by pressing the 

Tare

 button.

Put a certified 500 g standard weight on the bag holder. 

If the displayed weight on the digital display/control 

panel is not 500 ± 0.5 g, calibrate the instrument  

(see Calibrating the Instrument, page 14).

Using the Digital Display/Control Panel

The digital display/control panel consists of:
• 10 action keys
• 14 control LEDs that indicate the current status  

of the process and the result of the dilution/

distribution process.

2 control screens:
• Dilution mode: the weight and dilution rate
• Distribution mode: the adjustable weight  

targeted by the user

Note: The instrument automatically goes into sleep mode after 30 minutes of 

inactivity. Press the on/off/standby button 

 to resume activity.

Summary of Contents for DiluCult

Page 1: ...sigmaaldrich com User Guide DiluCult and DiluCult 2 instruments The life science business of Merck operates as MilliporeSigma in the US and Canada...

Page 2: ...ers 3 Operator and Equipment Safety 3 System Components 5 Setting Up the Instrument 6 Unpacking the Instrument 6 Installing the Instrument 6 Operating the Instrument 11 Powering the Instrument On 11 E...

Page 3: ...on Do not expose the DiluCult and DiluCult 2 instruments to liquid If liquid gets inside the instrument through the ventilation cut outs at the back of the instrument avoid any contact with the instru...

Page 4: ...ion time for a 375 g sample diluted at 1 10 80 s Dispensing time for 90 mL 7 s 7 s Dispensing time for 225 mL 10 s 10 s Maximum number of pumps 2 integrated 2 integrated Dispensing distribution mode F...

Page 5: ...acy sticker RS232 output USB output System Components Tubing holder Removable drip tray Fixed dispensing arm Nozzle holder Bag holder DiluCult Instrument Front Back On Off switch Identification sticke...

Page 6: ...DiluCult 2 Instrument The shipping box contains the following One dispensing assembly 6 4 mm diameter for GL45 bottle per pump One set of 10 GeckoGrip One set of adhesive gum One monitoring software C...

Page 7: ...t Instrument DiluCult 2 Instrument 2 1 Nozzle protector Installing the Bag Holder Clip the bag holder into the two holes in the base of the instrument For the DiluCult 2 instrument only also clip on t...

Page 8: ...pump extension are not aligned They should be staggered in relation to each other 4 Clip the pump extension on the pump 5 Open the 2 covers If the alignment is incorrect separate the pump from the pum...

Page 9: ...2 Install the tubing The direction of flow is indicated by the arrows on the housing 3 For tubing with an internal diameter smaller than 6 4 mm delivered as standard see Adjusting the Pump and Insert...

Page 10: ...r is 6 4 mm To change the setting turn the button on each side of the pump to obtain the right setting Tubing is pinched Tubing is not pinched 2 Insert the tubing into the pump 3 Close the pump keepin...

Page 11: ...dy to function The arm of the DiluCult 2 instrument is initialized Ensuring the Accuracy of the Weighing Platform To ensure greater accuracy of the weighing platform wait 10 minutes before the first u...

Page 12: ...ocessing Green indicates that the weighing platform is stable Proceed with the process 11 Start the dilution by pressing the Go button The In progress LED lights This indicates that the dilution is ta...

Page 13: ...Start the dispensing by pressing the Go button The In progress LED lights This indicates that the dispensing is taking place The light under the instrument turns orange and flashes slowly The robotic...

Page 14: ...on instructions at the back of the unit button again The instrument beeps 3 times 7 Remove the weight The instrument is calibrated and ready for use Using the Monitoring Software For traceability the...

Page 15: ...ed is a dilution Displayed as a whole number no decimal places the number N when the dilution ratio is 1 N Sample weight Displayed in grams with 2 decimal places Theoretical weight Displayed when the...

Page 16: ...g holder Drip tray Fixed arm Nozzle holder including roller Protecting plate for nozzle Follow these maintenance practices Autoclave all the dispensing assemblies every day when working in sterile con...

Page 17: ...ons correctly Cleaning the Nozzle Holder DiluCult 2 Instrument Only 1 Switch the instrument to standby mode by pressing the button 2 Press the Go button twice The arm initializes 3 Unscrew the nozzle...

Page 18: ...sure that the pumps are set correctly see Adjusting the Pump and Inserting the Tubing Stretch the tubing on both sides without opening the pump The pump perforates the tubing Ensure that the tubing ha...

Page 19: ...nsing reports Ensure that the DiluCult instrument is connected to the USB cable Disconnect and then reconnect the cable and ensure that the computer makes a sound every time If the computer does not h...

Page 20: ...demarks of Merck KGaA Darmstadt Germany or its affiliates All other trademarks are the property of their respective owners Detailed information on trademarks is available via publicly accessible resou...

Reviews: