background image

6

EN

7

EN

Section 2 

Getting Started

Loading the Battery

Before using the 

MyVideo

TM


, you must load Lithium-ion 

rechargeable battery

Push battery latch to remove cover. 

1. 

Insert the battery following to the correct polarity marks 

2. 

( + or -).
Close the battery cover firmly.

3. 

  Note

When the battery is absent or low, the date and 

• 

time will be reset. See page 17 to set date/ time.

Charging your battery

Fully charge the supplied battery before using the 

MyVideo

TM


 for the first time. 

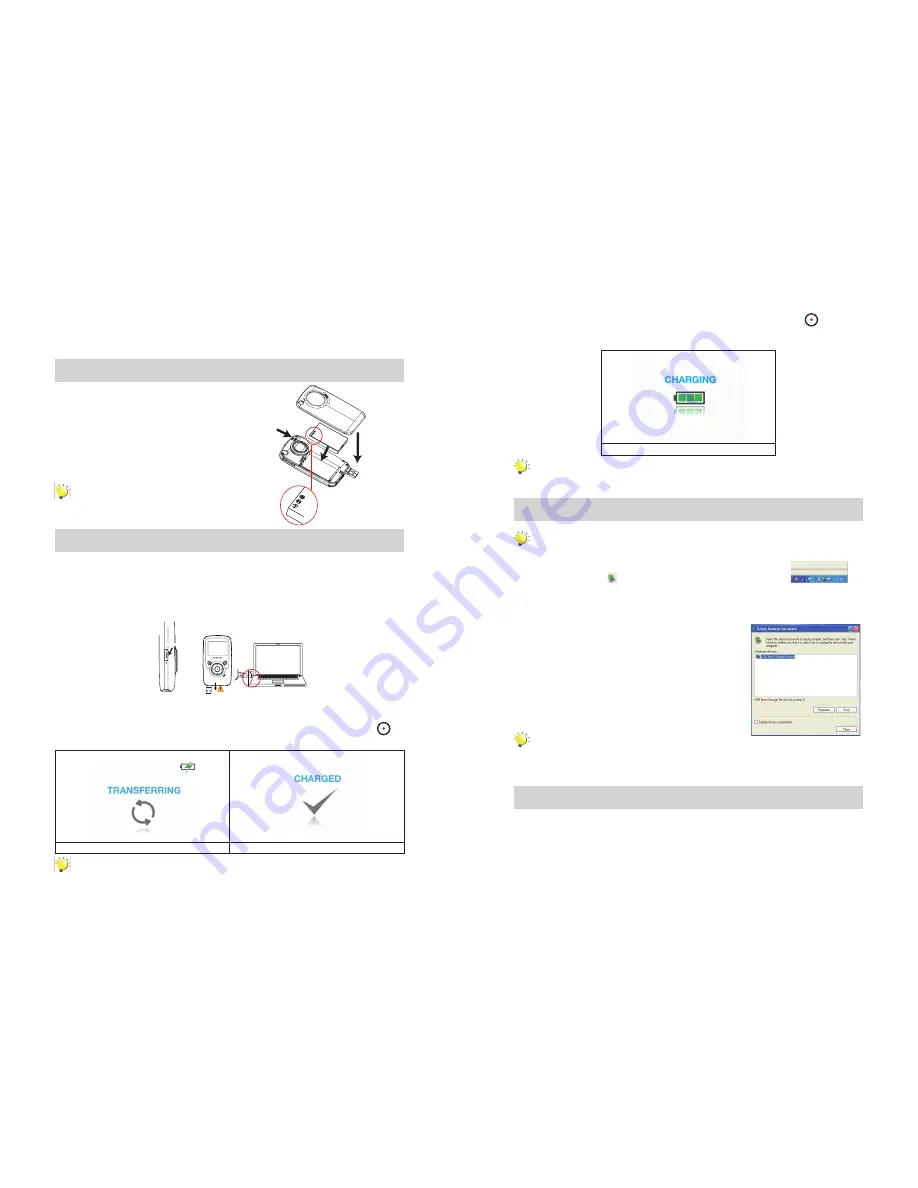
Extend the USB port: Press the USB latch and the USB arm pops out automatically.
Connect 

MyVideo

TM


 to the open USB port on your PC or Mac.

Retract the USB port: Press and release the USB latch and push the USB arm backward until it locked.

Press

Two charging modes are 

available:

1. 

Normal Charging Mode: 

When MyVideo

TM


 is plugged to a computer, it is in normal charging mode.

Note:


LCD will be turned off after 5 seconds. Press any button [except Record/ Enter button (

)] to 

turn on the LCD again. (Normal charging time is approximately 12 hours.)

Normal Charging & Data Transferring Mode

Battery charging completed

  Note

Product is not intended for children. Use caution when extending USB port to avoid injury.

• 

3

2

1

2. Express charging Mode: 

In normal charging mode, press Record/Enter Button (

) to switch to 

express  charging  mode.  Press  again  to  return  to  Normal  Charging  Mode  (Express  charging  time  is 
approximately 4.5 hours to fully charge the battery)

Express charging mode

  Important

Fully charge your new battery for the first time using the Normal Charge Mode.

• 

NOTE:


During Express Charging Mode, camcorder will not able to transfer files to computer.

Safely Remove from Computer (PC)

  Note

To avoid damage to the unit or data loss, always follow the procedure listed below before 

• 

disconnecting the unit from the USB port on your computer.

While in Normal Charging Mode, using your mouse, 

1. 

double-click Safely  


Remove Hardware icon ( ) on the tasktray.
From the “Safely Remove Hardware” window (shown lower right), select “USB Mass Storage 

2. 

Device” and click the “Stop” button. The “Stop a Hardware Device” window will pop up. Click “OK”. 
When the “Safe to Remove Hardware” window is displayed, you may remove the unit from the USB 
cable or remove the USB cable from the computer. 

  Note

If the “Safely Remove Hardware” icon is not displayed on the tasktray, please double click on  

[My Computer]. Right click on [Memorex] and left click on [Eject]. Then it is safe to remove unit 

from the computer.
To retract the USB: Press and release the USB latch and push the USB arm backward.

Hand Strap and Tripod Usage

To use hand strap: Attach the strap to the strap hook. Place your hand through the strap loop to 

• 

prevent the camcorder from damage by being dropped.
To use tripod (Optional): Place the camcorder on a tripod to support and stabilize the camera and 

• 

allow stabilized recording of videos and photos.

Summary of Contents for MyVideo MCC221

Page 1: ......

Page 2: ...including interference that may cause undesired operation Modifications not authorized by the manufacturer may void user s authority to operate this device SAFETY PRECAUTIONS Be sure to observe the fo...

Page 3: ...55L A02 Front Rear View Mirror Frame your reflection to photograph or record yourself Left Button Playback Play Pause Button Right Button Screen Delete Button Up Button Zoom In Speaker Down Button Zoo...

Page 4: ...ormal Charging Mode Express charging time is approximately 4 5 hours to fully charge the battery Express charging mode Important Fully charge your new battery for the rst time using the Normal Charge...

Page 5: ...ew Mode Note To conserve battery power the camcorder will turn itself off automatically after idle for two minutes Section 3 Preview Mode Button Function Direction Button Right Button Left Button Whil...

Page 6: ...Playback Button to switch to Playback Mode Press Left Right Buttons to view the previous next video photo Press Playback Button to play pause recorded video Photo Recording Press Left Right Buttons r...

Page 7: ...onfirm Yes No or All Or Press Delete Button to cancel the operation Section 4 Playback Mode Button Function The Buttons have the following functions in Video and Photo Playback Modes Direction Button...

Page 8: ...o switch to Playback Mode Press Left Right Buttons to view the previous next video photo Press Record Enter Button to return to Preview Mode Press Delete Button to delete the current video or photo Vi...

Page 9: ...enu Settings Time Date Operation Display Screen In 1 Menu Mode main screen use Direction Button to select TIME DATE Press 2 Record Enter Button to enter the submenu Move between date or time items by...

Page 10: ...Enter Button to validate and return to Menu Mode main screen Sound Effects Enable or disable operation sound Operation Display Screen In 1 Menu Mode main screen use Direction Button to select SOUND EF...

Page 11: ...r and view the User Guide the software must be installed upon first use when connecting MyVideoTM to your PC or Mac through USB port ArcSoft TM MediaImpression2 is a user friendly application that hel...

Page 12: ...nd or bright dots white red blue or green may appear on the LCD screen These dots are a normal result of the manufaturing process and do not affect the recording quality Reset the Camcorder If the cam...

Page 13: ...some of my indoor pictures look blurry and dark Camcorder extends pictures exposure time under low light indoor condition Keep camera and photographed subject steadyforseveralseconds when taking pictu...

Page 14: ...je No lo use cuando llueva o nieve Si le entra agua o cualquier material extra o a la c mara comcorder ap guela inmediatamente y contacte al centro de servicio autorizado local Da o f sico o mal funci...

Page 15: ...USB y el brazo de USB sale autom ticamente Conecte su MyVideoTM al puerto abierto USB en su PC o MAC Retraiga el puerto USB Presione y libere el pestillo USB y empuje el brazo USB hacia atr s hasta q...

Page 16: ...Computer Click derecho sobre Memorex y click izquierdo sobre Eject Entonces ahora es seguro remover la unidad de la computadora Para retraer el USB Presione y libere el pestillo USB y empuje el brazo...

Page 17: ...l valor de la exposici n 2 En el modo de Reproducci n presione para disminuir el volumen Bot n de Reproducci n 1 En el modo de Vista Previa presione para cambiar al modo de Reproducci n 2 Presione par...

Page 18: ...la cantidad de luz que la c mara recibe cuando est tomando videos fotos o mientras est en Modo de Vista Previa Para ajustar el valor de exposici n Use los botones de Aumento Disminuci n 1 para ajusta...

Page 19: ...ot n Grabar Inicio Presione para regresar al modo de Vista Previa Bot n de Aumento Presione para aumentar volumen Bot n de Disminuci n Presione para disminuir el volumen Bot n de Reproducci n Presione...

Page 20: ...ne Botones Izquierda Derecha para ver la foto deseada Secci n 5 Configurando su Videoc mara Operaciones para el Modo Men Operaci n Pantalla Presione Botones Izquierda Derecha 1 repetidamente hasta que...

Page 21: ...egrese al Modo de pantalla de Men principal Idiomas Disponibles Ingl s Descarte Espa ol Franc s Sistema TV Aseg rese que la TV standard apropiada de su rea est seleccionada ya sea NTSC o PAL La config...

Page 22: ...o de pantalla de Men principal Secci n 6 Viendo Videos y Fotos en la TV Conexi n con la TV Conecte un extremo del cable AV al Puerto de salida de la c mara 1 Conecte el otro extremo del cable a la tel...

Page 23: ...ador Electr nico Monitor LCD 2 0 LCD Medido diagonalmente Medios de Almacenamiento 2GB de memoria incorporada 200MB de memoria es utilizada por el sistema de software Graba hasta 2 horas de video o ca...

Page 24: ...ora Despu s de actualizarla formatee la unidad para completar el proceso de actualizaci n PARA CONFIGURACION ADICIONAL O ASISTENCIA OPERATIVA FAVOR VISITE NUESTRO WEB WWW MEMOREX COM PARA PODER REEMPL...

Page 25: ...i puisse provoquer une utilisation ind sirable Des modifications non autoris es par le fabricant peuvent annuler le pouvoir du consommateur utiliser cet appareil CONSIGNES DE SECURITE Veuillez vous as...

Page 26: ...lmer ou de prendre une photo de vous m me Bouton Gauche Bouton Retour en Arri re Marche Pause Bouton Droit Ecran Bouton Effacer Bouton Vers le Haut faire un zoom Haut parleur Bouton Vers le Bas Elargi...

Page 27: ...ent normal appuyer sur le bouton Enregistrer Accepter pour passer au mode de chargement Express Appuyer une fois de plus pour repasser au Mode de Chargement Normal le temps de chargement en mode Expre...

Page 28: ...e Dans le but de conserver l nergie de la pile le cam scope s teindra automatiquement s il na pas t utilis pendant deux minutes 3 me Partie Mode Aper u Les Fonctions des Boutons Bouton de Direction Bo...

Page 29: ...id o la photo suivante pr c dente Appuyer sur le bouton Retour en Arri re pour faire avancer la vid o enregistr e ou pauser Prendre une Photo Appuyer sur les boutons Gauche Droite plusieurs fois jusqu...

Page 30: ...cepter pour confirmer Oui Non ou Toutes Ou appuyer sur le Bouton Effacer pour annuler l op ration 4 me Partie Mode Retour en Arri re Fonctions des Boutons Les fonctions des boutons en Mode Retour en A...

Page 31: ...our voir la vid o photo pr c dente suivante Appuyer sur le Bouton Enregistrer Accepter pour retourner au Mode Aper u Appuyer sur le Bouton Effacer pour effacer la vid o ou la photo en cours Retour en...

Page 32: ...tabilisation Non s lectionn par d faut Sortie R glage en Menu Secondaire du Mode Menu Heure Date Op ration Affichage sur Ecran En Mode Menu utiliser le Bouton de Direction 1 pour choisir HEURE DATE Ap...

Page 33: ...a page principale du mode Menu Effets Sonores Activer ou d sactiver le son Op ration Affichage sur Ecran Sur la page principale du Mode Menu utiliser 1 le Bouton de Direction pour choisir EFFETS SONOR...

Page 34: ...un ordinateur et voir le manuel d instruction le logiciel doit tre install la premi re utilisation au moment de brancher MyVideoTM un ordinateur PC ou Mac travers du port USB ArcSoftTM MediaImpression...

Page 35: ...e fabrication et n affecte pas la qualit de l enregistrement Remise Jour du Cam scoper Si le cam scope fonctionne de mani re irr guli re retirer la pile pour le remettre jour Puis remettre la pile et...

Page 36: ...hotos vid os voir page 58 Il n est pas en marche Pourquoi certaines de mes photos prises l int rieur sont troubles et sombres Le cam scope augmente le temps d exposition de la photo lorsqu il y a peu...

Reviews: