background image

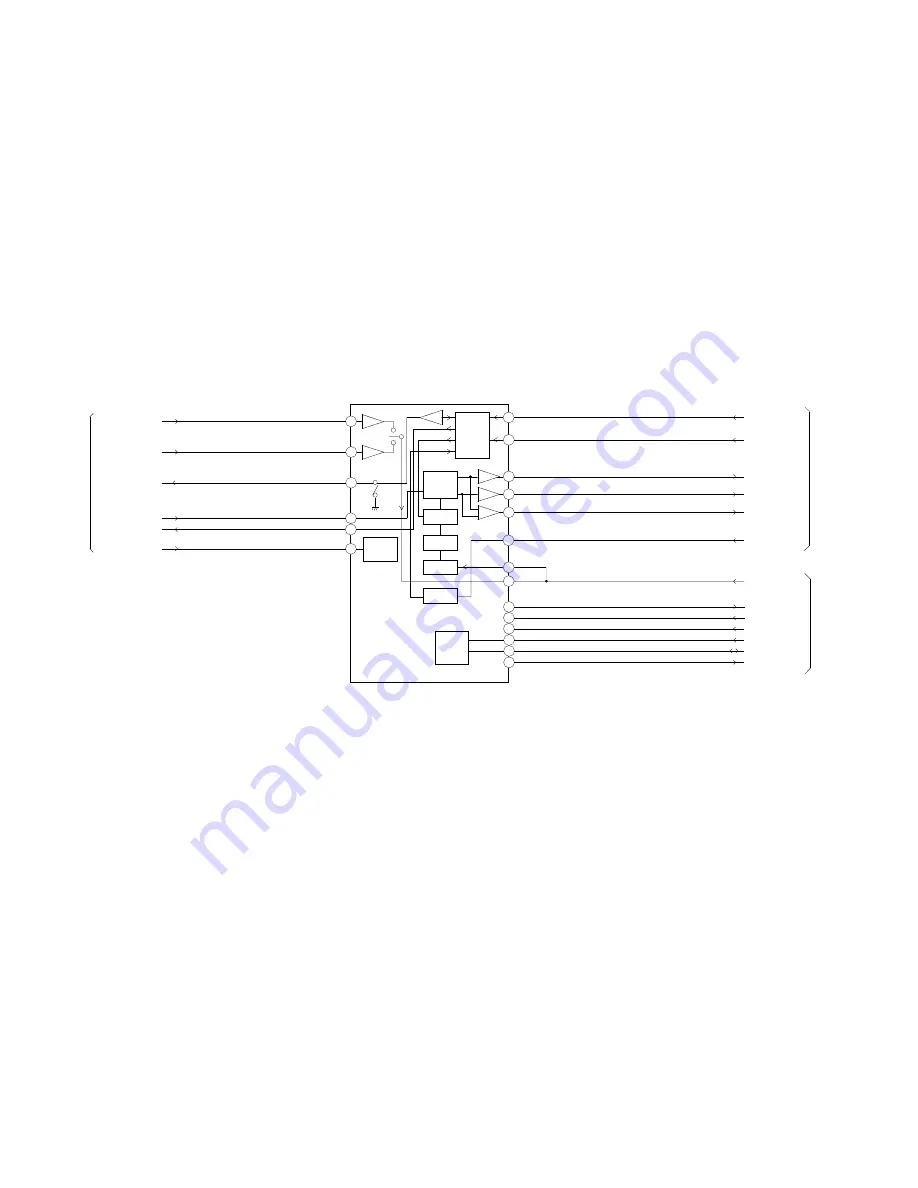
HI-FI/DEMODULATOR BLOCK DIAGRAM

HI-FI/AUDIO/HEAD AMP/DEM IC
IC5501 AN3663FBP

57

15

53

27

42

10

29

30

59

36

48

56

43

28

24

21

22

AUDIO_OUT_L

HIFI_H. SW

RF_CONV_A. OUT

TUNER_A

AUDIO_MUTE-H

V. REC_ST-H

HIFI_ENV. DET

IIC_CLK

IIC_DATA

AUDIO_OUT_R

ST_SELECT

FRONT_A_IN-L

FRONT_A_IN-R

HF2

HF_COM

HF1

TUNER

SYSCON/SERVO

Y/C/AUDIO/

CCD/

HEAD AMP

INPUT SW

AMP

AMP

RFC

PNR

BPF

FM LIM

AMP

AMP

AGC

LOGIC

OUTPUT

 SW

DEM 

BLOCK

62

61

FROM_NORMAL_A

TO_NORMAL_A

45

FSC

VCO - F0 

ADJ

LOGIC 

E-7

E-8

Summary of Contents for MVR4042

Page 1: ...SERVICE MANUAL MVR4042 Design and specifications are subject to change without notice VIDEO CASSETTE RECORDER ORIGINAL MFR S VERSION A ...

Page 2: ...IRING There are parts which use the insulation material such as a tube or tape for safety or which are assembled in the condition that these do not contact with the printed board The inside wiring is designed not to get closer to the pyrogenic parts and high voltage parts Therefore put these parts in the original positions A1 1 Please include the following informations when you order parts Particu...

Page 3: ...VCR DECK PARTS 3 REMOVAL AND INSTALLATION OF FLAT PACKAGE IC KEY TO ABBREVIATIONS SERVICE MODE LIST PREVENTIVE CHECKS AND SERVICE INTERVALS SERVICING FIXTURES AND TOOLS PREPARATION FOR SERVICING MECHANICAL ADJUSTMENTS ELECTRICAL ADJUSTMENTS BLOCK DIAGRAMS Y C AUDIO CCD HEAD AMP SYSTEM CONTROL SERVO TUNER HI FI DEMODULATOR OPERATION POWER PRINTED CIRCUIT BOARDS SYSCON OPERATION BOT SYSCON SCHEMATIC...

Page 4: ... 75ohm Sound Selector No Stereo Dual TV Sound Yes US Stereo G 3 Power Power Source AC 120V 60Hz DC Power Consumption Power On at AC 9W at 120V 60Hz Stand by at AC 1 7W at 120V 60Hz Per Year kWh Year Protector Power Fuse Yes Dew Sensor No G 4 Regulation Safety UL Radiation FCC G 5 Temperature Operation 5o C 40o C Storage 20o C 60o C G 6 Operating Humidity Less than 80 RH G 7 Signal Video Signal Inp...

Page 5: ...Time 6 Hours OTPB Valid Time No Timer Back up at Power Off Mode 5 sec G 11 Display Indicator No Indicator Type Clock Counter CH Timer Rec Play REC OTR FF Cue Rew Rev Stop ATR VCR PM RF Output CH G 12 Remote Unit RC EA Control Glow in Dark Remocon No Format type NEC Custom Code 80 7BH Power Source Voltage D C 3V UM size x pcs UM 4 x 2 pcs Total Keys 33 Keys Keys Power Yes 1 Yes 2 Yes 3 Yes 4 Yes 5 ...

Page 6: ...No Poles Terminal Loop Antenna No Terminal U V Mixer No DC Car Cord Center No Guarantee Card Yes Warning Sheet No Circuit Diagram No Antenna Change Plug No Service Station List No Important Safeguard No Dew AHC Caution Sheet No AC Plug Adapter No Quick Set up Sheet No AC Cord No AV Cord No Registration Card No PTB Sheet No 300 ohm to 75 ohm Antenna Adapter No G 15 Interface Switch Front Power Yes ...

Page 7: ...ox 3 8kg 8 4lbs G 18 Carton Master Carton No Content Material Dimensions W x D x H mm Description of Origin Gift Box Yes Material Single White Dimensions W x D x H mm 420x291x160 Design As Per BUYER s Description of Origin Yes Drop Test Natural Dropping At 1Corner 3Edges 6Surfaces Height cm 80 Container Stuffing 40 container 3 136 Sets G 19 Material Cabinet Front PS 94V2 DECABROM PCB Non Halogen D...

Page 8: ...ap Upper side Bottom side 1 4 SYSCON PCB Refer to Fig 1 4 1 2 3 4 Remove the screw 1 Remove the screw 2 Remove the 2 screws 3 Remove the Syscon PCB in the direction of arrow Fig 1 4 Syscon PCB Bottom Plate 3 1 2 3 1 3 DECKCHASSIS RefertoFig 1 3 NOTE Do not remove the cable at the FE Head section The FE Head may be damaged if you remove the cable by force 1 2 3 4 5 6 7 8 Remove the screw 1 Remove t...

Page 9: ... of the Locker R installation check if the one position of Fig 2 3 B is correctly locked When you install the Cassette Side R be sure to move the Locker R after installing 2 4 LINK UNIT Refer to Fig 2 4 Set the Link Unit to the Eject position Unlock the support 1 Remove the A side of the Link Unit first then remove the B side 1 2 3 Fig 2 4 2 5 LINK LEVER FLAP LEVER SENSOR Unlock the support 1 Remo...

Page 10: ...is correct In case of the Loading Motor installation hook the wire on the Cassette Opener as shown Fig 2 6 C When installing the wires between Capstan DD Unit and Loading Motor connect them correctly as shown Fig 2 6 D Loading Motor Capstan DD Unit L2 L1 Pink Fig 2 6 D White Fig 2 7 A Tension Arm Ass y Fig 2 7 B Fig 2 7 D Tension Band Tension Spring 1 2 4 Tension Band Tension Arm Ass y 3 1 Tension...

Page 11: ...4M If you do not grease noise may be heard in FF REW mode After installing the reel adjust the height of the reel Refer to MECHANICAL ADJUSTMENT 1 2 3 4 5 6 Fig 2 9 A NOTE 1 2 In case of the S Reel and T Reel installation check if the correct parts are installed Refer to Fig 2 9 B In case of the Idler Arm Ass y installation install correctly as Fig 2 9 C And also set it so that the section B of Fi...

Page 12: ...A C Head Use gloves When you install the A C Head Spring install as shown in Fig 2 11 B When you install the A C Head tighten the screw 1 first then tighten the screw 2 finally tighten the screw 3 1 2 3 A C Head A C Head Spring 3 1 2 A C Head Base Fig 2 11 A 2 1 2 2 Screw Torque 5 0 5kgf cm Spring Position Fig 2 11 B 2 12 FE HEAD RECORDER ONLY Refer to Fig 2 12 Remove the screw 1 Remove the FE Hea...

Page 13: ... Gear Remove the Main Rod Tension Lever Loading Arm S Unit and Loading Arm T Unit Main Rod Main Loading Gear Loading Arm T Unit Loading Arm S Unit Fig 2 16 A 1 1 2 2 14 CAPSTAN DD UNIT Refer to Fig 2 14 A Remove the Capstan Belt Remove the 3 screws 1 Remove the Capstan DD Unit 1 2 3 Fig 2 14 A Screw Torque 4 0 5kgf cm Capstan DD Unit Capstan Belt 1 1 1 In case of the Capstan DD Unit installation a...

Page 14: ...8 B Fig 2 18 C Cassette Guide Post Cassette Guide Post 2 17 Remove the Polyslider Washer 1 Remove the Clutch Ass y and Ring Spring Remove the Clutch Lever Remove the Coupling Gear Coupling Spring and Clutch Gear 1 2 3 4 Fig 2 17 A NOTE 1 When you install the Loading Arm S Unit Loading Arm T Unit and Main Loading Gear align each marker Refer to Fig 2 16 B Fig 2 16 B Loading Arm T Unit Main Loading ...

Page 15: ... a blower type IC desoldering machine Refer to Fig 3 2 2 Fig 3 2 NOTE Do not add the rotating and the back and forth directions force on the IC until IC can move back and forth easily after desoldering the IC leads completely When IC starts moving back and forth easily after desoldering completely pickup the corner of the IC using a tweezers and remove the IC by moving with the IC desoldering mach...

Page 16: ...hin tip Soldering Iron NOTE When the IC leads are bent during soldering and or repairing do not repair the bending of leads If the bending of leads are repaired the pattern may be damaged So be always sure to replace the IC in this case Finally confirm the soldering status on four sides of the IC using a magnifying glass Confirm that no abnormality is found on the soldering position and installati...

Page 17: ...lop Frequency Generator Front Loading Switch Frequency Modulation Frequency Sub Carrier Forward Generator Ground High Pass Filter I K L M N O P R S H SW Hz IC IF IND INV KIL L LED LIMIT AMP LM LDM LP L P F LUMI M MAX MINI MIX MM MOD MPX MS SW NC NR OSC OPE PB PB CTL PB C PB Y PCB P CON PD PG P P R REC REC C REC Y REEL BRK REEL S REF REG REW REV RVS RF RMC RY S CLK S COM S DATA SEG SEL SENS SER SI ...

Page 18: ...tor Separation Transistor Tracking Trick Playback Test Point Unregulated Volt Voltage Controlled Oscillator Video Intermediate Frequency Vertical Pulse Voltage Display Video Playback Variable Resistor Video Recording Visual Search Fast Forward Visual Search Rewind Voltage Super Source Vertical Synchronization Voltage Tuning Crystal Luminance Chrominance C1 2 ...

Page 19: ... position Refer to the MECHANICAL ADJUSTMENT GUIDE ROLLER and ELECTRICAL ADJUSTMENT PG SHIFTER Press the ATR button on the remote control for more than 2 seconds during PLAY Make the short circuit between the test point of SERVICE and the GND The BOT EOT and the Reel Sensor do not work and the deck can be operated without a cassette tape Refer to the PREPARATION FOR SERVICING ...

Page 20: ...Cylinder Unit Replace when rolling becomes abnormal Clean the Head Clutch Ass y Idler Arm Ass y CLEANING NOTE After cleaning the heads with isopropyl alcohol do not run a tape until the heads dry completely If the heads are not completely dry and alcohol gets on the tape damage may occur 1 AUDIO CONTROL HEAD Clean the Audio Control Head with the cotton stick soaked by alcohol Clean the full erase ...

Page 21: ...ead model APJG001T00 APJG001B00 APJG001P00 APJG001S00 Parts Name VHS Alignment Tape For 2 head model VHS Alignment Tape For 2 head model VHS Alignment Tape For 2 head model VHS Alignment Tape For 4 head model VHS Alignment Tape For 4 head model VHS Alignment Tape For 4 head model JG002B JG002E JG002F JG005 JG153 APJG022000 JG100A JG154 JG024A JG022 APJG002B00 APJG002E00 APJG002F00 APJG005000 APJG1...

Page 22: ...the adjusting section for the Tension Arm position so that the Tension Arm top is within the standard line of Main Chassis While turning the S Reel clockwise confirm that the edge of the Tension Arm is located in the position described above Fig 1 2 A Standard line of Main Chassis Tension Arm 0 5mm Adjusting range Adjusting section for the Tension Arm position Bend Tension Band The Tension Arm top...

Page 23: ... 2 as shown in Fig 2 1 B even if you press the Tracking Button to move the envelope The envelope waveform will begin to decrease when you press the Tracking Button Adjust the PG shifter during playback Refer to the ELECTRICAL ADJUSTMENTS 1 2 3 4 5 6 7 NOTE After adjustment confirm and adjust A C head Refer to item 2 2 CH 2 SW Pulse TP1002 CH 1 Track CH 2 Track CH 1 Envelope TP4001 Fig 2 1 A Entran...

Page 24: ...TP1002 CH 2 to TP4001 and CH 3 to HOT side of Audio Out Jack Playback the VHS Alignment Tape JG001S or JG001T Refer to SERVICING FIXTURE AND TOOLS Press and hold the Tracking Auto button on the remote control more than 2 seconds to set tracking to center Set the X Value adjustment driver JG153 to the 4 of Fig 2 2 B Adjust X value so that the envelope waveform output becomes maximum Check if the re...

Page 25: ...USTMENT PARTS LOCATION GUIDE 5 6 7 8 9 10 1 2 3 4 1 Tension Connect 2 Tension Arm 3 Guide Roller 4 Audio Control Head 5 X value adjustment driver hole 6 7 8 9 10 P4 Post T Brake Spring T Reel S Reel Adjusting section for the Tension Arm position ...

Page 26: ... PG SHIFTER CONDITIONS MODE PLAYBACK Input Signal Alignment Tape JG001P INSTRUCTIONS Connect CH 1 on the oscilloscope to TP1002 and CH 2 to TP4201 Playback the alignment tape JG001P Press and hold the Tracking Auto button on the remote control more than 2 seconds to set tracking to center Adjust the VR1001 until the waveform of the oscilloscope measures 6 5 0 5 H at both leading and trailing edges...

Page 27: ...TION GUIDE WIRING CONNECTION D3 2 TP1001 TP1002 VR1001 J4204 J4205 A C HEAD CP4002 CP1002 BOT PCB SYSCON PCB J4203 TP4001 OS651 CD4001 CP1001 FE HEAD FE HEAD CAPSTAN DD UNIT TU6001 J4201 TP4201 CD501 CP1004 CP4003 CD1503 AC IN CP651 CP601 OPERATION PCB CP651 ...

Page 28: ...MP 1 2 FBC Chara INS 6dB P R P R V AGC T4001 CLAMP EQ AMP LINE AMP MUTE ALC Y C_CS Y C_DATA Y C_CLK H AMP_SW C ROTARY H SW ENV DET COMP DUMMY_V SYNC OSD_V FRONT_V_IN TUNER_V TO_NORMAL_A FROM_NORMAL_A 6 2 3 1 5 Q4005 BIAS CTL 11 4 P CON 5V H AMP SW AUDIO MUTE C ROT RF SW IN ENV DET COMP OUT Q4006 BIAS OSC Q4003 SW Q4001 Q4002 AUDIO PB SW HF1 HF2 HI FI DEMODU LATOR HF_COM COIL BIAS OSC X4001 3 57954...

Page 29: ...6 X2 75 X1002 32 768 KHz Y C AUDIO CCD HEAD AMP 91 V REC ST H V REC_ST H CTL 4 H AMP SW CTL 3 100 COMP 101 V ENV 30 CTL H AMP_SW CTL COMP ENV DET VIDEO H SW 105 C SYNC 111 H SW C SYNC A MUTE H 90 AUDIO_MUTE H AFT S CURVE TUNER VCR H TV VCR AUDIO_OUT_MUTE 88 87 CV OUT 19 RF_SW 89 25 AFT S CURVE TV VCR A_OUT_MUTE L VIDEO_OUT RF_CH_SW V REC_ST H AUDIO_MUTE H HI FI DEMODULATOR HI FI H SW HIFI_H SW HIF...

Page 30: ...UDIO_OUT_L TV VCR P CON 12V 2 FRONT_V_IN TUNER_V 3 Y C AUDIO CCD HEAD AMP FRONT_A_IN R Q4204 MUTE SW Q4203 MUTE SW Q4202 MUTE SW TUNER_A 11 IIC_CLK 12 IIC_DATA 13 18 AFT S CURVE A_OUT_MUTE L 15 2 2 AUDIO L J4204 AUDIO R J4205 SYSCON SERVO 3 REAR OUT JACK J4201 2 3 5 Q4201 BUFFER VIDEO_OUT SYSCON SERVO RF_CH_SW E 5 E 6 ...

Page 31: ..._OUT_L HIFI_H SW RF_CONV_A OUT TUNER_A AUDIO_MUTE H V REC_ST H HIFI_ENV DET IIC_CLK IIC_DATA AUDIO_OUT_R ST_SELECT FRONT_A_IN L FRONT_A_IN R HF2 HF_COM HF1 TUNER SYSCON SERVO Y C AUDIO CCD HEAD AMP INPUT SW AMP AMP RFC PNR BPF FM LIM AMP AMP AGC LOGIC OUTPUT SW DEM BLOCK 62 61 FROM_NORMAL_A TO_NORMAL_A 45 FSC VCO F0 ADJ LOGIC E 7 E 8 ...

Page 32: ... Q502 CONTROL IC511 LTV 817M VB PHOTO COUPLER Q509 P CON 5V SW Q515 M_CONB SW Q512 P CON 12V SW Q513 P ON SW 32V P CON 12V P CON 5V POWER_ON_L AT 5V M_CON POWER_FAIL SYSCON SERVO SYSCON SERVO RECTIFIER D505 D508 D523 D528 AC IN KEY A KEY B REM_IN AT 5 2V 1G TV VCR_LED 2G T REC_LED 3G REC_LED 4G POWER_ LED SYSCON SERVO TV VCR LED D664 T REC LED D665 REC LED D666 POWER ON LED D663 E 9 E 10 ...

Page 33: ...R1121 W824 D1001 W025 R659 W014 R1003 W011 R1006 W055 W076 W012 W034 W031 W032 W033 W028 D1002 C1036 L1001 W027 C1025 C1022 W042 W064 W065 R4044 W040 W096 R4015 W038 W039 W041 W102 W053 W071 W070 W140 W060 W094 W095 W105 W097 W098 W099 W108 W100 R1023 W091 W063 W062 W049 C1080 W007 W067 R531 W104 W089 W119 W085 R1008 W110 W126 W056 R1042 W079 W080 R4034 W043 C1077 W035 W004 W046 W059 W050 R537 W05...

Page 34: ...5517 C5546 C5545_1 C5544_1 C5543_1 C5541 C5542 C5549_1 C5537 C5540 R5510 C5530_1 C5514 C5505 C5506 R5513 C5507 R5501 C5515 C5504 R5516 C5551 R5508 C5528 R4020 Q4201 R4204 R4205 C4204 C4202 R4202 R4212 R4206 Q4203 Q4204 Q4202 R4207 R4211 C5513 R5503 R5502 C5503 C5553 I C 1 0 0 1 C1006 C1031 R1017 C1072 R1065 R1071 R1070 R1069 R1058 R1059 R1073 C1073 C1074 C1075 C1076 C1079 R1040 C1041 C1040 C1052 R...

Page 35: ... RECORD COLOR SIGNAL RECORD LUMINANCE SIGNAL PLAYBACK COLOR SIGNAL PLAYBACK LUMINANCE SIGNAL AUDIO SIGNAL PB AUDIO SIGNAL REC TUNER VIDEO SIGNAL CD4001 9061604 CP4003 B2013H02 2P 1 2 H SW ENV DET COMP H AMP_SW C ROTARY Y C_CS Y C_DATA Y C_CLK P CON 5V P CON 5V AUDIO_MUTE H FSC P CON 5V GND FRONT_V_IN TUNER_V FSC 4FSC TO_NORMAL_A FROM_NORMAL_A HF1 HF_COM HF2 GND Y C_CLK Y C_DATA Y C_CS DUMMY_V SYNC...

Page 36: ...K CYL_DRIVE Y C_DATA LDM_CTL Y C_CS TV VCR CAP_F R DUMMY_V SYNC A_OUT_MUTE L V REC_ST H RF_CH_SW C ROTARY AUDIO_MUTE H AUDIO_MUTE H OSD_V V REC_ST H 4G POWER_LED CTL 3G REC_LED CTL 2G T REC_LED H AMP_SW COMP 1G TV VCR_LED ENV DET LDM_CTL H SW Y C_CLK CAP_F R C SYNC Y C_DATA Y C_CS REM_IN REM_IN C ROTARY KEY B KEY A H AMP_SW 1G TV VCR_LED COMP REEL T 2G T REC_LED LED_VCC CONTROL_IN 3G REC_LED 4G PO...

Page 37: ...ACK MEASURED WITH THE DIGITAL TESTER NOTE THE DC VOLTAGE EACH PART WAS OF PRINTING AND SUBJECT TO CHANGE WITHOUT NOTICE NOTE THIS SCHEMATIC DIAGRAM IS THE LATEST AT THE TIME C520 470 6 3V YK C514 1000 6 3V YK C508 47 200V PK C518 10 50V YK C519 470 16V YK C522 220 16V YK C511 0 0033 500V B C502 0 0033 500V B C505 0 0022 250V KY C512_1 0 0047 500V B C534 0 012 B C506 0 018 B C529 0 0082 B C501 0 1 ...

Page 38: ...NG PLAYBACK MEASURED WITH THE DIGITAL TESTER NOTE THE DC VOLTAGE EACH PART WAS OF PRINTING AND SUBJECT TO CHANGE WITHOUT NOTICE NOTE THIS SCHEMATIC DIAGRAM IS THE LATEST AT THE TIME C650 0 1 F R658 560 1 4W R660 560 1 4W R604 6 8K 1 4W R603 3 9K 1 4W R601 3 3K 1 4W R602 2 7K 1 4W R659 560 1 4W R657_1 560 R607 3 3K 1 4W R605 13K 1 4W W840 W824 W864 CD651 SM1382 001 1B 1G TV VCR_LED 2G T REC_LED 3G ...

Page 39: ...212 390 R6004 1K 1 4W R4207 1K R4209 75 R4210 100 1 4W R4206 390 R4211 1K R4204 10K R4205 10K R4202 75 R4201 4701 2W R6006 10K R6005 22K R4216 1K 1 4W W136 R4217 1K 1 4W W135 C4201 470 6 3V YK C4209 10 16V KA C6008 220 6 3V YK Q4204 KTC3875S_Y_RTK MUTE SW Q4203 KTC3875S_Y_RTK MUTE SW W810 TP4201 VIDEO OUT W815 W834 Q4201 KTA1504S_Y_RTK BUFFER L6002 22uH 0305 RECORD COLOR SIGNAL RECORD LUMINANCE SI...

Page 40: ... C5527 10 16V KA L5502 100uH 0305 L5501 100uH 0305 L5504 22uH 0305 AUDIO SIGNAL PB AUDIO SIGNAL REC FSC IIC_CLK IIC_DATA TUNER_A AUDIO_MUTE H P CON 5V FRONT_A_IN R FRONT_A_IN L AUDIO_OUT R AUDIO_OUT L RF_CONV_A OUT TUNER_A P CON 5V V REC_ST H AUDIO_OUT R HIFI_ENV DET HIFI_H SW ST_SELECT AUDIO_OUT L HF2 12V GND RF_CONV_A OUT HF1 HF_COM FSC TO_NORMAL_A FROM_NORMAL_A TO_NORMAL_A FROM_NORMAL_A P CON 5...

Page 41: ...OM OS651 TO VEBA03 PCB270 OPERATION PCB VMB280 SYSCON PCB PCB010 CP601 CD651 GND KEY B KEY A GND KEY B KEY A J4201_2 AUDIO OUT_L REAR OUT JACK FRONT AV JACK 3 2 1 Vout COMMAND TRANSMITTER TM601 B OS651 GND J4205 J4204 J4203 AUDIO R VIDEO FRONT AV JACK AUDIO L FRONT AV JACK HF_COM HF2 L HF1 R NC NC PCB370 BOT PCB Q1008 BOT SENSOR BOT AT 5 2V AUDIO REC AUDIO PB AUDIO_REC AUDIO_PB AE HEAD AE HEAD AE ...

Page 42: ... 2V 5ms div 3 PB 100mV 1ms div 8 POWER ON 1V 500µs div POWER 15 PB 50V 2µs div 5 REC 20V 5µs div 11 POWER ON 1V 50ns div HI FI DEMODULATOR 16 POWER ON 1V 10ms div 4 PB 200mV 500µs div 9 FF REW 500mV 500µs div 12 FF REW 2V 5ms div The following waveforms were measured at the point of the corresponding balloon number in the schematic diagram NOTE H 1 ...

Page 43: ... 1 204 102 202 202 202 202 PCB370 BOT PCB ASS Y 105 107 104 106 109 103 205 203 203 206 108 110 PCB010 SYSCON PCB ASS Y 201 112 111 113 PCB270 OPERATION PCB ASS Y 101 101E 207 101I 101G 101D 101A 101B 101G 101F 101C 207 101H 207 ...

Page 44: ...0 317 309 336 346 321 319 320 AB 316 318 325 347 AB AB AB AA AA AA AA AA AB AB AE AE AE AE 501 AD AC AC 345 AB AB Applying positions AA AB AD and AEfor the grease are displayed for this section Check if the correct grease is applied for each position NOTE PART NO CLASS MARK GREASE G 555G AA MG 33 AB FG 84M AC FL 721 AD 348 505 350 M101 CD1502 CD1501 510 349 G 313Y AE ...

Page 45: ...0 509 308 344 327 343 326 328 AA AA AB AB AB AA AA AD AA AA AA AA AA AA Applying positions AA AB AC and AD for the grease are displayed for this section Check if the correct grease is applied for each position NOTE PART NO CLASS MARK GREASE G 555G AA MG 33 AB FG 84M AC FL 721 AD CD1501 CD1502 CD1503 ...

Page 46: ... 107 702WSA0156 PLATE BOTTOM 108 752WSA0230 SHIELD CASE HEAD AMP 109 85OP700038 HOLDER END SENSOR 110 753WUAA006 SPRING EARTH HEAD AMP 111 752WSA0290 SHIELD COMPO 112 752WSAA053 SHIELD COMPO 113 723000C229 LABEL BOOMERANGIT 201 8110230804 SCREW TAP TITE P BIND 3x8 202 8109230802 SCREW TAP TITE B 3x8 203 8109230704 SCREW TAP TITE B R BIND 3x7 204 8109130B94 SCREW TAP TITE B R PAN 3x29 205 810722660...

Page 47: ...ION ARM ASS Y 2 H5002 1543Q02014 HEAD FULL ERASE VTR 1X2ERS11 154 315 85OA400231 INCLINED BASE S UNIT M101 1596P98001 MOTOR LOADING MXN13FB12K3 or 316 85OP800367 SPRING LOCKER 1596S98001 MOTOR LOADING MDB2B66 317 85OP900736 CASS HOLDER M2001 1510S98037 CAPSTAN DD UNIT F2QVB31 318 85OP900748 CASS SIDE L M2003 1589S11017 MICRO MOTOR I2OAL05 or 319 85OP900749 CASS SIDE R 1589S11015 MICRO MOTOR I2OAL0...

Page 48: ...024HT03564 CORE BEADS W4BRH3 5X6X1 0 D666 0021E2Q140 LED LTL 1CHEE 002A B502 024HT03564 CORE BEADS W4BRH3 5X6X1 0 D1001 0010E00330 INFRARED LED LTE 3271T 012A O B503 024HT03553 CORE BEADS W5RH3 5X5X1 0 D1002 D1VT001330 DIODE SILICON 1SS133T 77 CD501 120R419908 CORD AC BUSH 0R419908 D4202 D97U06R81B DIODE ZENER MTZJ6 8B T 77 CD651 06CU230901 CORD JUMPER SM1382 001 1B D5501 D1VT001330 DIODE SILICON ...

Page 49: ...M4F9 07D O R NO SPEC NO K344008 ...

Reviews: