background image

6

OPTIONAL CONNECTIONS

If you are using special CD+G (Graphics) discs in this portable Karaoke system, you must connect this unit
to a television set in order to see the On Screen Graphics that are recorded on CD+G Karaoke discs. 
The video cable has yellow RCA type plugs on each end. Please note that your TV set must have an RCA
type Video Input Jack  in order to view the CD+G lyrics on your TV screen. You cannot connect this portable
Karaoke system to your TV’s coaxial antenna terminal.
Also note that On Screen lyrics are only available on special Karaoke compact discs that bear
the CD+G mark.
Many newer TV sets have a set of Video and Stereo Audio jacks on the front panel for quick and
easy connections without having to turn the TV set to gain access to the jacks on the back panel.
If your TV set has such front panel A/V jacks, we suggest that you use those jacks to connect
your portable Karaoke. 
After connecting the Video Out jack on this portable Karaoke to the Video In jack on your TV with the
included video cable, you have the following  three choices:
1. Listen to the sound from the built-in speakers in this portable Karaoke system. In this case, no external

audio connections are required.

2. If your TV has stereo audio input jacks, you can connect the Audio Out jacks on the back of this unit to

the Audio In jacks  on your TV. The stereo audio connection cable is included. In this case, the lyrics from
the CD+G disc will appear on your TV screen and the sound from the disc will be heard from your TV
speakers. 
Note: If you have a mono TV with only one Audio In jack, you may have to purchase a “Y” adapter (stereo to
mono) at your local electronics accessories store in order to combine the Left and Right stereo channels
from this portable Karaoke to a single mono channel for connection to your mono TV.
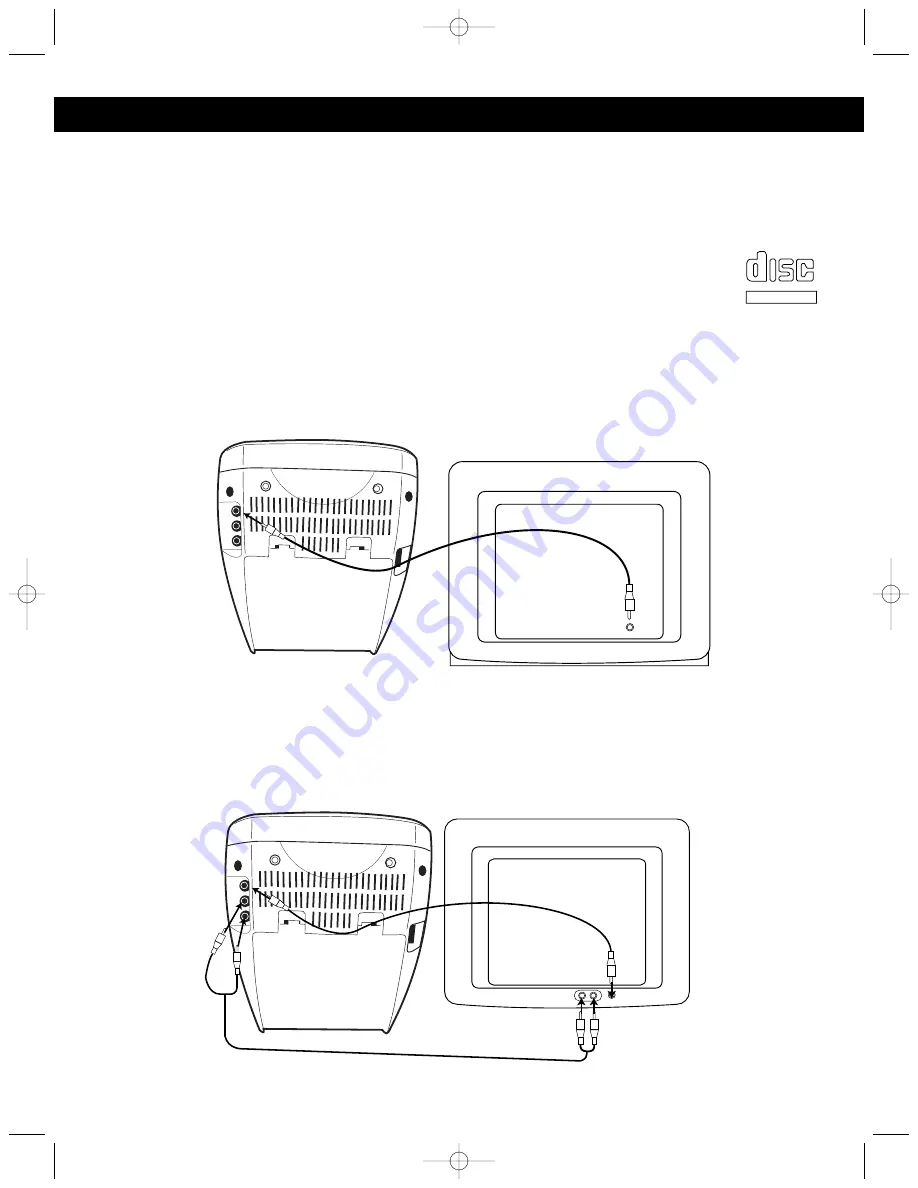
From 
Video

Out

To
Video
In

TELEVISION

From 
Video

Out

From 

Audio Out

To
Video
In

FRONT OF
TELEVISION

To 

Audio In

LYRICS WILL APPEAR
ON THE SCREEN

COMPACT

DIGITAL AUDIO

GRAPHICS

MKS2112.OM.QXD  5/26/03  10:23 AM  Page 6

Summary of Contents for MKS2112

Page 1: ...Before operating this product please read these instructions completely User s Guide Portable CD CD G Karaoke System MKS2112 MKS2112 OM QXD 5 26 03 10 23 AM Page 18...

Page 2: ...s equipment may cause harmful interference unless the modifications are expressly approved in the instruction manual The user could lose the authority to operate this equipment if an unauthorized chan...

Page 3: ...p to prevent hearing damage or loss in the future After all we want you listening for a lifetime We Want You Listening For A Lifetime Used wisely your new sound equipment will provide a lifetime of fu...

Page 4: ...nnect the antenna or cable system This will prevent damage to the product due to lightning and power line surges 14 POWER LINES An outside antenna system should not be located in the vicinity of overh...

Page 5: ...cator 9 Skip Search Button 10 REPEAT Button 11 Play Pause Button 12 BALANCE Control 13 VOCAL Control 14 MIC Jacks 15 CD Door OPEN Tab 16 Right Speaker 17 MIC VOLUME Control 18 REPEAT Indicator 19 PROG...

Page 6: ...y indicated inside the compartment Replace the Battery Compartment cover AC Plug AC Outlet BATTERY PRECAUTIONS Follow these precautions when using batteries in this device 1 Use only the size and type...

Page 7: ...ecting the Video Out jack on this portable Karaoke to the Video In jack on your TV with the included video cable you have the following three choices 1 Listen to the sound from the built in speakers i...

Page 8: ...eo system to hear the sound through your home stereo speakers Follow the instructions for your home stereo system to select the device connected to the external jacks as the audio source From Audio Ou...

Page 9: ...de the ON OFF switch located on the side of the microphone to the ON position To turn the microphone off slide the ON OFF switch to the OFF position MIC ON OFF SWITCH NORMAL CD PLAYBACK Rotate the BAL...

Page 10: ...controls as desired Playback will continue until all the tracks on the disc have been played 2 1 6 To stop playback before the disc ends press the Stop button The disc will stop and the display will...

Page 11: ...M A SPECIFIC TRACK CD ONLY During playback depress and hold either the Skip Search or button to move the player forward or backward within a track to locate a specific musical passage The player will...

Page 12: ...y Pause button to repeat all tracks 2 1 2 REPEAT PLAYBACK Press the POWER button to the ON position to turn the unit on the POWER indicator will light 1 Press the PROGRAM button 01 will appear in the...

Page 13: ...l continue until all the programmed tracks have been played If you attempt to program more than 30 tracks FU will appear in the display 2 1 7 It is also possible to use the Program and Repeat function...

Page 14: ...the music and vocals NOTE Make sure the BALANCE control is set to the center position so you can hear both the vocal and music tracks at an equal level MICROPHONE FEEDBACK Feedback is a howling or sc...

Page 15: ...it is designed to play only compact discs bearing the identification logo as shown here Other discs may not conform to the CD standard and may not play properly Compact Discs should be stored in their...

Page 16: ...al only the main vocal s control is off to be included are to be reduced Feedback is heard Microphone is too close to unit Move microphone away from when singing or MIC Volume is too high unit or decr...

Page 17: ...eaker 3W 8 Ohms Output Power 1 5W 10 THD CD SECTION Disc Diameter 4 72 120mm 3 15 80mm Single CD Optical Source Semiconductor Laser Specifications are subject to change without notice SPECIFICATIONS M...

Page 18: ...Memcorp Inc Weston FL Printed in Hong Kong Visit our website at www memorexelectronics com MKS2112 OM QXD 5 26 03 10 23 AM Page 17...

Reviews: