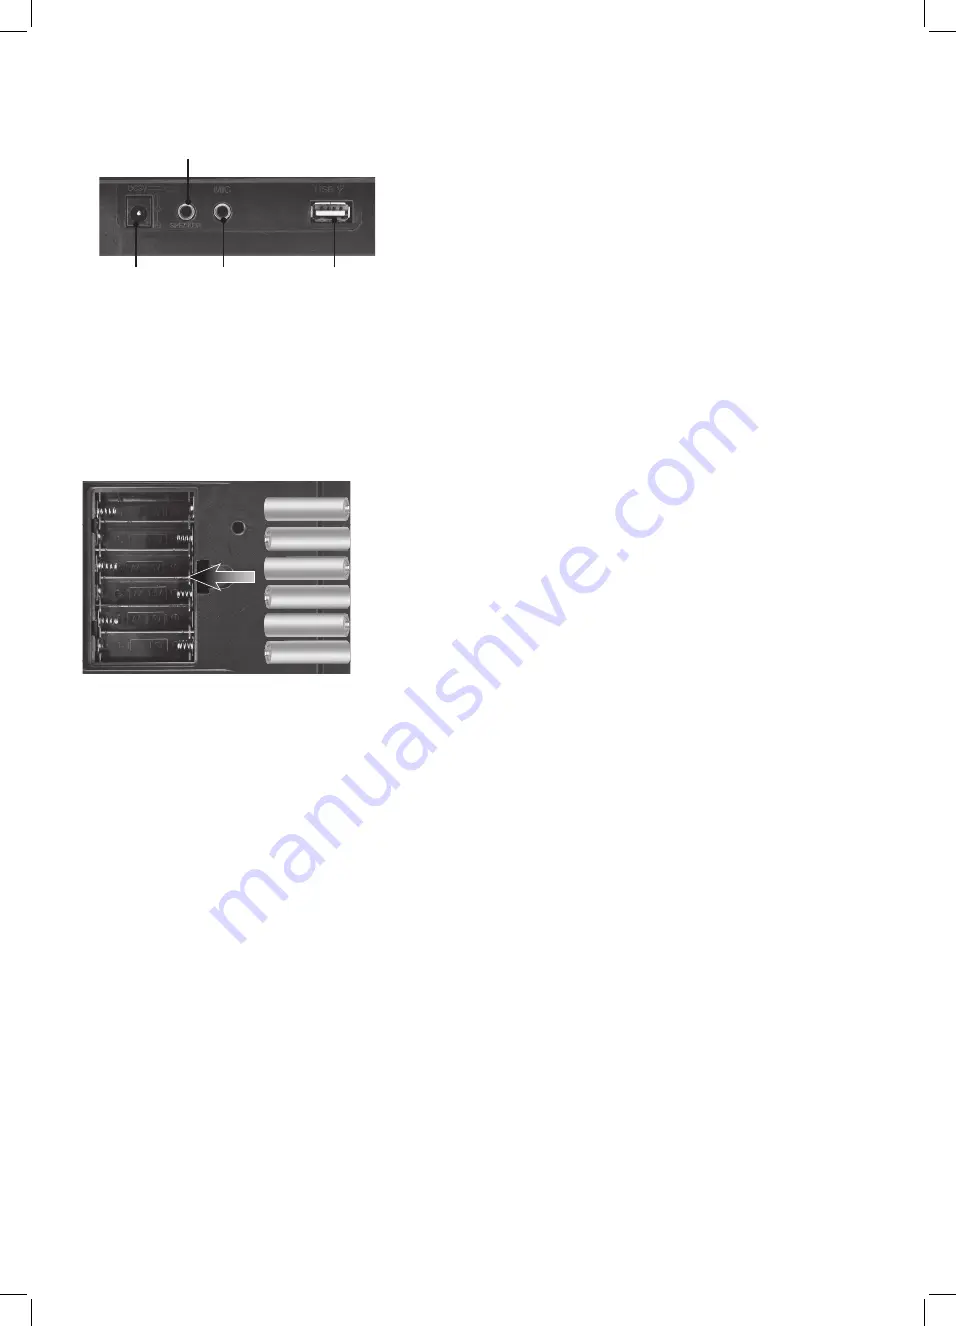
Powering Your Keyboard
Plug the AC/DC power adapter (included) into the DC Power Input of the
keyboard and a standard power outlet.
Using Battery Power
Requires 6 AA batteries (not included).
Using The Functions & Controls
Playing Demo Songs-
Press the
Demo
button to access demo songs list (8
total songs). The keyboard will play a demo song and the display will show
"000." To change to a different demo song, press the
Demo
repeatedly
button again to cycle through all available demo songs. Use the
Tempo +/-
buttons to increase or decrease the speed of the selected demo song. To
turn off demo songs press the
Power or Play/Pause
button.
Voice-
Press the
voice
button to access the instruments list (100 total). The
display will show "000." This is the default instrument. Use the number key
pad to enter the instrument number you wish to use. "000-099" Ex: to select
number 7, input "07" onto the number key pad. Use the
Tempo +/-
buttons
to increase or decrease the speed of the selected song. You can also use the
+/- button on the number key pad to cycle through the voice list one by one.
Sound Effects Control-
Press the Sustain button to turn sustain effect ON/
OFF. Press the Vibrato button to turn ON/OFF vibrato effect.
Rhythm-
Press the
Rhythm
button to access the rhythm list (100 total). The
display will show "000." This is the default rhythm. Use the number key pad
to enter the rhythm number you wish to use. "000-099" Ex: to select number
7, input "07" onto the number key pad. You can also use the +/- button on
the number key pad to cycle through the rhythm list one-by-one. Use the
Tempo +/-
buttons to increase or decrease the speed of the selected rhythm
song.
Synchronization Function-
Press the
Synchronous
button while in rhythm
mode to synch the rhythm to start when one of the keyboard keys are
pressed.
Single-Finger Chord-
When a rhythm is selected, press the
Single-Finger
button,
the display will show "001." This will allow you to produce chords
using one of the
Accompaniment Keys.
Press
Single-Finge
r button again
to turn off single finger chord mode.
DC Power Input
Microphone
USB
Headphone Jack
Rear
Multi-Finger Chord-
When a rhythm is selected, press the Multi-Finger
button, the display will show "002." This will allow you to produce multi-finger
chords using the
Accompaniment Keys
.
Press
Multi-Finge
r button again to
turn off multi-finger chord mode.
USB Music Functions:
This keyboard can play MP3 music files from your
USB thumb drive. Press the
Play/Pause
button to play the last song listened
to on the USB. Press the
Skip/Prev/Volume
buttons to change tracks and
turn volume up and down. Press the
Play/Pause
button to stop playing the
music.
Percussion-
This keyboard has 5 different percussion instruments. Press the
Percussion
button to create a melody using the percussion buttons. Press
the
Play/Pause
button to playback the melody you have created.
Record-
Press the
Record
button to record what you play on the keyboard.
When the keyboard's memory is full the display will show "FU" and the
recording will be stopped. Press the
Play
button to playback the recording.
Press the
Record
button again to turn off recording mode.
Teaching Function-
Press the teaching button, the display will show "ON."
This will allow the user to listen to a demo melody, and when the user begins
playing the melody will turn off. When the user stops playing the keyboard for
3 or more seconds the melody will automatically begin to play again, giving
the user the ability to study the melody before playing again.
Program-
Press the program button, the display will show "PRG." create a
melody using any of the percussion buttons. Once you reach 33 beats the
display will show "FU" indicating the program process has finished. Once the
program process is finished, pressing the
Play
button will play the melody
you created continuously on a loop. To stop the loop press the
Program
button again or press the ON/OFF button.


