background image

8

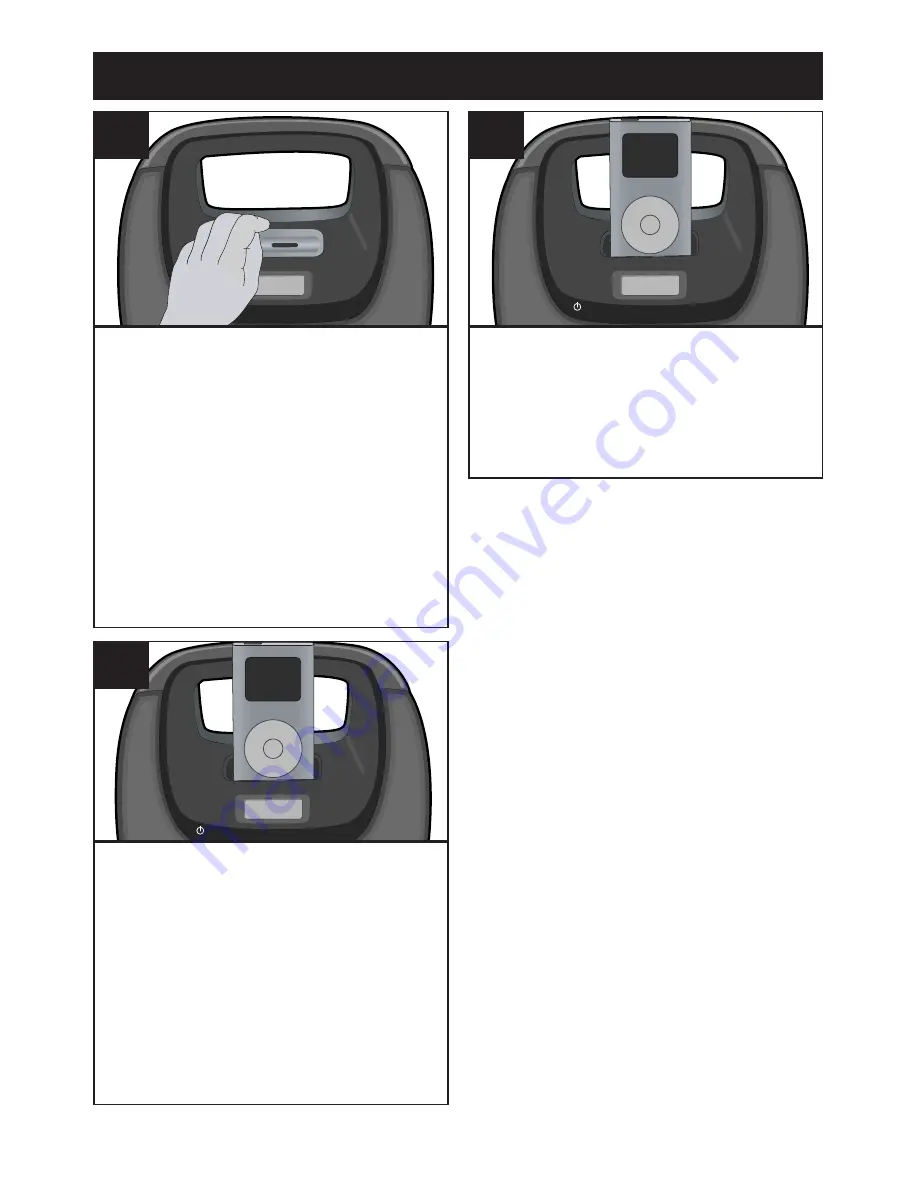
INSERTING AN iPod

Locate the correct iPod

®

Universal Dock to use as shown

on pages 13-14. Insert the dock

(A) into the iPod compartment (B)

(as shown), making sure the tabs

are facing front, and slip the tabs

into place. Press the rear side of

the Universal Dock until it is

positioned inside the iPod

compartment.

SOURCE

PRESET

EQ

+

M

L

(A)

(B)

1

The iPod will charge as long as

this unit is connected with the

AC adapter.

Please see the next page for

instructions on using an iPod with

this unit.

SOURCE

PRESET

EQ

+

M

L

3

Slide the iPod (A) into the dock

(B) (as shown). Gently push

down so the connector on the

iPod slides onto the connector on

this unit.

SOURCE

PRESET

EQ

+

M

L

(A)

(B)

2

NOTES:

• If this unit is turned on and in

FM/LINE IN mode, once the iPod

is connected, this unit will change

to iPod mode automatically.

Then, if you disconnect the iPod,

this unit will revert back to

FM/LINE IN mode.

• When the iPod is connected to

this unit, it will be in the

Pause mode.

• To remove the Universal Dock,

insert your finger (or other object)

into the gap in the Universal Dock,

then gently pull the Universal

Dock out to remove it.

CHARGING:

When the iPod is

inserted into the dock, whether

this unit is on or off, the iPod’s

battery will charge until it is full.

• You will not be able to select iPod

or LINE IN mode, if there is no

device or iPod connected to the

LINE IN jack or the iPod dock.

Summary of Contents for MIX3

Page 1: ...an equilateral triangle is intended to alert the user to the presence of important operating and maintenance servicing instructions in the literature accompanying the appliance FCC WARNING This equip...

Page 2: ...which can be determined by turning the equipment off and on you are encouraged to try to correct the interference by one or more of the following measures Reorient or relocate the receiving antenna In...

Page 3: ...o this now will help to prevent hearing damage or loss in the future After all we want you listening for a lifetime We Want You Listening For A Lifetime Used wisely your new sound equipment will provi...

Page 4: ...utton 6 Tune Skip Search M Button 7 Tune Skip Search L Button 8 Speaker 9 SOURCE Button 10 Battery Compartment Bottom of unit BATTERY COVER PART NO 3051 004010 00000 11 VOLUME Up Button 12 EQ Button 1...

Page 5: ...Button 10 Belt Clip REMOTE NOTES The remote buttons function in the same way as the buttons on the main unit To turn on the unit press the Power PLAY PAUSE p button To turn the unit off press and hold...

Page 6: ...6V jack located on the side of the stand in order for the unit to operate on battery power If the battery is low the battery low indicator will blink in the display IMPORTANT See BATTERY PRECAUTIONS o...

Page 7: ...nd then sliding the compartment out 2 Install a CR2025 battery by popping it in through the back of the compartment paying attention to the polarity diagram in the compartment positive side up 3 Repla...

Page 8: ...nnector on the iPod slides onto the connector on this unit SOURCE PRESET EQ M L A B 2 NOTES If this unit is turned on and in FM LINE IN mode once the iPod is connected this unit will change to iPod mo...

Page 9: ...THIS UNIT To play pause the iPod Press the Power PLAY PAUSE p button on the remote to start playback on your iPod Press again to pause playback and press yet again to resume playback 3 To skip forward...

Page 10: ...the unit off and then on again the volume level will be set to the level you selected prior to turning the unit off For private listening plug in headphones into the Headphones jack on the rear of th...

Page 11: ...h m 1 or l 2 button to manually advance the frequency in the display up or down until the desired frequency appears For auto tuning press and hold the Tune Skip Search m 1 or l 2 button until the freq...

Page 12: ...be saved into memory Repeat to program up to 10 Presets as desired SOURCE PRESET EQ M L 3 2 1 2 SETTING THE RADIO PRESETS up to 10 Follow Steps 1 2 on the previous page to turn the unit on and select...

Page 13: ...n on the next page to match with your iPod Insert the corresponding Universal Dock and your iPod into the unit as described on page 8 iPod Type Memory Univ Dock No 20GB U2 Special Edition 20GB 40GB Fo...

Page 14: ...Third Generation iPod nano and the iPod touch please use the Universal Dock included with your iPod The 5 holders provided with this unit are Universal Docks IMPORTANT The Universal Dock No is engrave...

Page 15: ...r Press the Power button FM mode is not then the SOURCE button to selected select FM Volume is Increase volume set to minimum FM poor sound Station is not tuned Retune the FM properly broadcast statio...

Page 16: ...AL SET UP OR OPERATING ASSISTANCE PLEASE VISIT OUR WEBSITE AT WWW MEMOREXELECTRONICS COM OR CONTACT CUSTOMER SERVICE For customers calling within US call 1 800 919 3647 For customers calling within Me...

Reviews: