background image

- 40 -

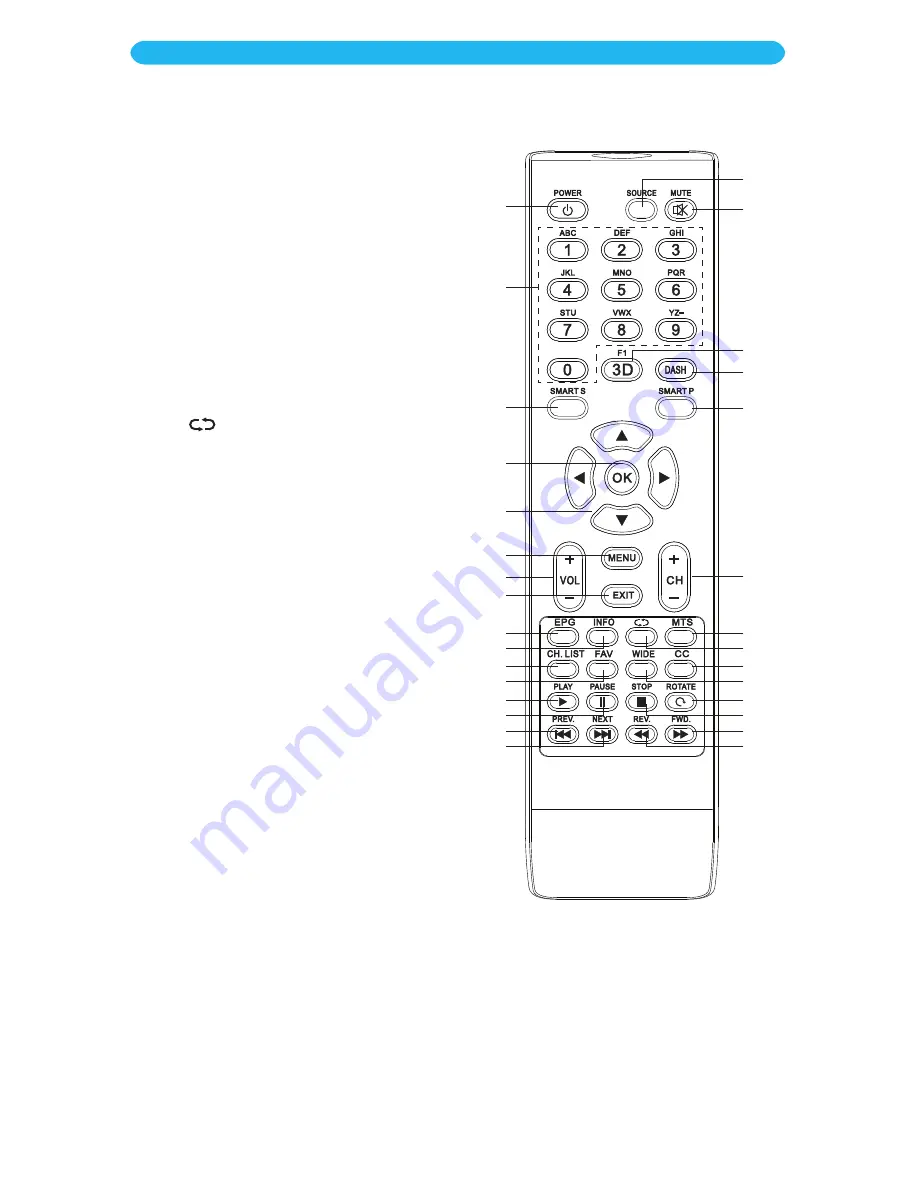
SMART Sound 

Button 

w

: Press to select 

the desired Sound mode.

SMART Picture 

Button 

bk

: Press to select 

the desired Picture mode.

EPG 

Button 

X

: When viewing a digital 

source, press to display the Electronic 
Program Guide.

INFO 

Button 

at

: Display some information 

of current program in TV mode. Will show 
info about the selected device when in other 
modes.

Return 


Button 

bn

: Press to return to the 

previous selected channel.

MTS 

Button 

bm

: When a stereo signal is being 

broadcast, press this button to select mono 
or stereo sound.
When an SAP program is received, press this 
button to select mono or SAP
When stereo and SAP broadcast is received, 
press this button to select mono, stereo or 
SAP.
Press this button to show the list of audio 
languages available for the current channel in 
ATSC broadcasts.

CH. (Channel) LIST 

Button 

ak

: Press to 

display the channel list mode.

FAV (Favorite) 

Button 

al

: Press to select 

access your Favorite Channel List.

WIDE 

Button 

bp

: Press to adjust the picture 

aspect ratio.

CC 

Button 

bo

: Press to turn Closed Captions 

On or Off.

The lower eight buttons are used when a 
USB drive in inserted and described in detail 
on page 42.

1

2

3

9

10

11

12

13

14

15

16

23

24

25

26

27

28

29

30

22

21

20

19

18

17

7

4

5

6

8

OPERATION

Main Operation

Summary of Contents for CrystalVision MLT5558

Page 1: ...tra 55 4K UHDTV Widescreen LED The Entertainer Owner s Manual Please read these instructions completely before operating this product memorex ce com Model MLT5558 PLEASE RECYCLE Facilities may not exi...

Page 2: ...etup Wizard 37 Main Operation 39 USB Media Operation 41 UPGRADING THE FIRMWARE 37 TROUBLESHOOTING 45 SPECIFICATIONS 47 TABLE OF CONTENTS Congratulations on your purchase of the Memorex MLT5558 Ultra H...

Page 3: ...limits for a Class B digital device pursuant to part 15 of the FCC Rules These limits are designed to provide reasonable protection against harmful interference in a residential installation This equi...

Page 4: ...for long periods of time unplug it from the wall outlet and disconnect the antenna or cable system This will prevent damage to the product due to lightning and power line surges 14 POWER LINES An out...

Page 5: ...nual Remote Batteries Stand Kit WHAT IS INCLUDED CrystalVision Ultra 55 4K UHDTV Widescreen LED The Entertainer Owner s Manual Please read these instructions completely before operating this product m...

Page 6: ...SOURCE Button 3 Channel Up Down Buttons 4 Volume Up Down Buttons 5 MENU Button 6 Power Standby Button 7 Main Power Switch 1 Power Indicator and Remote Sensor 1 7 2 3 4 5 6 LOCATION OF CONTROLS Front...

Page 7: ...ack 5 HDMI 1 Jack 6 Component AV Audio In Left and Right Jacks 7 Composite AV In Jacks use Y Video jack when connected with AV 8 VGA Jack 9 PC Audio In Jack 10 TV Coaxial Jack 11 Audio Out Jack 12 HDM...

Page 8: ...Button 15 Previous 9 Button 16 Next Button 17 SOURCE button 18 MUTE Button 19 Freeze F1 Button 3D is not applicable to this set 20 DASH Button 21 SMART Picture Button 22 Channel Up Down Buttons 23 MT...

Page 9: ...follow the correct polarity when installing the batteries as indicated in the battery compartment A reversed battery may cause damage to the device 4 Do not mix different types of batteries together...

Page 10: ...ll over if a placed on an uneven unstable or non level surface or b pushed pulled or improperly moved Also make sure to give proper clearance as shown in the image 1 Place the display screen side down...

Page 11: ...nough to an AC outlet Also make sure that nothing obstructs the view 4 Locate the studs as you want to make sure at the very least one stud is used to attach the mount 5 Attach the mounting rails of t...

Page 12: ...7 Press the SOURCE button and then select TV using the Navigation q p buttons Confirm by pressing the OK button Antenna Box Terminal Coaxial 75 NOTES Not all broadcasts are in High Definition HD Pleas...

Page 13: ...h utilizes HDMI 2 0 3 Turn on the TV and external unit 4 Press the SOURCE button and then select the respective HDMI jack 1 2 or 3 using the Navigation q p buttons Confirm by pressing the OK button DV...

Page 14: ...d white plugs of an audio cable not included from the Audio Out jacks on the external unit to the red and white Audio In jacks on the rear of the TV 4 Turn on the TV and external unit 5 Press the SOUR...

Page 15: ...rear of the TV 3 Connect the yellow video plug from the Video Out jack on the external unit to the Green Video In jack on the rear of the TV 4 Turn on the TV and external unit 5 Press the SOURCE butto...

Page 16: ...the TV and computer 4 Press the SOURCE button and then select PC using the Navigation q p buttons Confirm by pressing the OK button RGB OUT PC AUDIO OUT Computer Not Included NOTES For the best result...

Page 17: ...n SPDIF cable not included from the SPDIF Out jack on the rear of the TV to the SPDIF In jack on the external digital audio unit 3 Turn on the TV and digital audio unit 4 Make sure to set the Digital...

Page 18: ...4 Press the SOURCE button and then select HDMI 2 using the Navigation q p buttons Confirm by pressing the OK button Mobile Device or other Device Compatible with MHL Function Not Included NOTES If yo...

Page 19: ...4 Press the SOURCE button and then select MEDIA using the Navigation q p buttons Confirm by pressing the OK button For private listening connect headphones with a standard 3 5 mm plug into the Earpho...

Page 20: ...mode PC Media Picture Mode Color Temperature Advanced Settings Brightness Contrast Color Tint Sharpness Picture Time Setup Lock Channel Soft Normal 40 45 50 50 50 Sound Select Move Exit MENU These op...

Page 21: ...nected selected Video MFC Level Set the desired MFC Level Off Low Medium High Set to a higher setting when watching your favorite sporting event or playing game consoles for better motion compensation...

Page 22: ...ndard Stereo Raw Off Off English 50 50 0 Select Move Exit MENU Picture Time Setup Lock Channel Sound Sleep Timer Time Zone Daylight Saving Time Time Format Auto Clock Clock Off Pacific Off 12 hour On...

Page 23: ...l set by the viewer regardless of the channel or program If you find yourself constantly changing the volume i e turning it down for gunshots and then up for dialogue turning volume up for programming...

Page 24: ...DTV This option is only available when Auto Clock is set to Off 1 Press the MENU button to bring up the On Screen menu 2 Press the t u buttons to select Time 3 Press the q button to select a setting i...

Page 25: ...yes and then press the OK button again to restore all the options to their default settings SETUP WIZARD TV Mode only Press the u button to enter the setting This is the same Wizard that appears when...

Page 26: ...ast OPTION Select to set the various Closed Captioning appearance such as fonts colors opacity etc This option is only available when the set is broadcasting Digital signals 1 Access the Setup menu as...

Page 27: ...lized name of the device will appear instead of just HDMI1 etc 1 Access the Setup menu as described on the page 25 2 Press the q button to select Input Label and then press the OK button to enter 3 Pr...

Page 28: ...is only available while in the PC source mode 1 Access the Setup menu as described on the page 25 2 Press the q button to select PC Settings and then press the OK button to enter 3 Press the q button...

Page 29: ...n the page 25 2 Press the q button to select Other Settings and then press the OK button to enter 3 Press the q button to select a setting i e Blue Screen etc 4 Press the t u buttons to adjust the set...

Page 30: ...elect Lock 3 Press the q button to select Enter Password 4 Press the Child lock code you previously set using the Number buttons If you have never entered a password use the default password of 0000 6...

Page 31: ...Settings These options are only available when current stream has downloadable rating data 1 Access the Lock menu as described on the previous page 2 Press the q button to select a setting i e System...

Page 32: ...SB Jack 1 Access the Lock menu as described on the pages 30 and 31 2 Press the q button to select Input Block and then press the OK button to enter 3 Press the q button to select a setting i e TV etc...

Page 33: ...und TV MPAA Off 1 Access the Lock menu as described on the pages 30 and 31 2 Press the q button to select US Rating and then press the OK button to enter 3 Press the q button to select TV and then pre...

Page 34: ...ct a desired Canadian English rating Off C C8 G PG 14 18 then press the OK button 5 Press the MENU button to return to the previous screen 6 Press the q button to select Canadian French and then press...

Page 35: ...ton to exit the menus or press the MENU button to return to the previous menu This setting is only available when current stream has downloadable rating data which is used with providers like DirecTV...

Page 36: ...from the menu CHANNEL LABEL Allows you to change the channel labeling and name them as desired Select Move Exit MENU Select Move Exit MENU Picture Time Setup Lock Channel Sound Air Cable Auto Scan Fav...

Page 37: ...rst time the setup menu will appear Set the options as follows 2 Press the t u buttons to select the desired Menu Language 3 Press the q button to select Go to next step and then press the OK button 4...

Page 38: ...using an antenna or Cable if using cable 12Press the q button to select Go to next step and then press the OK button to enter 13The TV will then go through the available channels and save the ones th...

Page 39: ...ou can also select a channel directly using the DASH bt 0 9 v buttons followed by the OK button x FUNCTION BUTTON OPERATION MUTE Button ar Press to mute the sound Press again to restore F1 3D Button a...

Page 40: ...When an SAP program is received press this button to select mono or SAP When stereo and SAP broadcast is received press this button to select mono stereo or SAP Press this button to show the list of a...

Page 41: ...buttons USB Notes This unit can play audio or picture files Media formats have limitations so some files will not play properly or give an error Do not unplug the USB device while playing or else it w...

Page 42: ...Press to stop the slide show or music ROTATE Button bq Press to rotate the image on the screen if file can be rotated The on screen rotate allows the picture to rotate clockwise or counter clockwise P...

Page 43: ...view the playlist INFO Photo Mode only Press to view the information on the selected playing photo file ROTATE Photo Mode only Press to rotate the photo Clockwise or Counter Clockwise 90o ZOOM IN Pho...

Page 44: ...off Standby mode connect the USB device in to the USB jack 3 Press the Power button to turn on the unit after a few seconds the Power indicator will blink slowly indicating the unit is updating the fi...

Page 45: ...Mute button to un mute TV Signal is weak Closed Captioning is not turned on see pages 25 26 Remote is not aimed at sensor bottom right of TV Distance is too far or too much light in the room There is...

Page 46: ...om a digital source Standard analog TV will always be noticeable inferior to HD because your TV has video that is many times better than old TV s and so you can see interference and deficiencies you d...

Page 47: ...8W 8W Weight including base Approx 42 lbs Operating Temperature 5 C to 40 C Supported Systems ATV NTSC DTV ATSC AV Audio Input 20K Ohms 500mV RMS HDMI Video Input 480i 480p 576i 576p 720p 1080i 1080p...

Page 48: ...l number has been altered or removed from the Product This Warranty is valid only in the territory and only applies to products purchased and serviced in the territory NO WARRANTIES WHETHER EXPRESS OR...

Reviews: