Memoq MR-210 Owner'S Manual Download Page 12

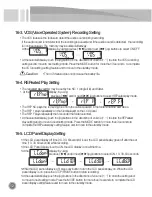
16-3. VOS(Voice Operated System) Recording Setting

12

• The VOS feature is the feature to detect the audio sound during recording.
  If the audio sound is not detected, the recording is paused and if the audio sound is detected,   the recording 
  is continued again. The memory may be utilized effectively.
  At the                             display, by using previous (◀◀) and/or next (▶▶) jog buttons to select ON/OFF.

• At the selected display, push the jog buttons in the directions of volume (+, -) to store the VOS recording 
  setting and to move to next setting mode. Press the MODE button for more than 3 seconds   to complete 
  the VOS recording setting feature and to move to the standby mode.

• The VOS feature does not increase the battery life.

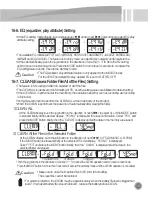
16-4. REPeated Play Setting

• The repeated play setting may be set by fi le NO, 1 (single fi le) and folder.
•  At the                             display, by using 
                                            previous (◀◀) and/or next (▶▶) jog buttons to select REPeated play mode.

• The REP NO plays the remaining fi les from the current position in the folder one time and stops.
• The REP 1 plays repeatedly on the fi le displayed on the LCD panel.
• The REP F plays repeatedly the fi les under the folder selected.
• At the selected display, push the jog buttons in the directions of volume (+, -) to store the REPeated
  play setting and to move to next setting mode. Press the MODE button for more than 3 seconds to
  complete the REPeated play setting feature and to move to the standby mode.

16-5. LCD Panel Display Setting

• If the LCD panel display off time (10, 30, 60seconds) is set, the LCD panel display goes off after the set
  time (10, 30, 60seconds) while recording.
• If the LCD Panel Display is set to ON, the LCD display is on all the time.
• At the                              display, by using
                                         previous (◀◀) and/or next (▶▶) jog buttons to select ON, 10, 30, 60 seconds.

• While the LCD panel display is off, press any button to turn the LCD panel display on. While the LCD
  panel display is on, press the STOP/ERASE button to stop recording.
• At the selected display, push the jog buttons in the directions of volume (+, -) to store the setting and 
  to move to next setting mode. Press the MODE button for more than 3 seconds to complete the LCD
  panel display setting feature and to move to the standby mode.

Caution

Summary of Contents for MR-210

Page 1: ...owner s manual before use and use it after understanding all the features Please make sure to write down the date and the place of purchase on the certificate of warranty attached Free of charge warr...

Page 2: ...CHECK 8 12 REMAININGRECORDINGTIMECHECK 8 13 FILEPREVIEWFEATURE 9 14 RECORDEDFILEERASE 9 15 FILEUPLOAD DOWNLOAD 9 16 MODESETTING 10 16 1 MODE RECORDINGMODE HQ SP LP SETTING 11 16 2 RECORDINGFOLDERSETTI...

Page 3: ...failure Pleasekeepawayfromthehumidplacesortheoilyplaces Otherwise itmaycausefireorfailure MAINBODYCAUTIONSANDWARNINGS Iftheproductisimpactedordropped itmaycausefailure Pleasedonotcleanthesurfaceofthep...

Page 4: ...Microphonejack Earphone USBjack Built inmicrophone LCDpanel Jogbuttons M 2 NAMESOFPARTS 4 Jogbuttonsdetailedview REC PAUSE button PLAY PAUSE button STOP ERASE button Speaker Battery cover...

Page 5: ...le Discharged alot Thebatterydurationforrecordingundertheearphonedisconnectedcondition BatteryDuration Recording mode Audio quality Battery duration PCM About 21 hours HQ About 19 hours SP About 20 ho...

Page 6: ...UseofPCUSBPORT Connecttheearphone USBjackwithUSBDCPowerSupplyADAPTERport Afterawhile theLCDpanelturnsinto IfthePLAY PAUSEbuttonispressedformorethan3seconds itenterstheoperationmodeand inthestandby sto...

Page 7: ...E PCM youcanplaybacktherecordedfilesof PCM folder andyoucanrecordto PCM folderbyPCMformat 8 RECORDING WhenyoupressRECbuttonlong morethan3seconds inpower off poweristurnedonandrecording startsbyMP3form...

Page 8: ...thdependingonthefiles PCM Format Standby Screen 10 AUDIOVOLUMECONTROL Pushthejogbuttonsbrieflyinthedirectionsofeitherhighervolume orlowervolume thentheLCD paneldisplaysaudiovolumelevelandtheaudiovolum...

Page 9: ...secommandiscancelled Erase operation display Forfurtherinformationforeraseofallofthefilesorfolderdeletion refertoMODEsetting 15 FILEUPLOAD DOWNLOAD Connecttheearphonejackofthemainbodyoftheproducttothe...

Page 10: ...ectionsofvolume and orvolume brieflytoselectthemodetobeset PresstheMODEbuttonformorethan3secondstostorethemodesettingsandtoexittothestandby mode LCD panel display by mode direction direction direction...

Page 11: ...nthefolderselected Iftherecordedcontentsaremanagedbyseparatedfolders itisconvenient Atthe display byusingprevious and ornext jogbuttonstoselectthefolder Attheselecteddisplay pushthejogbuttonsinthedire...

Page 12: ...nthefolderonetimeandstops TheREP1playsrepeatedlyonthefiledisplayedontheLCDpanel TheREPFplaysrepeatedlythefilesunderthefolderselected Attheselecteddisplay pushthejogbuttonsinthedirectionsofvolume tosto...

Page 13: ...layattribute featureisonlyappliedtotheMUSICfileplay FortheVOICE recorded fileplay appliedEQissettoFLAT EQOFF AttheCLEANdisplay pushthejogbuttoninthedirectionofnext toselectALL IftheMODEbutton ispresse...

Page 14: ...ostartrecording PresstheSTOP ERASEbuttonbrieflytostopandtostore 17 1 RecordingTelephonewiththeEar Microphone OptionalProduct Plugtheear microphone whichamicrophoneisbuiltin inaearandconnecttheothersid...

Page 15: ...15 MEMO...

Page 16: ...SP About 72 hours About 144hours About 288 hours LP About 288 hours About 576 hours About 1152 hours Battery life time PCM About 21 hours HQ About 19 hours SP About 20 hours LP About 20 hours Play Ab...

Reviews: