10
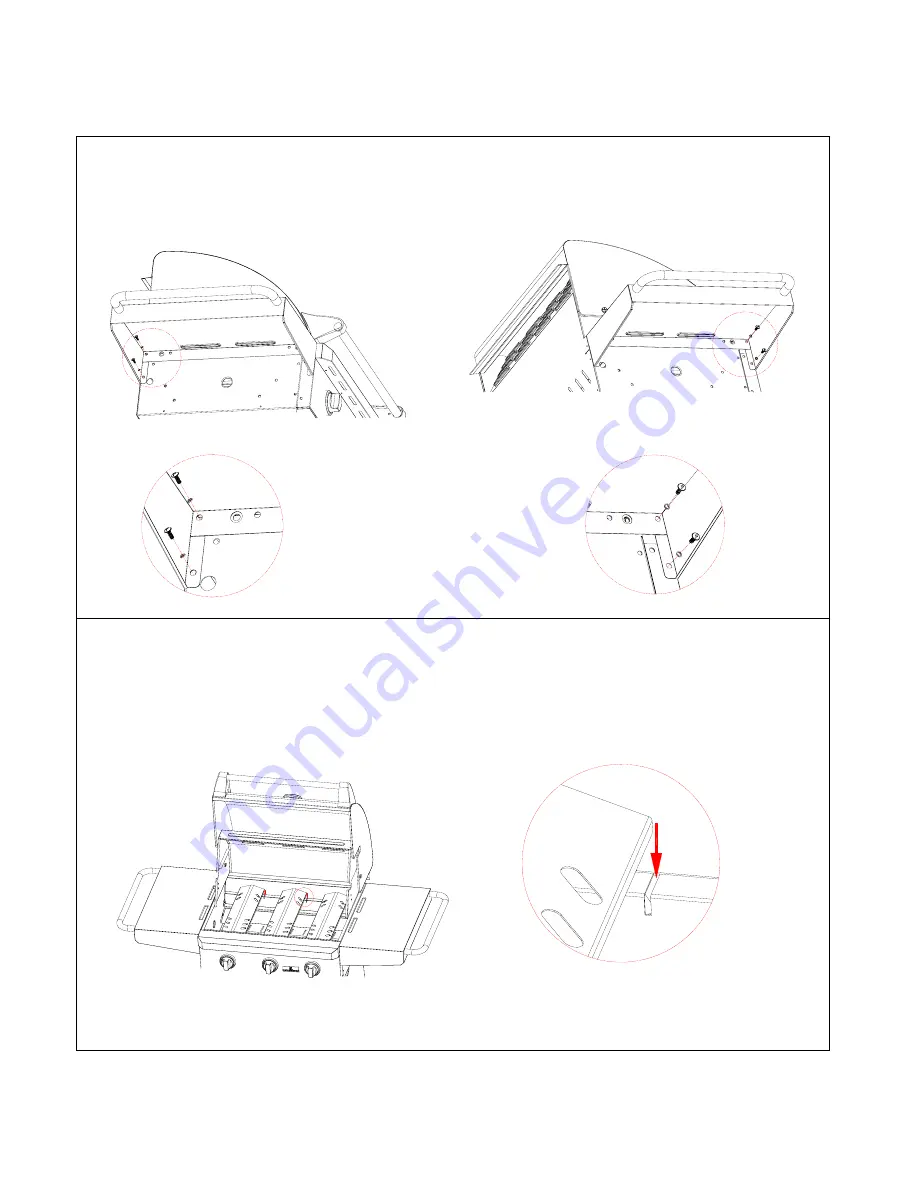
STEP 3
Use 4 Phillips Head Bolts (A) and 4 Lock Washers (B) to attach Left Side Shelf Assembly to Cabinet and Firebox Assembly.
STEP 4
Place Heat Diffusers (2) in the Firebox in the appropriate slots.
Page 1: ...s Grill Guide for future reference 5 Contact 1 800 933 0527 should you need assembly assistance or have any questions THIS GRILL IS FOR OUTDOOR USE ONLY If stored indoors then detach and leave propane...
Page 2: ...rill other than LP gas 6 Only use the pressure regulator with a type 1 connector that is supplied with this gas grill 7 Inspect the gas hose before each use If it is evident there is excessive abrasio...
Page 3: ...Operation 14 23 Trouble Shooting Guide 23 24 Write down here and keep for future reference Date of Purchase _________________ Serial Number ___________________ The serial number may be found on the pl...
Page 4: ...ed warranty will not apply to any grill used for commercial use This limited warranty is the sole warranty given by the manufacturer and is in lieu of all other warranties express or implied including...
Page 5: ...5 Lay all parts and hardware out and ensure you have everything listed on the Parts and Hardware page before you begin assembly See the Customer Support Page for contact information should any parts b...
Page 6: ...Side Panel 35 Condiment Box 11 Main Burner Bracket 36 Cylinder Drawer 12 Inner Heat Shield 37 Cabinet Bottom Shelf 13 Grease Tray 38 Swivel Caster 14 Gas Manifold Assembly 39 Caster 15 Bottom Heat Shi...
Page 7: ...7 BQ05051 3 Detail Parts List...
Page 8: ...2 Heat Diffuser 3PCS 3 Cooking Grate 2PCS 4 Stamped Warming Rack 1PC 5 Side Shelf Assembly 2PCS 6 Side Shelf Handle 2PCS Hardware List A Phillips Head Bolt M6 3 8 L 8PCS D Phillips Head Bolt M6 5 8 L...
Page 9: ...h Side Shelf Handle to Side Shelf Assembly Repeat the same procedure to attach the second Side Shelf Handle to the second Side Shelf Assembly STEP 2 Use 4 Phillips Head Bolts A and 4 Lock Washers B to...
Page 10: ...10 STEP 3 Use 4 Phillips Head Bolts A and 4 Lock Washers B to attach Left Side Shelf Assembly to Cabinet and Firebox Assembly STEP 4 Place Heat Diffusers 2 in the Firebox in the appropriate slots...
Page 11: ...ce Cooking Grates 3 on the inner lip of the Firebox STEP 6 Insert the Stamped Warming Rack 4 into the upper sides of the firebox Be sure the sides of the warming rack fit down into the slots to secure...
Page 12: ...Support Ring up to the top of the cabinet Place the LP Cylinder down into the tank support hole Unhook the LP Cylinder Support Ring and lower it over the top of the Cylinder Wrap it around the neck o...
Page 13: ...10 Remove any labels and additional packing material from the grill Be sure to clean all foam packing material out of all areas Congratulations Your grill is now fully assembled Please proceed and rea...
Page 14: ...outdoor cooking gas appliance area clear and free from combustible materials gasoline and other flammable vapors and liquids 11 Do not put a barbecue cover or other flammable material in the storage...
Page 15: ...ot use an open flame to check for leaks 1 Test outside in a well ventilated area 2 Use a paintbrush and a solution of 50 liquid soap and 50 water Do not use cleaning agents and they can damage the fue...
Page 16: ...that will restrict the flow of gas to 10 cubic feet per hour 0 28 cubic meters per hour TO CONNECT THE CYLINDER TO THE REGULATOR AND HOSE 1 Be sure the LP cylinder is OFF by turning the hand wheel cl...
Page 17: ...alve by turning the hand wheel clockwise WARNING 1 Do not connect this grill to any unregulated sources of propane 2 Protect the regulator fitting from damage when disconnected A damaged regulator fit...
Page 18: ...FOR YOUR SAFETY 1 Minimum clearance required from sides and back of unit to adjacent combustible construction is 24 inches 61 cm 2 Do not locate or use this outdoor cooking gas appliance under unprote...
Page 19: ...valve if it is not already on 4 Place a match in the Match Holder This is located in the condiment box in the cylinder drawer 5 Strike the match and insert into the lighting hole close to the burner...
Page 20: ...r using a stiff wire A straightened coat hanger is one suggested tool An alternative way to clean the inside of the burner is using compressed air Always wear eye protection if using this method Never...
Page 21: ...Too much noise indicates too much air Move the grill to an area of decreased air circulation or closing the shutter on the burner to get to your desired result ALWAYS 1 Keep the grilling area clear an...
Page 22: ...fish and poultry for fattier foods to reduce flare ups and when grilling using a roasting pan or aluminum foil Preheat the grill to 500 F 260 C Then turn some burners off and others to medium to low d...
Page 23: ...mitts or potholders when working around a grill in operation 16 Use a small amount of cooking oil on the cooking grates before heating to reduce foods sticking on the grates FOOD SAFETY 1 Always use s...
Page 24: ...k test and replace as necessary b Opening the control knobs before turning on the LP gas at the cylinder Turn on the gas at the LP cylinder first before turning on a control knob to light c Improper p...