background image

Use of the S100x oil-immersion objective

The MT - 420 and MT - 430 microscopes are equipped with an S100X N.A. 1.25 oil immersion 


objective. Please follow the below instructions on how to use this objective:


1.  Remove the dust protection cap from the revolving nosepiece to mount the S100X objective.


2.  Focus the image with the S40X objective.


3.  Lock the slide protection handle. 


4.  Turn the revolving nosepiece so the S100X objective almost reaches the click-stop.


5.  Put a small drop of immersion oil on the center of the slide (always use Immersion oil).


6.  Now turn the S100X objective so that you feel the click stop.


7.  The front lens is in contact with the immersion oil. 


8.  Look through the eyepiece and focus the image with the fine adjustment knobs.


9.  The distance between the lens of the objective and the slide is very small!


10.  In case there are small bubbles visible, turn the S100X objective a couple of times from   


left to right so that the front of the objective moves in the oil and the bubbles will disappear.


11.  After using the S100X objective, loosen the slide protection handle and turn the table  


with the course adjustment knobs downwards until the front lens doesn’t touch the oil  


any longer. Clean the front lens of the S100X objective.


12.  Always clean the front lens of the S100X objective with a piece of lens paper that is 


moistened with a drop of isopropanol. We recommend using lens paper and isopropanol.


13. Clean the slide after use as well. 

 
Illumination MT-420 and MT-430 Series

The illumination has the following specifications:


•  LED:  3W NeoLED for binocular and trinocular models


•  Power supply: Primary AC 100 – 240 Volt-50Hz.


Summary of Contents for MT-420 Series

Page 1: ...User Manual for MT 420 and MT 430 Series ...

Page 2: ...s Specific attention to production methods resulted also in an excellent price performance ratio Please read this manual carefully before using the product to ensure correct and safe usage The contents of this manual are subject to change without notice The appearance of the actual product can differ from the models described in this manual Not all equipment mentioned in this manual has to be part...

Page 3: ...ndenser 12 The field Köhler diaphragm 12 Adjusting the Aperture Diaphragm 12 Use of the S100x oil immersion objective 13 Illumination MT 420 and MT 430 Series 13 Phase contrast 14 Using the Zernike phase contrast set 14 Aligning the phase rings 15 Using the Phase Contrast Slider condenser optional 16 Maintenance and cleaning 17 Cleaning the optics 17 Caution 17 Maintenance of the stand 17 Replacin...

Page 4: ...ses etc affect the image quality of your system negatively Always try to prevent your microscope from getting dirty by using the dust cover prevent leaving fingerprints on the lenses and clean the outer surface of the lens regularly Cleaning optical components is a delicate matter Please read the cleaning instructions on our website carefully Environment storage and use This product is a precision...

Page 5: ... cleaning assembling or replacing LEDs to prevent electric shocks Prevent contact with water and other fluids Never allow water or other fluids to come in contact your microscope this can cause short circuiting your device causing malfunction and damage on your system Moving and assembling The MT 420 and MT 430 microscopes are relatively heavy systems consider this when moving and installing the s...

Page 6: ...ular tube C Diopter adjustment L Light intensity adjustment knob D Nosepiece M Coaxial coarse adjustment E Objectives N Slide protection handle F Stage with X Y mechanical stage O Condenser height control G X Y stage controls P Slide for polarization filter H Condenser with iris diaphragm Q Transport handle I Köhler iris diaphragm K D P E F G H B I J C A Q O M L ...

Page 7: ... the microscope with the right hand CAUTION Holding the microscope by its stage or focusing knob will damage the microscope Insert the power cord into the back of the microscope and use the cable storage system CSS Ca ble Storage System to store the cable after use CAUTION If the bacterial solution or water splatters over the stage objective or head pull out the power cord immediately and dry the ...

Page 8: ...lurgical attachment then this should be mounted first There is a supplementary manual supplied with any intermediate attachment with detailed mounting instructions Placing the eyepieces 1 Remove the cover of eyepiece tube 2 Insert the eyepiece into the eyepiece tube 3 Lock the eyepieces with a hexagon screw The eyeshades optional The eyepieces can be equipped with optional rubber eyeshades This pr...

Page 9: ...r to bright field position Close the iris diaphragm until it is just visible on the edge of the field of view The microscope is properly set for use with the 4X objective For each other magnification in bright field use this procedure should be repeated to ensure the best balance between contrast and resolution Phase contrast set up is explained later in this manual Place the specimen slide 1 Push...

Page 10: ...ction handle protects the slide by limiting the travel range of the mechanical stage This way the objectives will not touch or break your slides Adjusting the focusing tension The tension of the focusing knobs can be adjusted You can set it from light to heavy according to your own preference Please note that when the specimen leaves the focus plane after focusing or the stage declines out of its ...

Page 11: ...nce is different for each observer and thus should be set individually When more users are working with the microscope it is recommended to remember your interpupillary distance for a quick set up during new microscopy sessions The MT 420 and MT 430 swiveling eyepiece tube can be rotated 360º You can select corresponding eye point height according to your own preference 2 The correct eye point The...

Page 12: ...eld diaphragm adjustment ring to put the field diaphragm to the smallest position 4 Adjust the condenser to the point where the image is the sharpest 5 Adjusting the center adjustment screw and put the image to the center of the field of view 6 Open the field diaphragm gradually 7 The condenser is centered correctly if the image remains in the center when you open the field diaphragm and inscribed...

Page 13: ...h the fine adjustment knobs 9 The distance between the lens of the objective and the slide is very small 10 In case there are small bubbles visible turn the S100X objective a couple of times from left to right so that the front of the objective moves in the oil and the bubbles will disappear 11 After using the S100X objective loosen the slide protection handle and turn the table with the course ad...

Page 14: ...nd centered on your microscope If you suspect misalignment or want to check the alignment please see the next point for centering the phase rings The height of condenser can be adjusted by turning the rack and pinion up and down By doing this the light beam will be focused more on the specimen for maximum resolution The Zernike phase disc has five positions 0 for bright field observation this posi...

Page 15: ...wn in the figures below If the ring images can t be observed clearly focus the centering telescope first and if this does not solve the issue then try to adjust the condenser by turning it up and down If the bright ring and dark ring images are not coincided as shown below adjust the position of the ring by moving the ring at the bottom side of the condenser with your fingers Move it until bright ...

Page 16: ...phase contrast positions and in the center of the slide the bright field position for normal use without phase contrast Each phase contrast objective used has to match with the phase contrast ring on the slider For example when the 10X phase contrast objective is used the slider should be positioned to match the 10 phase diaphragm Note The phase diaphragms in the sliders are pre centered It is not...

Page 17: ...cope cleaning kit PB 5275 It is not necessary and not recommended to clean the lens surfaces at the inner side of the objectives Sometimes dust can be removed with high pressured air There will never be dust in the objectives if the objectives are not removed from the revolving nosepiece Caution Cleaning cloths containing plastic fibers can damage the coating of the lenses Maintenance of the stand...

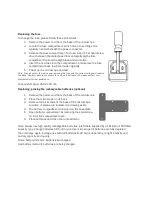
Page 18: ...ct your distributor for further assistance Fuse specification 250V 150 mA Replacing placing the rechargeable batteries optional 1 Remove the power cord from the back of the microscope 2 Place the microscope on its back 3 Remove the six screws of the base of the microscope Location of screws are indicated on drawing aside 4 The battery compartment in located on the baseplate 5 Open battery compartm...

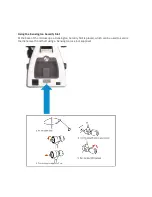
Page 19: ...Using the Kensington Security Slot At the back of the microscope a Kensington Security Slot is placed which can be used to secure the instrument from theft using a Kensington lock not supplied ...

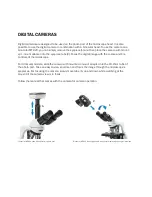
Page 20: ... with the coarse and fine controls of the microscope For trinocular models slide the camera with mounted c mount adapter into the 23 2mm tube of the photo port Take an easy to view specimen and focus the image through the microscope s eyepieces For focusing the camera slowly move tube A up and down while watching at the screen till the camera view is in focus Follow the manual that comes with the ...

Reviews: