background image

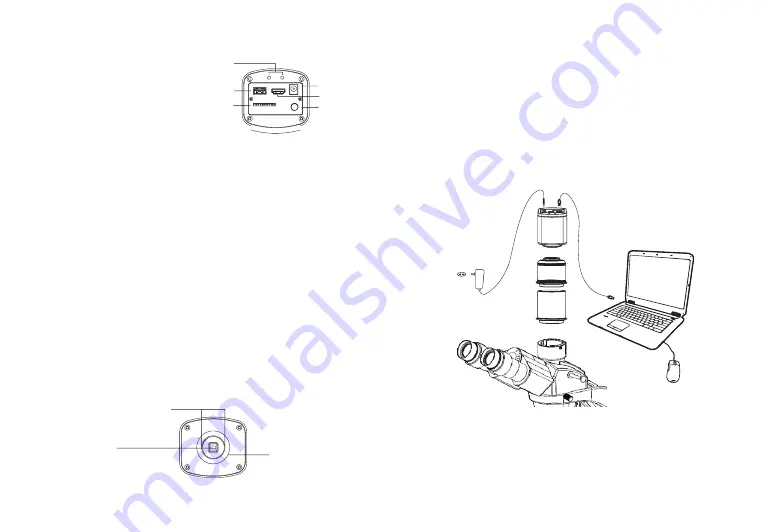
1) USB interface: 

A

 the mouse to the USB port, the camera can then be controlled directly 

by the mouse; 

B

connect the USB port to PC to make the camera work as a Driver-Free 

camera. Use Mosaic software to control it.

2) HDMI interface Use the HDMI cable to connect HDMI camera to the


screen. 

Image data is transferred and displayed on the monitor according to the HDMI 

protocol.


3) Power interface Please use the provided 12V/2A power supply. When power is 

plugged in, the red light is on. When camera is switched on, blue light is on.

4) ON/OFF key Press the ON/OFF key until the blue light is on or off to turn on or 

off the HDMI camera.

5)  SD card To get faster and more stable data transfer,  we recommend  you to 

use a Class10 SD card.

: Connect

: Or 

⑤ 

Power supply

Note: Some cameras support USB power supply, no need to install additional power 

supply, please refer to whether the power supply accessories are provided in the 

accessory list.

3.1 Camera Installation

① 

Camera

 ③ 

USB


Cable

 ② 

Microscope

④  

PC

⑤  

Indicator light

①  USB

②  HDMI

③   Power 

  ⑥   SD card slot

④  

ON/OFF

2.4 HDMI Cameras

①  
⑥  

③ 

④ 

2.5 Optical Interface Description

 ①  

Standard C-mount optical port


② 

Anti-dust seal


Please tear off before installation

  Adjustable ring

In PC mode, connect the camera to the computer with a USB cable and use the software 

to control the camera. It is suitable for all cameras that provide a USB interface. The 

camera installation is as follows:

-6-

-5-

3. Use in PC Mode 

B: Or connect the USB port to PC to make the camera work as a Driver-Free 

camera. Use Capture 2.0 software to control it.

Summary of Contents for HD1000LITE

Page 1: ...Camera Quick Start...

Page 2: ...x 1 x Camera 1 x Software U disk Screws 20MP Resolution Cooling noise reduction Real time 3D noise reduction Real time sharpening Real time stitching Real time EDF USB3 0 1 x Camera 1 x Power 1 x Powe...

Page 3: ...areonlyavailablewhenthecameraispurchasedwiththescreen 2 Camera Interface Description 2 1 FL Cooled Camera USB3 0 2pcs Indicator lights Screw positioning hole Powerswitch USB3 0 Powerinterface Indicato...

Page 4: ...faster and more stable data transfer we recommend you to use a Class10 SD card Connect Or Power supply Note Some cameras support USB power supply no need to install additional power supply please refe...

Page 5: ...op out select your application direction to enter the software The software will automatically optimize parameter settings based on your choice While using software the application direction can also...

Page 6: ...Under stable lighting environment move the regional white balance box to any white part of the pictures then adjust size and check Lock White Balance to lock present white balance which will make whi...

Page 7: ...the name TS as default but the name can be customized Customized name time stamp is supported A name can contain up to 64 bytes File format Support JPG TIF PNG DICOM default to TIF and can be checked...

Page 8: ...the cursor is moved to the left of the screen Capture and Setting icons will appear Click Setting to get the parameter setting menu Calibration Horizontalflip Verticalflip Zoomin Mask Album Compare Ba...

Page 9: ...ctable to have the data of perimeter or area 8 Perpendicular Measure the perpendicular length 9 Concentric circles Get the diameters of the two concentric circles 10 Bicircle Get the distance between...

Page 10: ...n immediate replacement 17 6 Maintenance 5 Precautions CAUTION Do not disassemble Do not contact water Do not subject the camera to physical shock Immediate repair request Do not disassemble repair or...

Reviews: