Meec tools 060-143 Operating Instructions Manual Download Page 38

ENGLISH 

38 

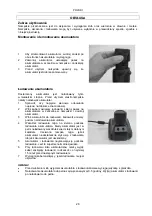
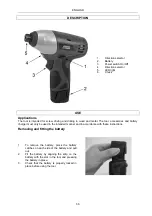
Setting right/left-hand drive


1. 

Select right-hand drive (clockwise rotation) 
by pressing the direction selector to the left 
side of the tool. 

2. 

Select left-hand drive (anticlockwise rotation) 
by pressing the direction selector to the right 
side of the tool. Do not move the direction 
selector when the motor is running. 

NOTE 

The tool cannot be started when the direction 
selector is in the middle position. 


LED light


The tool has an LED light to improve visibility in dark areas. The LED light goes on automatically when 
the power switch is pressed. When the battery is discharged, the LED light starts to flash rapidly when the 
switch is pressed. 

Starting and stopping


Start the tool by pressing the power switch. Release the power switch to stop the tool. Wait until all 
moving parts have completely stopped before putting down the tool. 
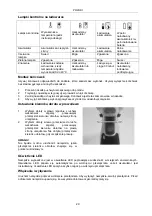
Screwing


1. 

Fit a suitable bit. 

2. 

Use a suitable speed for the task. Start by pressing in the power switch a little, and pressing it in 
more if a higher speed is needed. 

3. 

Press the power switch carefully, so that you are in full control all the time. 

If you are going to screw close to the edge of workpiece you should predrill a hole to prevent the wood 
splitting. 
Use the a countersink drill to properly sink the screw head, so that it does not stick up from the surface. 

MAINTENANCE 


Always unplug the power cord before adjusting or maintaining the tool. A damaged power cord 
must be replaced by an authorised service centre or qualified person to ensure safe use. 


Pull out the plug immediately if it is damaged. 


Do not expose the tool to rain or damp conditions. 

Cleaning


Do not use solvents on plastic parts, as this could damage the plastic. Remove any dirt and dust etc. with 
a clean cloth. 

Lubrication


All the bearings in the tool are permanently lubricated. No further lubrication is normally necessary. 

Jula reserves the right to make changes. In the event of problems, please contact our service department 
www.jula.com 


Summary of Contents for 060-143

Page 1: ...r slagskrutrekker Instrukcja obs ugi wkr tarki udarowej Operating Instructions for Impact Driver 060 143 SV Bruksanvisning i original NO Bruksanvisning i original PL Instrukcja obs ugi w oryginale EN...

Page 2: ...stopp 11 Skruvning 11 UNDERH LL 11 Reng ring 11 Sm rjning 11 NORSK 13 SIKKERHETSANVISNINGER 13 Arbeidsomr de 13 El sikkerhet 13 Personlig sikkerhet 13 Spesielle sikkerhetsanvisninger 13 Spesielle sik...

Page 3: ...wo 29 O wietlenie LED 29 W czanie i wy czanie 29 Wkr canie 30 KONSERWACJA 30 Czyszczenie 30 Smarowanie 30 ENGLISH 31 SAFETY INSTRUCTIONS 31 Work area 31 Electrical safety 31 Personal safety 31 Special...

Page 4: ...rdfelsbrytarskyddad n tanslutning Jordfelsbrytare minskar risken f r elolycksfall Personlig s kerhet Var uppm rksam Var hela tiden f rsiktig och till mpa sunt f rnuft vid arbete med elverktyg Anv nd a...

Page 5: ...yda att batteriet r defekt F lj anvisningarna nedan om du f r batteriv tska p huden Tv tta snarast med tv l och vatten Neutralisera med mild syra som citronsaft eller vin ger Om du f r batteriv tska i...

Page 6: ...g som inte anv nds ska f rvaras utom r ckh ll f r barn L t aldrig barn eller personer som inte k nner till elverktyget eller har tagit del av dessa anvisningar anv nda det Elverktyg r farliga om de an...

Page 7: ...er s kerhetskraven i till mpliga EU direktiv Verktyg klass II Dubbelisolerat ska inte jordas Anger risk f r d dsfall personskada eller egendomsskada om inte anvisningarna f ljs Anger risk f r elolycks...

Page 8: ...A K 3 dB A Vibration 0 72 m s2 K 1 5 m s2 Anv nd alltid h rselskydd Det deklarerade v rdet f r vibration som har uppm tts i enlighet med standardiserad testmetod kan anv ndas f r att j mf ra olika ve...

Page 9: ...r och batteriladdare f r endast anv ndas p avsett s tt och i enlighet med dessa anvisningar Demontering och montering av batteri 1 F r att demontera batteriet tryck in batterisp rrarna p vardera sida...

Page 10: ...alltid ut laddarens n tsladd n r laddaren inte anv nds OBS Dra ut laddarens n tsladd innan du s tter i eller tar ut batteriet Normalt tar det 0 5 timmar f r batteriet att laddas helt Avl gsna batterie...

Page 11: ...n du l gger ifr n dig verktyget Skruvning 1 Montera l mpligt bits 2 Anv nd l mpligt varvtal f r uppgiften B rja med att trycka in str mbrytaren lite och tryck in den l ngre om h gre varvtal beh vs 3 T...

Page 12: ...SVENSKA 12 R tten till ndringar f rbeh lles Vid eventuella problem kontakta v r serviceavdelning p telefon 0200 88 55 88 Jula AB Box 363 532 24 SKARA www jula se...

Page 13: ...ing Jordfeilbryter reduserer faren for el ulykker Personlig sikkerhet V r oppmerksom V r alltid forsiktig og bruk sunn fornuft n r du arbeider med el verkt y Ikke bruk el verkt y hvis du er tr tt elle...

Page 14: ...nedenfor hvis du f r batteriv ske p huden Vask straks med s pe og vann N ytraliser med mild syre som sitronsaft eller eddik Hvis du f r batteriv ske i ynene skyll ynene med rent vann i minst ti minutt...

Page 15: ...bruk skal oppbevares utilgjengelig for barn Ikke la barn eller personer som er ukjent med el verkt yet eller som ikke har lest disse anvisningene bruke det El verkt yet er farlig hvis det brukes av u...

Page 16: ...sikkerhetskravene i aktuelle EU direktiver Verkt y klasse II Dobbeltisolert skal ikke jordes Angir fare for d dsfall personskade eller skade p eiendom hvis anvisningene ikke f lges Angir fare for el...

Page 17: ...A K 3 dB A Vibrasjon 0 72 m s2 K 1 5 m s2 Bruk alltid h rselvern Den angitte verdien for vibrasjon som er m lt i henhold til standardiserte testmetoder kan brukes til sammenlikne ulike verkt y med hv...

Page 18: ...og batterilader skal bare brukes til det det er beregnet for og i henhold til disse anvisningene Demontering og montering av batteri 1 For demontere batteriet trykker du inn batterisperrene p hver si...

Page 19: ...7 Trekk alltid ut laderens st psel n r laderen ikke er i bruk OBS Trekk ut laderens str mledning f r du setter i eller tar ut batteriet Normalt tar det 0 5 timer f r batteriet er helt ladet Fjern batt...

Page 20: ...f r du legger fra deg verkt yet Skruing 1 Monter egnet bits 2 Bruk egnet turtall til oppgaven Begynn med trykke inn str mbryteren litt og trykk den lenger inn hvis det er n dvendig med h yere turtall...

Page 21: ...NORSK 21 Med forbehold om endringer Ved eventuelle problemer kan du kontakte v r serviceavdeling p telefon 67 90 01 34 Jula Norge AS Solheimsveien 6 8 1471 L RENSKOG www jula no...

Page 22: ...wyci gania elektronarz dzia ani do wyjmowania wtyczki z gniazdka Chro kabel przed wysokimi temperaturami olejami ostrymi kraw dziami i ruchomymi cz ciami narz dzia Uszkodzone lub spl tane kable zwi k...

Page 23: ...c zako cz wykonywan czynno i wy cz urz dzenie zanim oderwiesz od niego wzrok Sprawdzaj regularnie czy po czenia rubowe s odpowiednio dokr cone U ywaj odpowiednich rodk w ochrony indywidualnej okular w...

Page 24: ...ycznemu spad a lub jest w jakikolwiek inny spos b uszkodzona Kontrol i lub napraw adowarki zle uprawnionemu pracownikowi punktu serwisowego Nie rozbieraj adowarki na cz ci W razie potrzeby zle kontrol...

Page 25: ...pomoc adowarki rekomendowanej przez producenta adowarka przeznaczona dla jednego rodzaju akumulatora mo e spowodowa po ar je li zostanie u yta z akumulatorem innego rodzaju 3 U ywaj elektronarz dzia...

Page 26: ...Wyci gnij kabel z gniazdka je eli narz dzie nie jest u ywane a tak e przed wymian akcesori w napraw czyszczeniem i regulacj U ywaj okular w ochronnych U ywaj maski przeciwpy owej Nie nara aj akumulat...

Page 27: ...a wykorzystana do por wnania r nych narz dzi oraz w celu dokonania wst pnej oceny nara enia na dzia anie drga OSTRZE ENIE Rzeczywisty poziom drga podczas korzystania z elektronarz dzia w zale no ci od...

Page 28: ...czce znamionowej 2 W kabel zasilaj cy adowarki skieruj pasek na akumulatorze w szczelin w narz dziu i doci nij akumulator 3 W akumulator do adowarki adowarka mierzy poziom na adowania akumulatora 4 Ws...

Page 29: ...hwytu szcz kowego Ko c wka jest teraz zamocowana w nasadce 4 Aby wyj ko c wk wykonaj powy sze czynno ci w odwrotnej kolejno ci Ustawianie kierunku obrotu w prawo lewo 1 Wybierz obroty w prawo zgodnie...

Page 30: ...ieniem do regulacji i konserwacji Je li kabel jest uszkodzony nale y zleci wymian w autoryzowanym serwisie lub uprawnionej osobie Pozwala to unikn zagro enia Natychmiast wyci gnij uszkodzony kabel z g...

Page 31: ...proved for outdoor use Cords intended for outdoor use reduce the risk of electric shock If it is absolutely necessary to use power tools in damp conditions use a mains connection protected by a residu...

Page 32: ...sks that may be incurred as a result of the type and design of the tool Damage to lungs if effective dust filter mask is not worn Damage to ears if effective ear protection is not worn Special safety...

Page 33: ...tions concerning the use of the charger by someone who is responsible for their safety Children must be supervised to make sure they do not play with the charger Using and maintaining power tools 1 Do...

Page 34: ...t only be serviced by qualified personnel using identical spare parts This will ensure that the power tool remains safe to use Symbols The following symbols are used in the instructions and or on the...

Page 35: ...LWA 77 0 dB A K 3 dB A Vibration 0 72 m s2 K 1 5 m s2 Always wear ear protection The declared vibration value which has been measured by a standardised test method can be used to compare different too...

Page 36: ...ies and battery charger must only be used in the intended manner and in accordance with these instructions Removing and fitting the battery 1 To remove the battery press the battery catches on each si...

Page 37: ...utes before charging the next battery 7 Always unplug the power cord to the charger when the charger is not in use NOTE Unplug the charger s power cord before inserting or removing the battery It norm...

Page 38: ...a suitable speed for the task Start by pressing in the power switch a little and pressing it in more if a higher speed is needed 3 Press the power switch carefully so that you are in full control all...

Page 39: ......

Reviews: