


EN
75
sawing, as shown in the diagram. Make sure
to position the workpiece correctly and do not
attempt to saw it without the support of the
fence – risk of the blade getting stuck, and risk
of serious personal injury.
FIG. 31
Groove sawing
WARNING!
DO NOT USE DADO BLADES. Only use saw
blades of the standard type.
1. Mark out the width and depth of the cut on
the workpiece and put the workpiece on
the saw table. Align the blade to the line.
2. Secure the workpiece on the saw table.
3. Move down the saw head so that the
blade touches the marked line on top of
the workpiece.
4. Hold the top arm in this position and turn
the depth setting screw (2) until the end
rests on the stop plate (1). See
Adjusting
the sawing depth
.
FIG. 32
5. Saw two parallel lines as shown in the
diagram.
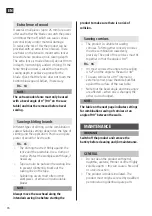
Supporting the workpiece
Support long workpieces with roller supports,
or the equivalent. Keep the hand that supports
the workpiece at least 17 cm from the blade,
outside the marked area. The support should
be adjusted so that the workpiece is flush with
the saw table during the sawing.
FIG. 33
NOTE:
When the product is mounted on a level
surface the saw table is 67 mm over the
surface.
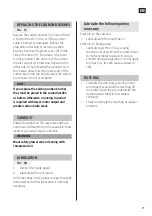
Sawing wide workpieces
Follow the instructions below when sawing
workpiece up to 20 cm to avoid the risk of
personal injury and/or material damage.
IMPORTANT:
Secure the workpiece with a clamp, clips or
vice.
• Allow the blade to reach maximum speed
before it makes contact with the
workpiece. This reduces the risk of the
workpiece being thrown off.
• Never saw by lowering the blade and pull
the saw head towards you through the
workpiece. The blade can be jerked out of
the slot and the saw head and blade
thrown back.
FIG. 30
1. Release the lock knob for the carriage (1)
so that the saw head can move freely.
2. Set the required bevel angle and/or mitre
angle and lock.
3. Always secure the workpiece (3) with the
clamp (2).
4. Pull the handle with the power switch (4)
until the centre of the blade is over the
front edge of the workpiece (3).
5. Press the power switch to start the product.
6. When the blade reaches maximum speed,
slowing move down the handle with the
power switch and cut the workpiece from
the front edge.
7. Move the handle with the power switch
slowly to the fence and complete the cut.
8. Release the power switch and wait until
the blade has stopped before lifting the
saw head and removing the workpiece.
Sawing curved workpieces
Curved workpieces must be placed against the
fence and secured with the clamp (1) before
Summary of Contents for 012176
Page 4: ...1 1 2 3 4 5 6 7 8 9 10 11 12 13 14 15 1 26 24 25 17 16 18 19 20 21 22 23 ...
Page 5: ...3 2 6 4 7 5 1 2 ...
Page 6: ...8 9 12 10 13 11 20 mm ...
Page 7: ...14 15 18 16 19 17 ...
Page 8: ...20 21 24 25 22 26 23 1 2 3 4 5 3 ...
Page 9: ...27 28 31 29 32 30 ...
Page 10: ...33 34 37 35 38 36 1 2 ...