

SC00IN009 V
er 2, 12/15
Medistim ASA
(Head office)
Økernveien 94
0579 Oslo
Norway
Phone +47 23 05 96 60
Medistim Danmark ApS
Gøngetoften 13
2950 Vedbæk
Denmark
Phone +45 2276 5669
Medistim USA Inc.
14000 25th Ave N. Ste. 108
Plymouth, MN 55447
USA
Phone +1 763 208 9852
Medistim Deutschland GmbH
Bahnhofstr. 32
82041 Deisenhofen
Germany
Phone +49 (0) 89 62 81 90 33
Medistim Norge AS
Økernveien 94
0579 Oslo
Norway
Phone +47 23 03 52 50
[email protected]
www.medistim.com
Medistim UK Limited
3
4 Nottingham South Ind Est
Ruddington Lane
Wilford,
NG11 7EP
Nottingham, UK
Phone +44 (0) 115 981 0871
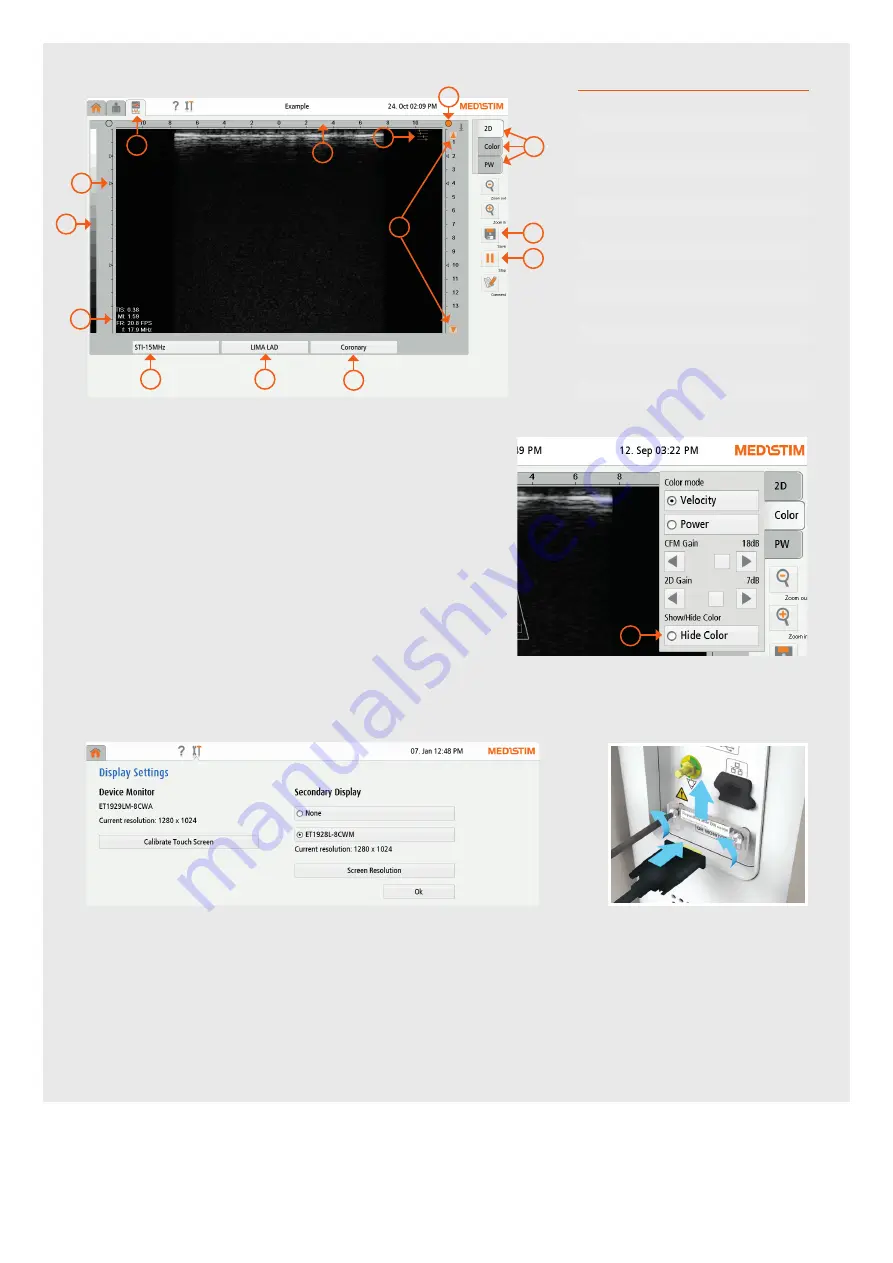
3. CONNECTING TO AN EXTERNAL SCREEN
1.
Locate the external monitor connection on the
Media Panel
on the back of the MiraQ™ System.
2.
Unscrew the two screws and remove the plastic cover fitted over the connection.
3.
Connect the system to the desired external monitor. Please note that the external monitor interface is not galvanic isolated
and must always be used with an external isolation device.
4.
Enter
System Settings
->
Advances System Features
->
Display Settings
.
5.
In the right column on the MiraQ™ screen you will find
Secondary Display
. Choose the connected monitor and change
the resolution to fit the monitor specification.
Connecting to an external screen
Media panel
5
7
8
3
6
9
2.2 Overview of the Imaging Screen
#
Screen Element
1
Live measurement screen tab
2
Lateral scale
3
TGC Sliders
4
Probe orientation
5
Mode tabs: 2D, Color and PW
6
Change the depth
7
Save
8
Start/Stop
9
Current imaging preset
10
Anatomical location
11
Imaging properties
12
Exposure statistics
13
Gray scale map (Color flow
map)
14
Focal points
15
Hide color
2
1
10
11
12
14
13
4
Imaging screen
Imaging presets control panel
15
The System is preset according to the selected application. To change
the presets, press the
Current Imaging Preset
button (9) and choose the
correct protocol. The following adjustments can be made:
• Change depth (6)
• Turn on Color Doppler or Pulsed Wave Doppler (5)
• Hide Color (15)
• Change position of ROI or PW Gate
• Change the velocity scale
Press
Save
to store a 5-second video sequence
Note
After 5 minutes of inactivity, the system will stop scanning and freeze
the image. Press the
Start
icon (8) to resume scanning.


