background image

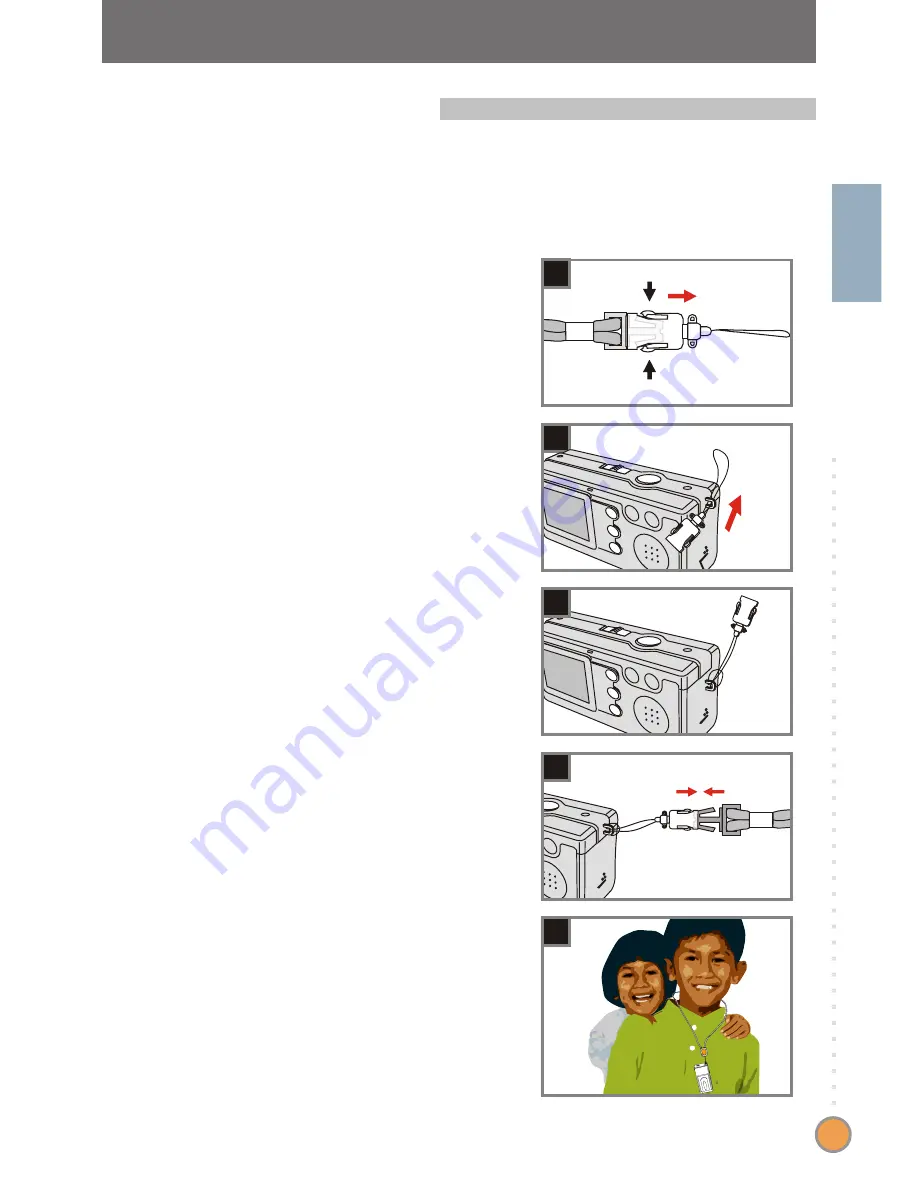
For convenience and safety, you may wish to attach the 
carrying strap. 

4. Attaching the strap

Press the buttons as indicated to 
separate the strap into two parts.

Thread the strap loop through the 
hook in the direction indicated.

1

2

G

e

tt

in

g

 S

ta

rt

e

d

7

Fasten the strap loop as indicated.

3

Combine the strap as indicated.

4

Wear the strap around your neck.

5

3

2

1

4

5

Summary of Contents for MD 42361

Page 1: ......

Page 2: ...mera body For your own safety avoid using the camera when there is a storm or lightning Avoid using batteries of different brands or types at the same time There is potential of explosion from using i...

Page 3: ...he card Basic Operation 1 Switching on and off 2 Setting the Mode switch 3 Taking still pictures 4 Recording movies The LCD display information The LCD display information Snapshot Making a movie 5 Pl...

Page 4: ...e all and format Setting the date and time 1 Installing MD 42361 Manager 2 Connecting your camera to your computer 3 Copying images and audio clips to your computer 4 Playing on your computer Using MD...

Page 5: ...amera via MD 42361 Manager Viewing your images 43 Capturing immediate images to your computer Advanced settings Live mode panel Troubleshooting Other Information 1 Battery life 2 LED indicator events...

Page 6: ...Lens cover Card slot PLAYBACK button Control button MENU button Strap hook LCD display Microphone Lens Flash strobe Self timer lamp USB port Focus switch Control button Zoom out Control button Zoom in...

Page 7: ...into the battery section with the correct and ends Close inward and slide upward the battery card cover to lock it 1 We recommend you to use rechargeable 1 2 V Ni MH batteries as this will increase t...

Page 8: ...tery card cover 1 2 3 6 1 The camera comes with 16MB flash memory built inside for storage If you do not insert a SD MMC card the data will be saved in the built in flash memory automatically 2 The SD...

Page 9: ...the strap Press the buttons as indicated to separate the strap into two parts Thread the strap loop through the hook in the direction indicated 1 2 Getting Started 7 Fasten the strap loop as indicate...

Page 10: ...particularly while taking self portraits longer movies video conferencing or in the macro mode Attach the tripod to the port on the bottom of the camera and rotate the serrated wheel to lock it Unfold...

Page 11: ...peration 1 Switching on and off If the camera is idle for over 60 seconds the LCD display will be turned off to conserve battery power press any key to wake up the camera If you do not operate this ca...

Page 12: ...that you wish to use DSC mode Taking still pictures recording movies and setting the camera AVI recording a movie SELFTIMER taking a self portrait picture SETTING fine tuning the camera settings Audi...

Page 13: ...Date stamp 1 2 3 4 Zoom ratio White balance or effect status Flash status Focus mode Remaining number of pictures 8 9 5 7 1 2 3 8 10 6 7 5 4 9 10 Battery life The LCD display information Storage medi...

Page 14: ...out Press the Control button to zoom in or the Control button to zoom out Take a still Press the Shutter button to take a shot Slide the Lens cover to switch the camera on Then set the Mode switch to...

Page 15: ...g movies 1 Focus mode Movie mode 1 2 3 4 Recording time White balance or effect status 5 1 6 4 3 2 5 6 Battery life The LCD display information Storage media Internal memory SD card MMC card 13 Basic...

Page 16: ...he Shutter button to start recording Stop recording Press the Shutter button again to stop recording 2 4 5 1 DSC AVI SELFTIMER SETTING OK SHUTTER menu effect Making a movie 2 Focus Push the Focus swit...

Page 17: ...en Playback mode 1 2 4 Playing time of a recording Picture or movie number 5 1 6 3 2 5 6 Battery life The LCD display information 3 Storage media Internal memory SD card MMC card 5 Playing your pictur...

Page 18: ...view The last image taken will be highlighted 2 1 menu effect Zoom in Press the MENU button to exit menu effect View the file Previous Next Press the Control button to select the previous image or the...

Page 19: ...PLAYBACK button to enter a thumbnail view The last image taken will be highlighted 2 menu effect If the highlighted file is a movie a count indicator will appear at the bottom of the LCD display 1 Pr...

Page 20: ...s the Control button to select the previous image or the Control button to select the next one 3 Playback mode Press the PLAYBACK button to enter a thumbnail view The last image taken will be highligh...

Page 21: ...udio clip While starting to record the count indicator at the bottom of the LCD display will run 2 0 0 0 0 Stop recording Press the Shutter button again to stop recording 3 1 To play your audio clip p...

Page 22: ...t the SETTING item Press the MENU button Use the Control buttons to highlight the SETTING item then press the Shutter button to confirm 2 Adjust the settings Use the Control buttons to highlight the d...

Page 23: ...Y DELETE ALL DATE DATESTAMP LANGUAGE LANGUAGE ENGLISH DEUTSCH FRAN AIS OK SHUTTER ITALIANO ESPA OL PORTUGU S Select the LANGUAGE item 1Under the SETTING Menu use the Control buttons to highlight the L...

Page 24: ...GUAGE DATE 08 00 2003 01 01 ADJUST SET SMART NEXT SHUTTER Set date and time 2Use the Control buttons to adjust the value then press the Shutter button to shift between items Press the Smart key to con...

Page 25: ...is needed The strobe does not fire Charging the flash strobe requires more battery power When the battery power is low the flash strobe Auto cannot be set Please change the batteries Select the STROBE...

Page 26: ...728 type when you want to develop 6 8 photos or smaller The most memory saving option Select the 1600x1200 type when you want to develop 3 5 photos or smaller 2304X1728 2048X1536 1600X1200 Select the...

Page 27: ...P LANGUAGE DATE STAMP NO YES OK SHUTTER Select the DATESTAMP item 1Under the SETTING Menu use the Control buttons to highlight the DATESTAMP item then press the Shutter button to confirm Select the YE...

Page 28: ...AMP LANGUAGE FLICKER FORMAT FLICKER 50 Hz 60 Hz OK SHUTTER Select the FLICKER item 1Under the SETTING Menu use the Control buttons to highlight the FLICKER item then press the Shutter button to confir...

Page 29: ...YES OK SHUTTER Select the DELETE ALL or FORMAT item 1Under the SETTING Menu use the Control buttons to highlight the DELETE ALL or FORMAT item then press the Shutter button to confirm Select the YES i...

Page 30: ...se the Control buttons to highlight the SELFTIMER item then press the Shutter button to confirm You will see a icon on the top left section of the LCD display 2 Use the self timer When the Shutter but...

Page 31: ...e through six choices Auto Sunny Cloudy Tungsten Fluorescent and B W on the LCD display 2 menu effect SMART key Tungsten Suitable for indoor shooting with incandescent lamp lighting low color conditio...

Page 32: ...g on your computer Move the cursor to the icon MD 42361 Manager and click it 3 Enjoying your Images and Audio Clips on the Computer For Windows XP users Skip step 1 Installing MD 42361 Manager and go...

Page 33: ...ow the on screen instructions to continue 4 Fig 1 1 The Digital Signature Not Found dialogue box might show twice Please simply click Yes The camera works well for Windows 2000 Notice for Windows 2000...

Page 34: ...r or never install DirectX 8 0 or above click Yes If you are a Windows XP user or you have already installed DirectX 8 0 or above click No When a window as Fig 3 or Fig 4 appears please click OK or Fi...

Page 35: ...ter Set the Mode switch on your camera to or Turn on your computer 1 2 Insert the USB cable to the USB port on your computer 3 Insert the other end of the USB cable to the USB port on your camera 4 En...

Page 36: ...ng your camera with the computer a window will automatically appear as Fig 5 Select the Open folder to view files using Windows Explorer item and then click OK For Windows 2000 ME 98SE users Double cl...

Page 37: ...e to the My Documents file folder to copy your image or audio clip to the computer 4 For Windows XP users For Windows 2000 ME 98SE users You can find the files of your pictures movies and audio clips...

Page 38: ...t your camera from the computer please follow these steps Notice on disconnecting the camera from the computer for Windows 2000 ME users 1 Double click on the task bar 2 Click USB Disk then click Stop...

Page 39: ...s enhancement images management and PC Camera If you never install MD 42361 Manager please finish the installation first For details please see step 1 Installing MD 42361 Manager on page 30 If you hav...

Page 40: ...ss and hold the Shutter button as you insert the other end of the USB cable to the USB port on your camera 4 Please slide the Lens cover on if you want to use PC Camera function Press and hold the Shu...

Page 41: ...indows 2000 For Windows ME users Please select Automatic search for a better driver when a window as Fig 7 appears For Windows 98SE users Click Next when a window as Fig 8 appears Select Search for a...

Page 42: ...ute the program or click the Start menu and go up to Programs then go to the folder named MD 42361 Manager and click it to launch the program Launch the software 1 The windows below are interface of M...

Page 43: ...es in My Album My Album Exit Album manager Delete images in work area Select all images in work area Upload images to the work area Thumbnail Minimize Album Live mode switch Transfer images to the alb...

Page 44: ...ou want to download photos from your camera 1 The enhancement function enhances your images form 4 Mega to 5 Mega 3 Mega to 4 Mega and 2 Mega to 3 Mega The enhanced format offers higher quality but al...

Page 45: ...ovie thumbnail in the Work area to view it Then a viewer window as Fig 13 when viewing a picture or a default media player window as Fig 14 when viewing a movie will appear Fig 13 Fig 14 Next picture...

Page 46: ...ges to My Album Click the icon to transfer your pictures and movies to the Work area 1 Click the desired image in the Work area 2 Click the icon to copy the image from the Work area to My Album 3 Work...

Page 47: ...new photo album 1 Key in a new album name then click to designate a path where the album will be stored Click Update to confirm Fig 15 2 2 3 4 5 Double click the new album item to open the newly crea...

Page 48: ...1 Click the icon then a Make AVI file window will appear 2 Arrange the sequence of the images and adjust the frame rate Select the Compression check box if you want to reduce the file size Then press...

Page 49: ...5 Using PC Camera via MD 42361 Manager 1 Live mode panel Video Record Snapshot Video Format Setting Video Source Album Live mode switch Using MD 42361 Manager 47...

Page 50: ...he icon to stop recording 3 Click to designate a path where the file will be stored Set the speed and time of the recording Then press the Start Record button to begin recording 2 Continued from the s...

Page 51: ...Space Compression 1 Output Size 2 RGB 24 Better image quality I420 The file will be compressed to add advantage for faster speed transformation Set output size to change the size of the preview windo...

Page 52: ...g Filter item on the Video Setting tab to avoid noise Select 50Hz or 60Hz until the screen stops flickering If you want to restore the default setting select Normal AE 1 1 Bandwidth If the controller...

Page 53: ...se free some space of the SD MMC card or flash memory Check if the camera is under the status of charging batteries Check if the SD MMC card is set to protected If the MEMORY ERROR or CARD ERROR messa...

Page 54: ...e If you have any other camera or capture device completely remove the camera and its driver from the computer to avoid a driver conflict The image is too blurred Adjust the focus Keep the camera stea...

Page 55: ...attery will be shorten in the following conditions Number 1 Taking snapshot at low temperature 2 Switching on off power repeatedly 3 Using the flash strobe frequently 2 LED indicator events Never ejec...

Page 56: ...depending on the resolution and color saturation 30 60 120 240 480 20 40 80 160 320 15 30 60 120 240 SD MMC card 512MB 480 640 960 64 mins 4 More on flicker The default flicker setting of your camera...

Page 57: ...up to 20 fps Video conferencing LCD display Digital zoom Exposure Smart key Lens Self Timer Interface Power saving Built in flash strobe Battery Dimension VGA 640x480 pixels up to 10 fps QVGA 320x240...

Page 58: ...covered by this limited warranty Medion will at its option repair or replace the product This limited warranty extends to repaired products and replacement products only through the end of the origina...

Reviews: