Medion LIFE E12009 Instruction Manual Download Page 11

10 of 42

4.  

Start of Operation

CAUTION!

Before starting up please make sure that you read the “Safety instructions”section

4.1. Unpacking

• 

Select a suitable place for setting up the device.

• 

Open the box very carefully to avoid damaging the device. The device could be damaged if you use a knife with a 
long blade to open the box.

• 

The box contains a number of small items (including batteries). Keep these items out of reach of children; the parts 
are easy to swallow.

• 

Store the packaging material in a safe place; only use this box to transport the TV.

WARNING!
Keep packaging material such as plastic film away from children. There is a risk of suffocation if used 
improperly.

4.2.  

Installation

Attach the base stand as shown in the drawing. Carry out this step before connecting the LED-Backlight TV.

4x

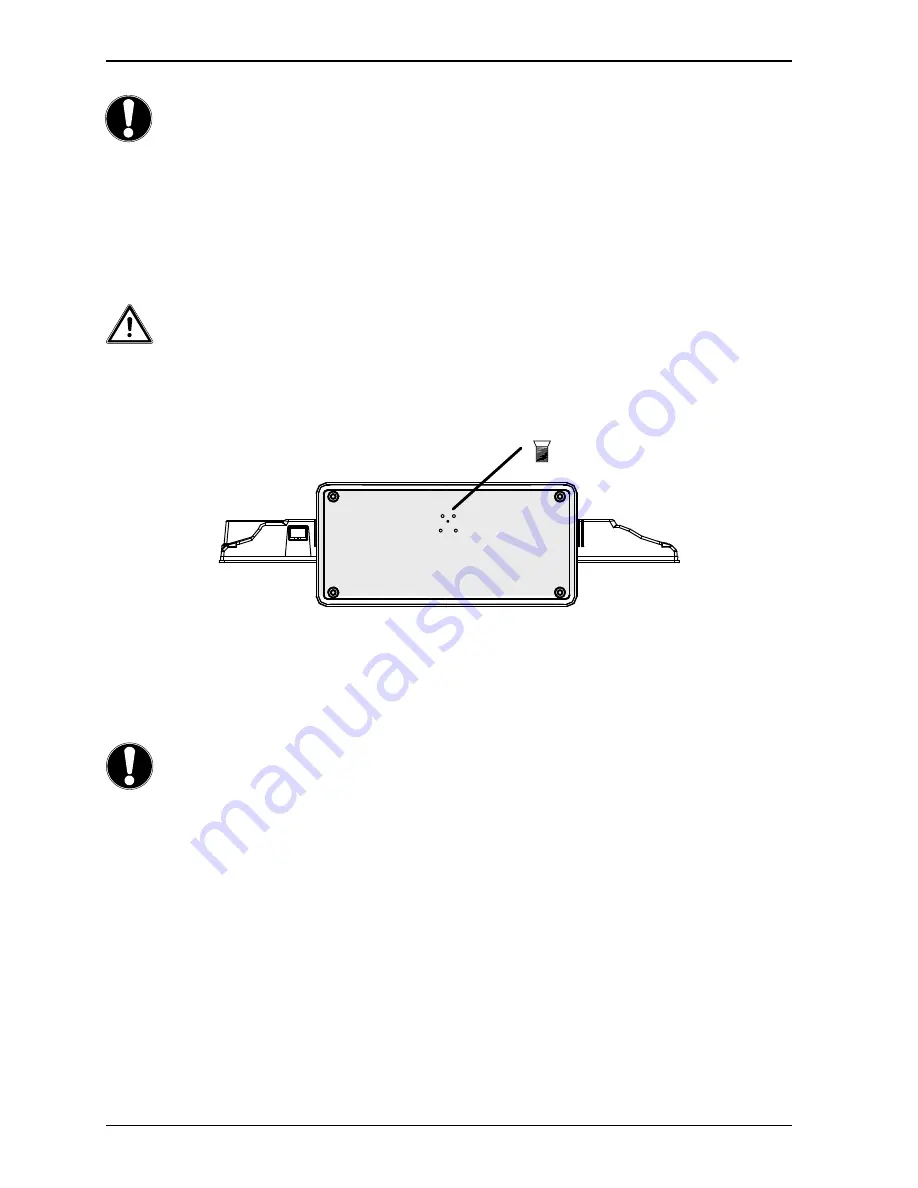
4.3.  Inserting Batteries into the Remote Control 


Open the battery compartment cover on the back of the remote control. 


Insert two (AAA) 1.5-V batteries in the battery compartment of the remote control. Check the battery polarity 
(inscribed on the bottom of the battery compartment).


Replace the cover.

CAUTION!

Remove the batteries if the device will not be used for long periods. The remote control can be damaged by leaking 
batteries.

Summary of Contents for LIFE E12009

Page 1: ...21 5 LED TV DVD Combi MEDION LIFE E12009 MD 21259 Instruction Manual ...

Page 2: ...Use 12 5 Operation 13 5 1 Channel Selection 13 5 2 Setting the Volume 13 5 3 Picture Setting 13 5 4 Displaying Information 14 5 5 Favourite Channel List 14 5 6 Input Source Selection 14 6 Connecting External Devices 15 6 1 Connecting Headphones 15 6 2 Digital Amplifier via Coaxial Connection 15 6 3 Connecting a Blu Ray Player 15 6 4 Connecting a Video Recorder VCR 15 6 5 Connecting a DVD Recorder ...

Page 3: ...ction 28 9 1 Direct Recording Start Stop 28 9 2 Scheduled Recording 28 9 3 Playback of Recorded Files 28 10 EPG Program Guide 29 11 DVD Mode 30 11 1 Switching from TV to DVD mode 30 11 2 Inserting a DVD 30 11 3 Button function 30 11 4 Navigating between Audio Picture MP3 JPEG 31 11 5 DVD Player Setup 31 12 Troubleshooting 34 12 1 Do You Need More Help 35 13 LED Backlight TV pixel faults 35 14 Clea...

Page 4: ...uidelines in the operating instructions WARNING Warning danger of electric shock WARNING Warning danger due to excessive volume Bullet point information on operating steps and results Tasks to be performed 1 2 Target Group This unit is to be used only for receiving and playing back TV programmes The range of connections supplied makes it possible to expand the input and output sources e g receiver...

Page 5: ...ating correctly the device has fallen or the casing is damaged 2 2 Set Up Location In the first hours of operation new devices may emit a typical unavoidable but completely harmless smell which will decline increasingly in the course of time We recommend that you ventilate the room regularly in order to counteract the formation of the smell Keep your LED Backlight TV and all connected devices away...

Page 6: ...ecommend using an over voltage protection device to prevent your LED Backlight TV sustaining damage as a result of power surges or lightning strikes If you are using an extension cable make sure that it complies with UK and Ireland Electrical Safety requirements If in doubt contact your electrician Position the cable so that nobody is able to step on it or trip over it Do not place any objects on ...

Page 7: ...r product The device has a safety system that prevents dangerous laser rays from escaping during normal use To avoid eye injuries never tamper with or damage the device s safety system 2 9 Contents Please check the items received in the box and inform us within 7 days from purchase if anything is missing Your statutory rights are not affected WARNING Keep packaging material such as plastic film aw...

Page 8: ...the menu 4 VOL VOL Set the volume or navigate in the menu 5 PLAY For playing back DVDs 6 EJECT Eject button DVD 7 POWER Standby button switches the device on or into standby mode 8 Operating light Lights up red when the appliance is in standby mode Lights up green when the appliance is switched on Infrared sensor Reception field for the infrared signals from the remote control 9 LCD screen ...

Page 9: ...al connection DVB T analogue 5 USB 5V DC MAX 500mA USB connection for connecting an external storage medium for playing back music images and videos 6 HDMI HDMI connection for devices with HDMI output 7 SPDIF COAX OUT Digital audio output coaxial 8 SCART SCART connection 9 VGA Connection for connecting a PC 10 VGA AUDIO IN Audio connection for PC sound playback 11 HEADPHONE OUT For connecting head...

Page 10: ... up recording list PVR 14 CH Programme selection buttons TV Select next previous programme 15 Colour buttons Call up various functions in the OSD menu 16 REVEAL D SUB DVD Show subtitles 17 D LANG NICAM A2 Analogue TV Stereo mono digital TV select audio language if available DVD select disc language 18 SUBPAGE DVD next track next chapter 19 SIZE DVD go to start of track chapter previous track previ...

Page 11: ... use this box to transport the TV WARNING Keep packaging material such as plastic film away from children There is a risk of suffocation if used improperly 4 2 Installation Attach the base stand as shown in the drawing Carry out this step before connecting the LED Backlight TV 4x 4 3 Inserting Batteries into the Remote Control Open the battery compartment cover on the back of the remote control In...

Page 12: ... a 100 240 V 50 Hz mains socket CAUTION Please only use the included power supply adapter model DC12030012A The use of different power supply adapters may cause damages to the device 4 8 Switching the LED Backlight TV on and off Connect the power supply adapter to the device and plug it to the mains The unit will switch to standby off mode when connected to the mains To switch on the unit either p...

Page 13: ...and press OK 2N LW Exit OK Move Auto Installation Auto Search ATV Setup 3 All Previous Page DTV Use the direction buttons to select the reception type ALL search for digital and analogue TV stations ATV search for analogue TV stations DTV search for digital TV stations After you have finished making your settings press OK The search process starts LW Exit Auto Installation ATV channels found DTV c...

Page 14: ...een the following picture modes STANDARD MILD USER DYNAMIC The USER setting is defined under the menu option PICTURE PICTURE MODE Depending on the program the pictures are displayed in the formats 4 3 or 16 9 Use the ASPECT button to adjust the picture format AUTO not available for YPbPr PC MEDIA and DVD The format displayed is automatically adjusted to match the input signal 4 3 Is used to displa...

Page 15: ...ollows Open the menu by pressing FAV Use the direction buttons to select one of the four favourites lists With the red button you can change the name of the favourites list Use the direction buttons to select a programme and open it by pressing OK 5 6 Input Source Selection Use INPUT to call up the source selection list The following sources are available DTV TV mode digital signal ATV TV mode ana...

Page 16: ...Audio Cable 3 x Cinch RCA on 3 5 mm jack Connect the AV adapter to the Mini AV connection on the LED Backlight TV Connect a stereo cinch RCA cable red and white jack to the AV adapter and the audio outputs on the external device Connect a video cinch RCA cable yellow jack to the AV adapter and the video outputs on the external device PLEASE NOTE Please only use the included AV adapter 6 3 2 Compon...

Page 17: ...the audio outputs on the external device Connect a video cinch RCA cable yellow jack to the AV adapter and the video outputs on the external device PLEASE NOTE Please only use the included AV adapter 6 6 2 HDMI Cable If the external device has a HDMI output connect a HDMI cable not included between the HDMI input on the LED Backlight TV and the HDMI output on the external device 6 6 3 Component Vi...

Page 18: ...e has a DVI output then you can also connect it to the HDMI input HDMI is downwards compatible to DVI Digital Visual Interface For this you will need a HDMI DVI adapter The DVI output does not transmit sound so you will have to connect an audio cable in addition Connect a stereo cinch RCA cable with 3 5 mm jacks to the VGA AUDIO IN socket to transmit sound 6 12 Connecting a PC or Notebook The LED ...

Page 19: ...a sub menu not every menu has a sub menu option Press MENU to return to the next higher menu Use the direction buttons to enter a desired value or make another selection Press EXIT to close the menu and also confirm your selection Please remember that the menu will close automatically after a couple of seconds if you don t press a button You can select the following main menus Menu PICTURE Menu SO...

Page 20: ...at here This function corresponds to the button ASPECT NOISE REDUCTION This function reduces picture noise and improves image quality when the signal is weak Choose between LOW MIDDLE HIGH and OFF 7 3 Sound Menu 2N LW 0HQX Exit Return OK Move Sound User 50 50 Off 0 PCM Sound Sound Mode Bass Treble Balance Surround AVL SPDIF Picture Channel Feature Setup Off Menu Item Setting SOUND MODE Select audi...

Page 21: ... selected channel flashes Now move the channel to the desired location using and press the blue button again The other channels will be shifted up down accordingly FAVORITE MANAGEMENT In the Favourites Manager you can set up up to four favourites lists Use to select the desired channel The CH buttons bring you direct to the next previous channel in the channel list Now press the respective colour ...

Page 22: ...turn OK Move HDWXUH OK OK OK 4 Hours Off Feature Lock Language Clock Sleep Timer Auto Power Off Hearing impared CI Info 3LFWXUH 6RXQG KDQQHO 6HWXS Off OK PVR Pause TV OK Menu Item Setting LOCK You can use this to activate the settings LOCK ENABLE PARENTAL GUIDANCE and HOTEL MODE You need to enter the password The default password is 0000 PLEASE NOTE Make a note of the new password It will not be r...

Page 23: ... This is a function which helps protect the environment HEARING IMPARED not in ATV mode If the station transmits special audio signals for the hearing impaired you can set the setting to ON to receive these signals This option is only available in DTV mode CI INFO You will have to register with the respective provider in advance if you wish to watch channels with costs You will receive a Condition...

Page 24: ... delete DEL ALL With this function you can delete all of the programmed timer recordings ADD Save a new timer recording RECORDER Activate deactivate timer recording function TYPE Select the reception type DTV or RADIO CHANNEL Select the required channel START TIME Select the start time DURATION Select the duration DATE Select the date MODE Set whether you want the timer recording to be once daily ...

Page 25: ...klight TV pixels This will result in a clear image with an even sharp display CLOCK With this setting the picture signal is synchronised to match with the monitor s pixel rate This corrects errors that can appear as vertical stripes in pixel dense images like tables or text with small fonts Set the pixel frequency using BLUE SCREEN not in DTV mode If the LED Backlight TV is not receiving a signal ...

Page 26: ...will be While recording on your external USB device a new folder will be created labelled PVR The OSD will show the file format and size selected how many minutes of the TV program can be recorded in either SD quality or HD quality from the source media After selecting the system type and size press OK again will start the formatting After the USB device has been formatted it can be used for recor...

Page 27: ... green button to delete or accept all the files in the playlist To leave the media player press the KPRWV button and select another source if required 8 7 Display of Photos Images If you select PHOTO from the main menu all the available image files will be filtered and displayed on the screen If there are several folders on the storage medium use to select the folder and confirm with QM Use to sel...

Page 28: ...on to return to the previous menu 8 9 Video Playback If you select MOVIE from the main menu all the available video files will be filtered and displayed on the screen If there are several folders on the storage medium use to select the folder and confirm with QM Use to select the required video and press QM to select it for the playlist You can select several videos for the playlist using OK You c...

Page 29: ... the GZKV button to return to the previous menu 9 PVR Function You can use your LED Backlight TV to record TV programmes on a USB storage medium e g USB stick You can store recordings directly after a time delay or according to programmed settings Channels that are encrypted with a CI module cannot be recorded Before it is possible to make a recording you must make the required settings in the FEA...

Page 30: ... programme guide display daily weekly view Green button REMINDER Pressed once Adds a reminder for the selected programme to the timer list As soon as the programmed time is reached the device automatically switches to the programmed broadcast Pressed twice Adds a timer recording to the recording list As soon as the programmed time is reached the device automatically starts recording the programmed...

Page 31: ...he DVD will start to play automatically PLEASE NOTE In some cases you may need to start the playback manually 11 3 Button function 11 3 1 Special screen message If you select a function that is not available on the inserted media or cannot be accessed in the current mode the not valid symbol shown to the left will be displayed The symbol disappears after a few seconds 11 3 2 PLAY Press the PLAY bu...

Page 32: ...er or file is shaded orange The total number of the files in the folder appears in the top row Use the arrow keys to navigate to a folder and confirm your selection with OK The other sub folders may also be opened if available In this case you can return to the higher level menu using the left arrow key or via the top menu item To listen to a particular track or view a particular picture select it...

Page 33: ... Menu Audio Setup Page Select the AUDIO SETUP PAGE menu item to set the sound mode Audio Setup Page If you use the analogue output you can change the loudspeaker settings from this menu SURROUND Choose this setting if you wish to play surround sound STEREO This option produces stereo sound Choose this setting when the sound is only being output via two speakers 11 5 4 Menu Dolby Digital Setup Dyna...

Page 34: ...nder 18s 8 ADULT Adults only For example if you have inserted a DVD that is coded with authorisation class 7 18 or 8 ADULT and you have selected authorisation classes 1 to 6 a message appears and the viewer must enter a password Parts of a DVD certain scenes for example may also be encoded with an authorisation class or a range of authorisation classes Password Here you can set the password for ac...

Page 35: ...a is connected properly Check the settings for sharpness and noise reduction in the PICTURE menu There is a double triple picture Check if the antenna is aligned properly Waves might be reflected off buildings or mountains The picture is pixellated There might be interference from cars trains power lines neon lights etc There might be interference between the antenna and power cables Position the ...

Page 36: ...r multiple pixel drop outs dead pixels This is rare however For active matrix TFTs with a resolution of 1920 x 1080 pixels which are each made up of three sub pixels red green blue there are a total of approx 6 2 Mio control elements in use Occasionally one or more pixels can fail or become incorrectly controlled because of this very high number of transistors and the associated extremely complex ...

Page 37: ...int free cloth Ensure that no water droplets remain on the LED Backlight TV Water droplets may result in permanent discolouration Do not place the screen in strong sunlight or near ultraviolet light Store the packaging material in a safe place only use this box to transport the LED Backlight TV ATTENTION None of the parts inside the housing require cleaning or maintenance 15 Disposal Packaging You...

Page 38: ...ptor 1 x Component In YUV 3 5 mm mini jack adaptor Audio Stereo Audio In for Composite Video YUV 3 5 mm mini jack adaptor Headphone jack 3 5 mm jack PC Audio In 3 5 mm jack Digital Audio Out SPDIF coaxial Drives storage media Drives Disk USB Supported formats via USB1 Photo JPG PNG BMP JPEG Music MP3 WMA OGG Film MPEG 1 2 4 MKV Xvid AVI MP4 Quicktime Text TXT Capacities USB max 1 TB Supported form...

Page 39: ... Dimensions with stand W x H x D approx 510 x 345 x 161 mm Weight with stand approx 3 3 kg Weight without stand approx 2 7 kg Wall mounting Vesa standard hole spacing 100 x 100 mm2 2 1 Due to the large number of different codecs it is not possible to guarantee playback of all formats 2 Wall mount not supplied When mounting the device make sure that you use M4 screws The length of the screws corres...

Page 40: ...t the written permission of the manufacturer Copyright is owned by the company Medion AG Am Zehnthof 77 45307 Essen Germany The operating manual can be reordered via the service hotline and is available for download via the service portal at www medion com gb service start You can also scan the QR code above and download the operating manual onto your mobile device via the service portal ...

Page 41: ...40 of 42 ...

Page 42: ...ites 14 Feature menu 21 Front 7 Full HD 3 I Initial operation 10 Installation 10 M Media mode 25 O Operating safety 4 Operation 13 OSD menu 18 P Picture menu 19 Picture settings 13 Pixel faults 35 Power supply 5 Program guide 29 PVR 23 28 R Rear 8 Remote control 9 S Safety instructions 4 Operating safety 4 Power supply 5 SAT receiver 16 Setup menu 24 Sound menu 19 T Technical data 37 Timeshift 23 ...

Page 43: ...42 of 42 ...

Page 44: ...o contact us by email please visit the Service and Support section of our website at www medion co uk www medion co uk 2 M In 03 2014 Medion Electronics Ltd 120 Faraday Park Faraday Road Dorcan Swindon SN3 5JF Wiltshire United Kingdom Hotline 1 800 992508 free phone Fax 01793 715716 To contact us by email please visit the Service and Support section of our website at www medion co uk www medion co...

Reviews: