background image


Navigation 

26 


Note 

Clean the windscreen thoroughly with a glass cleaner. Warm the disk and 
the nipple slightly at temperatures below 15° C. 


Place the holder with the suction head directly onto the wind screen and press the lever on 
the suction head downwards. The sucker will attach itself to the background firmly. 

II. Attaching the Navigation System  

1.


Connect the car adapter and, if necessary, the TMC aerial to your navigation system 
and insert the memory card. 

2.


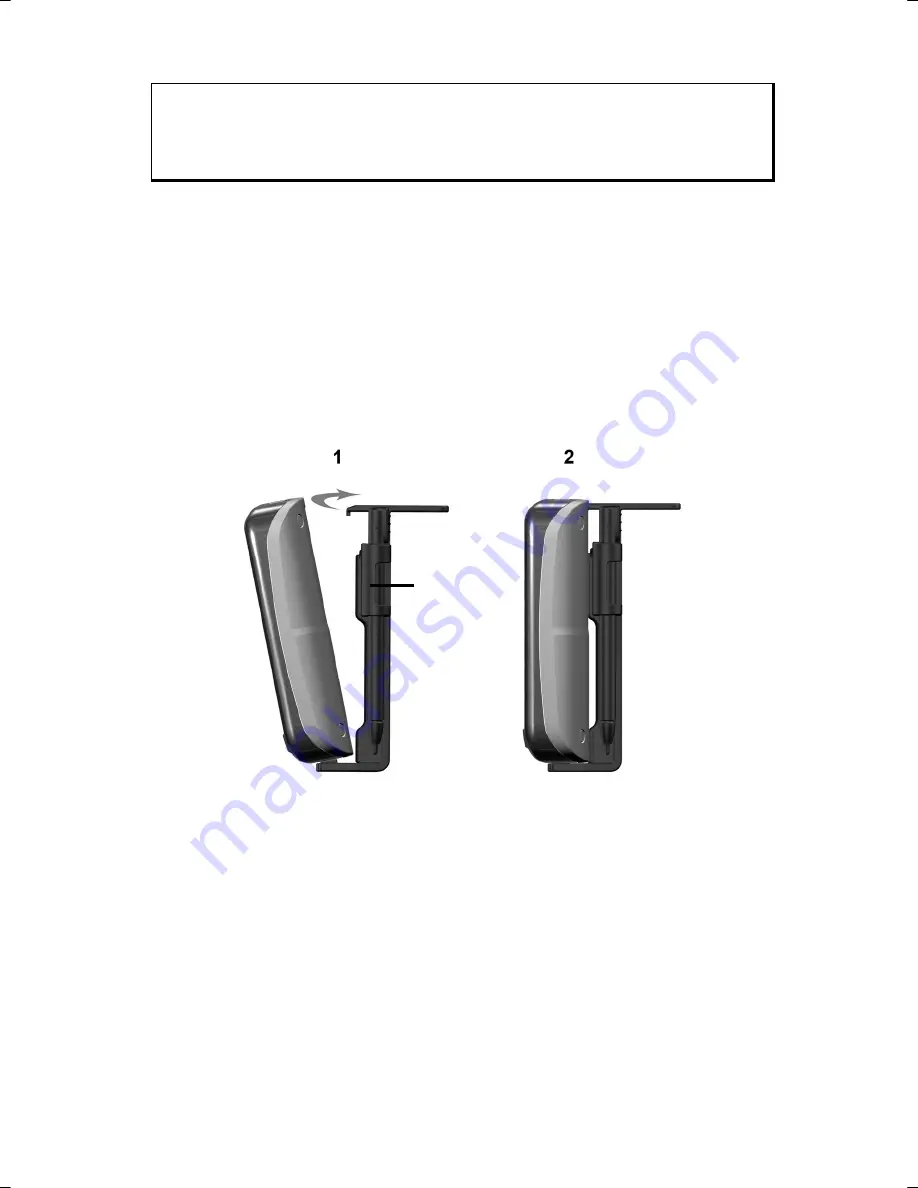
Place the device below in the centre of the holder. 

3.


Press it gently 

backwards

 (

) until it engages audibly (

). 


4.


Place the holder on the fixing catches of the car holder. 

5.


Now, push the unit 

to the side

 until it engages audibly. 

6.


Now you will be able to place the complete unit on the cleaned windscreen. 

Stylus in 
holder


Summary of Contents for E3140

Page 1: ...ustomer service department Document Your Navigation Unit It is important to record the details of your Navigation Unit and the purchase thereof In the event you require warranty support you may be ask...

Page 2: ...upport and assistance whenever you have ques tions or are experiencing problems This manual contains a section specific to Customer Service starting on page 41 Copyright 2010 version 07 09 2010 All ri...

Page 3: ...e of the Display 5 Recycling and Disposal 5 Transport 6 Supplied Items 7 Views 8 Front Components 8 Back Components 9 Bottom Components 9 Top Components 10 Initial Set up 11 I Charging the Battery 11...

Page 4: ...raffic monitoring points 29 MP3 Player optional 32 Overview of the Main Screen 32 Select a Title and Move it into the List of Favourites 33 List of Favourites 34 List of the established bookmarks 34 P...

Page 5: ...58 Trafficmaster optional 58 Installing the External TMC Receiver optional only for model E3140 59 Connecting an additional TMC Dipole Aerial optional only for model E3140 and E3240 59 Working with Me...

Page 6: ...vi...

Page 7: ...e display Otherwise there is a danger that the screen will break To avoid damage do not touch the screen with sharp objects We recommend us ing only the stylus provided or finger when using the touch...

Page 8: ...ions and shaking Please note the device should be installed vertically this will ensure that the device remains secure within its holder Repair Please contact our Service Centre if you encounter techn...

Page 9: ...it by adjusting the positions of and the distances between the devices Before driving please ensure that the electronic systems of the car are working properly Connection When connecting your applianc...

Page 10: ...at Take care to avoid overheating of appli ance and the integrated battery Failure to comply with this instruction may lead to damage to or even explosion of the battery Only use the car adapter to ch...

Page 11: ...ion Use only a soft lint free cloth to clean the screen Do not expose the screen to strong sunlight or ultraviolet radiation Recycling and Disposal The device and its packaging are recyclable Device A...

Page 12: ...sure that you are aware of the power and communications pro visions at your destination Before travelling obtain any power or communications adapters that may be required for the operation of your dev...

Page 13: ...orward to us all claims for miss ing items within 14 days from the date of purchase The package should include the following Navigation system Power cable for cigarette lighter Car holder and cradle U...

Page 14: ...or The LED will flash orange during the charging process It will shine constant green when the accumulator is fully charged Touch Screen Displays the output of your appliance Tap on the screen with th...

Page 15: ...a PC by means of a USB cable for data transfer as well as connection to external power supply You also have the possibility to connect an external TMC receiver here only for the model E3140 Headphone...

Page 16: ...Components Ref Component Description On Off button Turn the device on or off by pressing and holding the On Off button You will switch to the stand by mode or reactivate the device by quickly pressin...

Page 17: ...s fully charged This may take a few hours The charging status LED will shine constant green if the battery has a high level of charge Leave the device charging for 20 further minutes to ensure the bat...

Page 18: ...of charging the battery The battery will charge as soon as you connect your navigation device to a switched on PC or notebook by means of a USB cable No additional software or updates is required for...

Page 19: ...n Off key for a long time 3 sec The navigation system will start the first setting up automatically Select the language that you require first The brand logo will appear and your device will display t...

Page 20: ...Off key 3 sec to completely switch off the device No data will be lost as data is stored in the internal memory The starting process will only last slightly longer Your navigation system will use a lo...

Page 21: ...ged even when it is in the standby mode 2 To switch off your navigation system briefly press the On Off switch The following screen will appear You have three possible choices Button Description Cance...

Page 22: ...password 4 A keyboard will appear Enter a password with it Note The password must consist of at least 4 symbols Use a combination of letters A Z and numbers 0 9 Keep the password in a safe place 5 Con...

Page 23: ...rmation note successfully Button Description Set here whether the device should request the password after a hard reset Set here whether the device should request the password after a restart Set here...

Page 24: ...n will appear on the display after you have confirmed the settings Note Record this data in your Operating Instructions see Page 1 and keep them in a safe place You will need this information if you h...

Page 25: ...splay will appear Button Description Change the password or the information text Authentication settings see Page 17 Making settings Display SuperPIN and UUID see Page 18 Reverses the complete securit...

Page 26: ...rd Note The password will be displayed in the form of small stars 2 Click on the question symbol to have the information note displayed if you have forgotten the password and need the Help setting 3 C...

Page 27: ...A reset is often used in order to reorganise the memory In doing so all programs that are running are interrupted and the working memory is reinitialised You can carry out two different Reset procedu...

Page 28: ...tely the consumption of energy can be kept as low as possible through this All the data in the temporary memory will be lost if the device is switched off completely hard reset To switch your navigati...

Page 29: ...on and apply the waning function only where allowed We cannot be held liable for damag es caused by the use of the warning function Attention The road layout and driving rules take precedence over the...

Page 30: ...not being blinded during operation Do not mount the components within the operating range of any airbags Check the secure adherence of the suction cup at regular intervals The power plug will consume...

Page 31: ...aerial and installation possibilities in the vehicle if the reception is inadequate I Mounting the Car Holder Attention Only fix the holder for the navigation system to the windscreen if it does not...

Page 32: ...to the background firmly II Attaching the Navigation System 1 Connect the car adapter and if necessary the TMC aerial to your navigation system and insert the memory card 2 Place the device below in t...

Page 33: ...the power adapter into the cigar lighter socket ensuring that it will not lose contact while driving This could cause a malfunction Note Remove the power adapter from the cigarette lighter socket when...

Page 34: ...rding to the version 3 Tap on Navigation on the screen for entering the destination Enter the destina tion address Confirm your entry by clicking the symbol to start the navi gation After a short time...

Page 35: ...for traffic monitoring points optional has been installed Confirm with if you want to use navigation with the warning function for traffic monitoring points Tap on the Configure special functions int...

Page 36: ...a traffic monitoring point Acoustic information about a traffic monitoring point will be given by a warning sound approx 15 seconds before it is reached Then another double warning sound will be give...

Page 37: ...mark The use of devices that warn about traffic monitoring systems like speed traps is prohibited in some countries i e Germany Ireland and Switzer land Please obtain information about the legal situa...

Page 38: ...Overview of the Main Screen Button Description Reduces the screen brightness to a minimum to save electricity Determine add bookmarks or Increase or decrease the volume The display in the upper right...

Page 39: ...order to mark all the titles including all sub directories Tap on in order to mark all titles currently in view Tap on to delete all marks within a directory The selected titles will be indicated by a...

Page 40: ...irm with in order to take over the new selection into the List of Favourites List of the established bookmarks You will reach the list of the established bookmarks by clicking on the symbol You will d...

Page 41: ...g the Picture Viewer Start the Picture Viewer from the menu Other Applications by tapping on the Picture Viewer button Alternatively the Picture Viewer can also be started from the navigation software...

Page 42: ...view in order to activate the service strip Fig Full image view with service strip Button Description Previous picture Turn it clockwise by 90 in stages Fade in grid Start the slide show Pause the sli...

Page 43: ...be subdivided into 6 fields by tapping on the symbol fade in grid Fig Full image mode with grid Tap on a square in the grid to zoom in on that area of the picture Fig Zoom in Mode Tap on the centre o...

Page 44: ...of individual towns and cities or regions in Europe such as sights restaurants culture and travel infor mation Start the Travel Guide from the menu Other Applications by tapping on the Travel Guide b...

Page 45: ...e to the navigation software as the destination Button Description Previous image Shows the address of the selected category Shows the available images in the selected category Tap on this control but...

Page 46: ...this function from the menu Other Applications by tapping on the Alarm Clock button The waking function can work when the device is switched off Standby Mode Power Saving Mode as well as a reminder d...

Page 47: ...on Current system time Setting up mode Setting volumes system time and alarm Night mode Standby mode Reset deactivate the waking function Setting the alarm time Delete the entry Confirmation interface...

Page 48: ...current time will be located in the upper right corner of the screen You can adjust it as follows 1 Tap on in the main screen The following screen will appear 2 Tap on to change the time setting Note...

Page 49: ...ol 2 Select the desired alarm sound and confirm the selection with 3 Tap on the corresponding file in the Memory Card directory if you would like to se lect an alarm tone from the storage card and con...

Page 50: ...Setting the Volume You can adjust the volume of the alarm signal by tapping on the interface Note The volume configured here only relates to the alarm signal and will not change the volume of the lang...

Page 51: ...t 3 Tap on to activate the Snooze function 4 To be wakened again at the same time on the following day tap on the button 5 Tap on to return to the screen before the alarm signal started Ending the Ala...

Page 52: ...a number puzzle The puzzle area is square and subdivided into nine sections Each section consists of 9 smaller squares When playing Sudoku the aim is to fill all the 81 number fields using the numbers...

Page 53: ...lds by tapping on this control button Tap on the control button again to hide the solutions A new Sudoku will be opened by tapping on this con trol button Settings You have the following possibilities...

Page 54: ...be entered in the number fields The selected number will stand out and it will now be possible to enter it into a number field Entry mode First tap on the number in the strip of numbers to be entered...

Page 55: ...tional assistance These aids will be provided to you while you are using the computer or the device What do I need the accompanied CD DVD for The CD DVD contains the ActiveSync program for balancing d...

Page 56: ...sition of your navigation system and ensure that unrestricted sight of the aerial is not impaired No language statements can be heard Check the volume setting Additional Support If the suggestions in...

Page 57: ...e installed from the My Flash Disk memory part of the permanent memory in which the executable parts of the navigation software will be located following the initial alignment My Flash Disk Navigation...

Page 58: ...the withdrawal of the external power supply For example this function is useful in the case of vehicles where the cigarette lighter also switches off when the ignition is switched off The AutoSuspend...

Page 59: ...he action actually takes place To do this press on YES There will be a corresponding report if the data to be deleted is no longer available Please read the Transferring Installation Files and Map Mat...

Page 60: ...tten or changed during the installation of software You should create a hard disk backup in order to be able to have access to the original files in the case of possible problems following the install...

Page 61: ...your navigation device as a detachable device e g a USB stick in the Mass Storage mode Two drives the internal memory of the navigation system itself and the optional memory card if it has been inser...

Page 62: ...n en tered If this is the case the changes that have taken place on the PC and on the navigation system since the last synchronisation will be compared and adjusted to each other You will be able to d...

Page 63: ...uracy of the navigation The GPS receiver consumes additional power This is especially of concern when running on batteries To conserve power do not turn on the GPS receiver unnecessarily Also ter mina...

Page 64: ...m supports TMC before the possible purchase of a TMC re ceiver In Austria the TMC traffic messages are made available by the TMCplus service TMCplus stands for an even faster and more efficient passin...

Page 65: ...or model E3140 and E3240 A TMC receiver and an active TMC dipole aerial are already integrated into your navigation system to receive traffic information However if the TMC signal is too weak you have...

Page 66: ...tton be forehand Otherwise you will risk a loss of data 1 To remove the card press lightly onto the upper edge until it ejects 2 Pull the card out without touching the contacts 3 Store the memory card...

Page 67: ...pplied with the device enables a simple and individual compilation of the map material to be transferred Depending on the amount of map data on the navigation CD DVD memory cards with capacities of 25...

Page 68: ...iles and Map Material to the Internal Memory Note The navigation system must be connected to a computer by means of ActiveSync for the transfer of the data Your device has an internal permanent memory...

Page 69: ...24V DC 800mA Sicherung 2A T2AL 250V 5V 1A max Battery Li Ion 3 7 V Earphone connection Stereo earphones 2 5 mm Memory card type Micro SD USB interface USB 2 0 Dimensions approx 100 mm x 79 mm x 19 5...

Page 70: ...rated TMC receiver and TMC dipole antenna E3140 E3240 Equipment available Equipment not available Copying this manual This document contains legally protected information All rights reserved Copying i...

Page 71: ...lar installation If this equipment does cause harmful interference to radio or television reception which can be determined by turning the equipment off and on the user is encouraged to try to correct...

Page 72: ...card included with the product Please keep the original purchase receipt and the warranty card in a safe place MEDION and its authorised sellers reserve the right to refuse a repair under warranty or...

Page 73: ...le Please submit a letter containing as much detailed information as possible and a full description of the defect or fault This should include a description of the fault when it occurred how long it...

Page 74: ...oduct for exact specifications and tolerances To the extent which is permitted under law MEDION will accept no liability for burnt in images on plasma or LCD products as a result of normal wear and te...

Page 75: ...roduct or of a component of the product are modified or made illegible To the extent permitted by law MEDION shall only be responsible for losses which are a reasonably foreseeable consequence of the...

Page 76: ...For pre installed operating system as well as to application programme software included in the MEDION product MEDION only guarantees the data media e g the diskettes and CD ROMs upon which this softw...

Page 77: ...o carry out your order properly You are responsible yourself for connecting and configuring any existing external peripheral products after MEDION or its authorised personnel have carried out their re...

Page 78: ...Security 1 DC AutoSuspend 52 E Earphone connector 9 Electromagnetic Compatibility 3 EMC 3 F FAQ 49 FCC Compliance Statement 65 G GPS 57 H Hard Reset 22 Hotline 50 I Initial set up Charging the batter...

Page 79: ...ansport 6 Security 16 Faults and possible causes 50 Hotline 50 Specifications 63 Standards FCC Compliance Statement 65 R TTE 4 Starting the navigation software 28 Sudoku Description of the switch fiel...

Page 80: ...Index 74...

Reviews: