background image


vi 

Notes on Laser Radiation .................................................................................. 84


Recycling and Disposal ........................................................................................... 84


Appendix .................................................................................................. 85


Information about conformity ................................................................................ 87


ISO 13406-2 Class II ............................................................................................ 87


Information about the Regulatory Compliance  according to R&TTE ................... 89


FCC Compliance Statement ................................................................................ 90


Restricted Warranty ................................................................................................ 91


Making Copies of this Manual ............................................................................. 95


Index ...................................................................................................................... 96


Summary of Contents for AKOYA P9614

Page 1: ...134 Medion AG 45307 Essen Germany Medion Electronics Ltd 120 Faraday Park Faraday Road Dorcan Swindon SN3 5JF Wiltshire Hotline 0871 376 10 20 Costs 7p min from a BT landline mobile costs maybe higher...

Page 2: ...programs incorporate extensive help functions As a general rule you can access help functions by pressing F1 on the keyboard These help functions will be available to you while you are using the Micr...

Page 3: ...r newest customer Thank you for choosing our products 2010 Medion All rights reserved Microsoft MS DOS and Windows are registered trade marks of Microsoft Corporation in the U S and other countries Pe...

Page 4: ...tion 13 Views 14 Front View 14 Left and Right Side 15 Rear Side 16 Getting Started 17 Step 1 Inserting batteries in keyboard 17 Step 2 Inserting batteries in mouse 17 Step 3 Inserting batteries in the...

Page 5: ...ta from Discs 39 Regional Playback Information for DVD 40 Subjects Concerning the CD DVD Rewriter 40 The Card Reader 41 Inserting Memory Cards 41 Removing Memory Cards 41 The Sound System 42 Configura...

Page 6: ...tion 68 Product Activation on your All In One PC 68 BIOS Setup 69 Execution of the BIOS Setup 69 Customer Service Self Help 71 Data and System Security 73 Data Security 73 Maintenance Programs 73 Syst...

Page 7: ...and Disposal 84 Appendix 85 Information about conformity 87 ISO 13406 2 Class II 87 Information about the Regulatory Compliance according to R TTE 89 FCC Compliance Statement 90 Restricted Warranty 91...

Page 8: ...Safety Handling Components Aid Appendix Chapter 1 Safety Subject Page Operational Safety 3 Power Supply 4 Data Security 6 Battery Treatment 6...

Page 9: ...English 2...

Page 10: ...In One PC This may lead to electric shock electrical short circuit or fire that will damage your All In One PC Do not cover the slots and openings in the All In One PC casing These open ings are for v...

Page 11: ...plug on the All In One PC Pulling the plugs in the wrong order may damage the mains adapter or the All In One PC When pulling the plug hold the plug itself Never pull on the cord Note Be sure to shut...

Page 12: ...cable supplied with the devices for the connection of your peripheral devices Make sure that all connection cables have been connected to the peripheral de vices associated with them in order to avoid...

Page 13: ...r the liquid of the battery may get into your eyes or adhere to your skin If this happens rinse with a large quantity of water immediately and consult a doctor Do not expose batteries to strong impact...

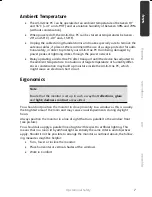
Page 14: ...ons of large temperature or humidity differ ences condensation may build up moisture inside the All In One PC which might cause an electrical short circuit Ergonomics Note Ensure that the monitor is s...

Page 15: ...ontal or angled slightly downward Your lower legs should be near a right angle to your thighs Your feet should rest flat on the floor If necessary use a footrest but double check that you have your se...

Page 16: ...ndling Components Aid Appendix Chapter 2 Setting Up Getting Started Subject Page Included with your All In One PC 11 Setting Up 12 Views 14 Front View 14 Left and Right Side 15 Rear Side 16 Getting St...

Page 17: ...English 10...

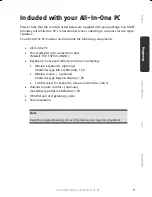
Page 18: ...nclude the following components All In One PC Power adapter with connection cable Modell FSP FSP135 ASAN1 Keyboard mouse and remote control set containing Wireless keyboard optional 2 batteries type M...

Page 19: ...osition the foot in progressive angles so that the monitor can be in stalled with various degrees of slant Attachment with a VESA support optional You can install the All In One PC to the wall with a...

Page 20: ...is tance of 7 mm is maintained between the wall and the All In One PC in order to avoid overheating Set up Location Keep your All In One PC and all units connected to it away from moisture dust heat a...

Page 21: ...English 14 Views Front View Diagram the same 1 Webcam p 45 2 Microphone p 42 3 Multi Touch Display p 27 4 On Off button p 25 5 Stereo speakers 1 2 3 4 5...

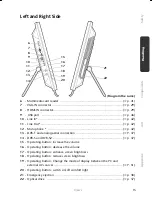
Page 22: ...aerial connection P 47 14 DVB S and DVB S2 p 47 15 Operating button increase the volume 16 Operating button decrease the volume 17 Operating button enhance screen brightness 18 Operating button reduce...

Page 23: ...with the included software p 42 Rear Side 23 Hard drive slot for a second hard drive 24 Kensington lock p 56 14 Power socket p 26 26 LAN port RJ 45 p 52 27 Digital audio out S P DIF optical p 42 28 HD...

Page 24: ...board The keyboard requires 2 batteries type Micro LR03 AAA 1 5V 1 Remove the battery com partment cover on the bot tom of the keyboard 2 Insert 2 batteries type Micro LR03 AAA 1 5V The illus tration...

Page 25: ...f the remote control is described on page 48 Step 4 Connecting the USB receiver 1 Attach the receiving station for the mouse keyboard and remote control to a free USB port on your All In One PC Step 5...

Page 26: ...s on the screen Dialogue boxes will explain any steps that need to be taken The greeting procedure will guide you through the following screens and dialogues Should you have any questions just click o...

Page 27: ...rom the miniature the full screen preview will close Windows Search Windows Search helps you find almost all data located on the All In One PC quickly and easily With Windows 7 you get search results...

Page 28: ...changes System tray System tray on the current time When certain events occur for example upon receipt of an e mail message or upon opening the task manager it may happen that too many notification s...

Page 29: ...English 22...

Page 30: ...The Mouse 31 The Keyboard 32 Setting the frequency for keyboard and mouse 34 The Hard Drive 35 The Optical Drive 37 The Card Reader 41 The Sound Card 42 The Webcam 45 The USB Port 46 The TV Tuner Car...

Page 31: ...English 24...

Page 32: ...ll inform you about the operational status of the All In One PC The All In One PC will always be switched off if the main switch is pressed for more than 4 seconds Warning Do not switch off your netbo...

Page 33: ...ter is connected to the rear side of the All In One PC The adapter has an on and off switch No electricity will be used and the netbook will not be supplied with electricity if the switch is set to OF...

Page 34: ...ean the display use only suitable cleansers such as glass cleansers or moni tor cleansers available in the retail trade Screen Resolution The screen has a native resolution of 1920 x 1080 pixels If yo...

Page 35: ...3 Select the Ease of Access Center 4 Click on Start On Screen Keyboard Appearance and Personalization This program offers you the possibility of adjusting the presentation on your display This include...

Page 36: ...ng an external monitor 1 Shut down your All In One PC 2 Connect the video signal cable of the external monitor to the HDMI OUT port of the All In One PC 3 Connect the external monitor to the electrica...

Page 37: ...n the case of this mode Extend these displays An empty Desktop will be displayed on the second external monitor in this mode Windows from the first screen cane shifted to the second one and vice versa...

Page 38: ...gh a document or internet pages Note The scroll wheel can be used as a button The functionality depends on the application In Word for example you can push the wheel to move up and down as a scroll fu...

Page 39: ...le pressing the other key The right Alt key operates in a similar way but selects certain special characters The Ctrl key like the Alt key carries out program functions Useful key combinations softwar...

Page 40: ...this key to skip backwards to the previous track title in the active player Fn Play Pause Use this key to start or pause for a short time the playback of a track title just as you would with a normal...

Page 41: ...ator will start blinking 2 Push the button on the bottom of the keyboard The channel will be changed after the button is released 3 Push the connect button located on top of the receiver The indicator...

Page 42: ...ity The hard drive is addressed as drive C and D Note Never switch off the computer while the busy indicator is lit since this may result in loss of data A flickering hard drive display is your indica...

Page 43: ...rive C includes important files required to start Windows In the factory setting these files are hidden for safety reasons C Programs As the name suggests in this directory programs install the files...

Page 44: ...f or discs of poor quality Because of the high speeds in the drive the discs might break and damage your data as well as your drive Examine the discs before you enter them If damage or dirt is visible...

Page 45: ...the Desk top link or by pressing the Windows key and the E key at the same time Open Windows Explorer by means of Start All Programs Accessories The pre installed media reproduction will be used auto...

Page 46: ...em and the related settings Your All In One PC is able to playback and to retrieve Audio CDs DVD Movies and Data discs After loading the disc your operating system will open a selection window with di...

Page 47: ...ulations re quire that each CSS decipherable system may only be used in one region Attention The decoding software included with your All In One PC may be changed for regional DVD decoding up to five...

Page 48: ...ing adapter not included in the scope of delivery Inserting Memory Cards Note Memory cards can only be installed in one direction Do not attempt to insert a card by force This can damage the card read...

Page 49: ...antees optimal sup port for all popular programs and games If you wish to alter the base volume click on the loudspeaker symbol in the task bar Click on Mixer in order to open the volume mixer By usin...

Page 50: ...The Sound System 43 Safety Handling Components Aid Appendix Configuration of the Loudspeakers Connect the plug of one audio device with one of the audio sockets The device will be recognised...

Page 51: ...sockets possess their basic functions 5 1 Loudspeaker The audio input is the loudspeaker output on the back The audio output is the loudspeaker ouput on the front The microphone connection is for the...

Page 52: ...the camera icon below your dis play image A wizard helps you optimize the settings of your speakers microphone and webcam Follow the instructions on your screen 3 Click on Finish to transmit your ima...

Page 53: ...e a hub distributor booster On the USB it is possible to connect up to 127 devices which correspond to the USB standard 1 1 and 2 0 supported The data transfer speed is 1 5 Mbit s or 12 Mbit s dependi...

Page 54: ...TV reception You will be able to watch television with your digital satellite equipment by means of the DVB S connection Attention Pull the antenna out when the device is not being used particularly...

Page 55: ...control the Media Center program on your All In One PC In order for it to work the following conditions must be met The All In One PC must be booted up Windows must be fully loaded The driver softwar...

Page 56: ...ge television mode Switch the Comfort Light On Off Switch to AV source Switch the screen On Off User defined button Press to increase the volume Press to lower the volume With these navigation keys yo...

Page 57: ...tart directly by pressing a button on the user defined button of the remote Proceed a follows to program the button 1 Click on the symbol in the information area of the Task Strip with a right mouse c...

Page 58: ...provided that your AV device has an HDMI output No additional cble to transmit sound will be necessary because this will take place through the HDMI cable With a VGA cable Connect a VGA cable monitor...

Page 59: ...our All In One PC to another or several other All In One PCs Users can transfer information and data between computers and share resources such as printers modems and hard disk drives Here are some pr...

Page 60: ...are normally needed A fee may be required to use a public access point To set up a wireless network to share Internet access files and printers at home you will need an access point a router and a bro...

Page 61: ...roblem Maybe one of the used network boards works with a different speed e g 10 instead 100 Mbit and your network computer is unable to recognize this If necessary set the network driver to the compat...

Page 62: ...rinter Using a Bluetooth wireless keyboard and mouse Joining a personal area network PAN Synchronizing a personal digital assistant PDA to a computer or another de vice using Bluetooth wireless techno...

Page 63: ...e You will not be able to delete your password if you forget it Contact your customer Service if you lose your password You can also use the security options of Windows in order to protect your data a...

Page 64: ...niatures of each file or each window open in the program Moving the cursor over the miniature displays a full screen preview of the particular window Moving the cursor away from the miniature closes t...

Page 65: ...d on it will be instantly visible Click on the Titlebar of the window shake it and all open windows will be displayed as symbols on the Taskbar Shake the window again and the other windows will be dis...

Page 66: ...hat it is as if all files were located on one single hard drive This allows you to store digital pho tos on the computer in your home office and then enjoy easy access to them from a laptop in any oth...

Page 67: ...thing you need to know about the features of the All In One PC It is the aim of this feature to enable both beginners and experienced users to make additional setting for the optimal use of Windows 7...

Page 68: ...hange the size of the text on your screen Use Getting Started to understand your All In One PC better and in order to be able to use it optimally It will also serve you as an additional source of info...

Page 69: ...rther information on any element in the Control Panel category view hold the cursor over the symbol or category name and read the pop up display text To open one of these elements click on the associa...

Page 70: ...Center functions is below Main menu Sub menu TV Films Recordings You will have the possibility of recording broadcasts if you connect a TV tuner You can play back the broadcasts re corded delete them...

Page 71: ...an MP3 player or a digital camera you will be able to synchronise the respective data to an external device with the notebook through this sub menu Extension set up You will be able to set up a Window...

Page 72: ...ere Play back everything You will start the playback of all the files stored in your music library by means of this sub menu Radio You will have the possibility of listening to a radio broadcaster and...

Page 73: ...e page 73 for further information regarding data backup How to Install your Software Please follow the instruction of the software vendor We will describe a typical installa tion Once you insert a CD...

Page 74: ...y the program Software Uninstallation In order to remove installed software from your All In One PC follow the next steps 1 Click on Start 2 Click on Control Panel 3 Then select the Programs option 4...

Page 75: ...er activation needs your unique Product ID which can be found on the Certificate of Authenticity sticker on your All In One PC housing When you call please inform your agent that you are running an OE...

Page 76: ...agement The All In One PC is factory pre set to guarantee optimum opera tion Please only modify the parameters if this is absolutely essen tial and if you are familiar with the configuration possibili...

Page 77: ...English 70...

Page 78: ...onents Aid Appendix Chapter 4 Customer Service Self Help Subject Page Data and System Security 73 System Restore 74 FAQ Frequently Asked Questions 77 Customer Service 79 Upgrades and Repairs 83 Recycl...

Page 79: ...English 72...

Page 80: ...CD RW Windows offers Backup Status and Configuration This program is found in Accessories System Tools within the Start menu You should make a backup disk with all your passwords and the operating sys...

Page 81: ...e installing new software or drivers At this point if the system does not run properly this recovery point should enable you to return to a workable configuration without deleting newly created docume...

Page 82: ...ation of the operating system programs or hardware components will be classified as an important update and automatically selected for installation for you Important updates will be provided to remove...

Page 83: ...er Version numbers of additional software programs Plug Play identification key of the hardware devices Windows Update will stand up for the protection of your private data and will not record your na...

Page 84: ...indows is loading files will appear Wait until the files are loaded The Power Recover menu will then appear 4 Select the language of the restoration menu 5 Click on Next 6 You may now choose between t...

Page 85: ...the Windows activation Your operating instructions include a chapter about this subject How do I perform a data backup Make a backup and another backup of selected data to an external medium CD R to...

Page 86: ...equipment is supplied with power Check power points power cable and all power switches Switch off the All In One PC and check all cable connections Check the con nections to peripherals Do not exchang...

Page 87: ...letters for some cards No data can be accessed from the optical drive Check whether the disc is inserted correctly Is the optical drive displayed in Windows Explorer If so test another disc The mouse...

Page 88: ...dware Can you manually repeat the problem If you have been given a customer number previously please quote this Driver Support This All In One PC has been extensively tested in our laboratories with a...

Page 89: ...months that all air vents permit sufficient air circulation Use a Hoover to keep the air vents clear of dust If your device regu larly sucks in a great deal of dust we also recommend that the interio...

Page 90: ...er to life through electric shock There is also a risk of damage to the components Internal components of the All In One PC may be damaged by electrostatic dis charge ESD Carry out system upgrades and...

Page 91: ...ng optical protection Do not allow yourself to be exposed to the laser beam Avoid exposure of the eyes or skin to direct or stray radiation Recycling and Disposal Device At the end of its life the app...

Page 92: ...Safety Handling Components Aid Appendix Chapter 5 Appendix Subject Page Information about conformity 87 Conditions of Warranty 91 Index 96...

Page 93: ...English 86...

Page 94: ...each red green blue contain about 6 2 million addressable transistors Because of this very high number of transistors and their extremely complex production process occasionally defective or incorrect...

Page 95: ...s E g constantly lit with half the brightness one colour is not shining blinking or flickering but not belonging to Type 1 or 2 Pixel Failures In addition A cluster of type 3 2 or more defective sub p...

Page 96: ...Information about the Regulatory Compliance according to R TTE The following remote equipments may have been supplied with this All In One PC Wireless keyboard optional Wireless mouse optional Remote...

Page 97: ...nstallation If this equipment does cause harmful interference to radio or television reception which can be determined by turning the equipment off and on the user is encouraged to try to correct the...

Page 98: ...EDION and its authorised sellers reserve the right to refuse a repair under warranty or a warranty confirmation if a proof of purchase or registration of purchase cannot be established or has not been...

Page 99: ...turned complete with all parts which were included with the original product Incomplete contents of the returned package may lead to a delay in the repair or re placement MEDION does not accept any li...

Page 100: ...ny of MEDION s findings MEDION will not be liable for any costs incurred to you when doing so 3 Exclusion from warranty To the extent permitted by law this warranty shall be void in the event that def...

Page 101: ...for any costs incurred to you when doing so This warranty is restricted in relation to any pre installed operating system as well as to application programme software that is included with the MEDION...

Page 102: ...provided by you at your own expense You are responsible yourself for restoring the application software after the repair services have been carried out by MEDION or its authorised personnel You must...

Page 103: ...s 7 Errors and possible causes 80 External monitor 29 F FAQ 78 FCC compliance statement 90 G Getting started Connecting USB receiver 18 Inserting batteries in keyboard 17 Inserting batteries in mouse...

Page 104: ...Setting the frequency for keyboard and mouse 34 Setting Up of the All In One PC 12 Set up location 13 Software 57 Software uninstallation 67 Sound System 42 Standards FCC compliance statement 90 Start...

Page 105: ...English 98...

Reviews: