background image

Service manual P9-0270-S

 9 of 78

Version 2.0.2/2012

Medema Production A/S

1

3
5

4

7

8

2

6

Introduction DX2

DX2 is the fi rst in a new generation of joysticks to control the 
electric wheelchair. With its large color LCD screen and its 
logical icon built menu structure, it directs the user to the target.

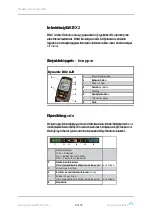
Joystick parts

Dynamic DX2 AJR

1

Start/stop button

2

Indicator left

3

Indicator right

4

Select

5

Display

6

Speed selector

7

Accessory Selector

8

Horn

Operating

At the top of the display you will fi nd the status bar. Battery indicator 
is displayed constantly. The clock can be turned on or off as you 
wish. The other is lit when the corresponding function is active. 

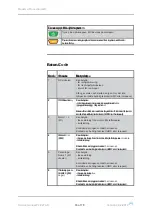
1

Battery indicator
Green = fully charged
Yellow = least half full
Red = almost empty - charge now!

2

Indicator left is active
When hazard warning lights are active, both icons blinks.

3

Lights on

4

Error code - see section on error codes.

5

Indicator right is active
When hazard warning lights are active, both icons blinks.

6

Real time

1              2       3           4             5             6

1

3
5

4

7

8

2

6

Inledning DX2

DX2 är den första i en ny generation joysticks för styrning av 
elektriska rullstolar. Med sin stora LCD-färgskärm och den 
logiska, ikonuppbyggda menystrukturen leder den användaren 
till målet.

Beteckningar  - knappar

Dynamic DX2 AJR

1

Start-/stopp-knapp

2

Blinker vänster

3

Blinker höger

4

Funktionsväljare

5

Display

6

Hastighetsväljare

7

Tillbehörsväljare

8

Tuta

Handhavande

Högst upp på displayen fi nns statusraden. Batteriindikatorn 
visas hela tiden. Klockan kan visas eller döljas enligt önskemål. 
Övriga symboler lyser när motsvarande funktion är aktiv. 

1

Batteriindikator
Grön = fulladdat
Gul = laddat till minst hälften
Röd = nästan tomt, ladda nu!

2

Blinker vänster är på
Vid varningsblinkers blinkar båda ikonerna

3

Belysningen är tänd

4

Felkod, se avsnittet om felkoder

5

Blinker höger är på
Vid varningsblinkers blinkar båda ikonerna

6

Aktuell tid

1              2       3           4             5             6

Summary of Contents for MC Concept 1170 II

Page 1: ...Service Manual MC Concept 1170 II P9 0270 S ver 2 0 2 June 2012 GB medemagroup Service Manual MC Concept 1170 II medemagroup...

Page 2: ...Service manual P9 0270 S 2 of 78 Version 2 0 2 2012 Medema Production A S...

Page 3: ...ming 27 Diagnosing and Troubleshooting 28 Maintenance 29 Servicing the MC Concept 1170 II Concept Chair 31 Checking the rear bar 32 Checking the pivot wheel 33 Checking the anti tilt wheels 34 Checkin...

Page 4: ...eat module 1170 II electric hoist 58 Headrest Junior 59 Headrest pad adult 60 Footrest electric adult 61 Footrest manual adult 62 Footrest actuator part 63 Mounting bracket for footrest 64 Footplate 6...

Page 5: ...uld generate heat and cause a fire If help is required with troubleshooting Medema Production A S is always happy to provide telephone assistance If the problem seems to be an electrical fault that pr...

Page 6: ...users weighing max 155 kg The vehicle can be specially adapted at the factory for users weighing up to 200 kg Joystick The joystick control box should not be exposed to extreme temperatures or be in a...

Page 7: ...cuit anything Take great care not to short circuit the battery terminals Be careful not to lift heavy parts such as the seat battery and motor gear incorrectly or drop them Make sure to raise one rear...

Page 8: ...17 mm Phillips and torx screwdrivers 10 15 20 25 k rv Needle nose pliers Side cutting pliers Plastic hammer Set of punches Retractable knife Steel brush Water pump pliers Wire strippers Crimping tool...

Page 9: ...ks 3 Lights on 4 Error code see section on error codes 5 Indicator right is active When hazard warning lights are active both icons blinks 6 Real time 1 2 3 4 5 6 1 3 5 4 7 8 2 6 Inledning DX2 DX2 r d...

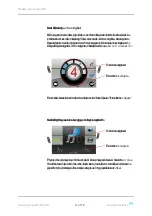
Page 10: ...until the above icon is showed in the center of the screen Use Select to switch between X and Accept by pressing the arrow up down button Visa d lja klockan Tryck p pil upp ned eller f r joysticken f...

Page 11: ...tion you want modified Use the joystick to change example angle of the seat back Setting the seat back and leg supports Select Inst llning av hastighet N r joysticken sl s p visas nedanst ende bild p...

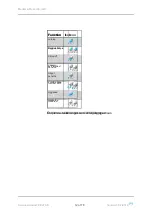
Page 12: ...gle Tilt Backrest angle Seat height Left footrest Right footrest footrest both Lying down Headrest Only the available options will be displayed Funktion Ikon Lutning Ryggvinkel S teslyft V nster benst...

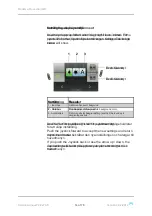
Page 13: ...Use Joystick forward back or arrow up down to accept the new settings and return to the main menu Setting the Backlight T nda sl cka belysning Tryck p pil upp ned tills ikonen f r belysning visas i m...

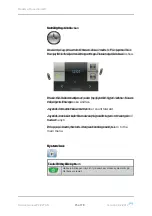
Page 14: ...nd return to the main menu If you push the Joystick back or use the arrow up down the new setting will be dismissed and you will return to the main menu Exit Cancel Exit Cancel Inst llning av sk rmmil...

Page 15: ...to the main menu System lock To lock the DX system Press the on off button for 4 sec while the system is turned on The system will now shut down in locked condition Inst llning av klockan Anv nd pil...

Page 16: ...ff button The system will show a lock in the display Press the horn twice within 10 seconds The system will boot normally Felkoder Kod Orsak Betydelse 1 DX modulen Kan betyda fel i programmering fel i...

Page 17: ...switch 2 Display 2 Display 3 Select program 3 Gear down up 4 Display for seat functions 4 Display for seat functions 5 Battery indicator 5 Battery indicator 6 Magnetic lock 6 Magnetic lock 7 Horn 7 Ho...

Page 18: ...4 Horn 4 Flash lights hazard warning lights 5 Seat lift 5 Magnetic lock 6 Lights lights are extra equipment 6 Speed Electrical function back seat functions in the form of letters A Tilting seat B Elec...

Page 19: ...3 2 Select the maximum speed Keep pressing button 3 to change the numbers between 1 2 3 4 and 5 on the display Select the speed you want 1 is the lowest speed and 5 is the highest Driving Driving 1 St...

Page 20: ...s with the G90T Selecting seat functions with the G90A A Left footplate A Left footplate B Seat angle tilt B Seat angle tilt C Backrest angle C Backrest angle D Seat height D Seat height E Right footr...

Page 21: ...5 is the highest Driving Driving 1 Start driving by moving the joystick in the direction you want to travel The speed depends on how far forward you push the joystick To brake return the joystick to...

Page 22: ...ootrest do as above D Left footrest do as above E Seat lift do as above 6 Seat lift is working in the same way as shown above This feature is optional L Hazard warning lights joystick back Light joyst...

Page 23: ...2 2012 Medema Production A S Replacing Joystick Remove the plastic strip that keeps the cord to the joystick Loosen the Allen screw that holds the joystick bracket Unplug the joystick Note that there...

Page 24: ...llen screws connecting joysticks and bracket Mount the new joystick in reverse order Remember to attach the cord with a new plastic strip After replacing the joystick and programming check that all fe...

Page 25: ...l be a light for the activated function key Fault in the electronics Press the funtionstast that lights and turn off at I O button Wait 5 seconds Press I O button again Contact supplier The driving sp...

Page 26: ...n the charger has blown The switch in the charging plug is malfunctioning Contact supplier Contact supplier The charging lamp indicates a fault The charging plug has not been inserted or there is a ma...

Page 27: ...ation proper braking and sensitivity are guaranteed For each step which can be found at Dynamic Joystick Box the supplier can using a separate programming device set values for speed braking accelerat...

Page 28: ...or Yes Yes No 6 Right M2 parking brake error Yes Yes No 7 Low battery voltage Yes No No 8 High battery voltage Yes No No 9 Cable Fault Yes No Yes 10 Cable Fault Yes Yes Yes 11 Stops Yes Yes No 12 Wron...

Page 29: ...ke sure that the charger gives the correct charge voltage current 8 Fuses function test 9 Moving parts legrests etc Lubricated with acid free oil 10 Checking the wheels central wheel pivot wheel anti...

Page 30: ...mperature must not exceed 50 The MC Concept 1170 II is designed to stay safe to use for at least 10 years up to a maximum of 5 000 hours providing it has service and safety inspections every year whic...

Page 31: ...is a general check which aims to detect mechanical defects Remember that the vehicle must be turned off before you begin It is recommended that the MC Concept is placed on a workbench or table which h...

Page 32: ...78 Version 2 0 2 2012 Medema Production A S Checking the rear bar Verify that the rear bar can move up down There must be no cross play in the bar If there are cross play in rear bar then retighten t...

Page 33: ...e to be changed Art No Bearing CR 01118 Notice the number and the position of the washers Now check the wheels If there is any play the bearings have to be changed Art No Bearing CR 00090 Unmount any...

Page 34: ...ies must be removed See section Dismantling Hoist Tilt There shall be no cross play if any play tighten the bolt If this is not enough change bearings Art No CR 01150 Bearing Notice the number and the...

Page 35: ...tral wheel Place a piece of wood or similar beneath the chassis to lift the wheel clear of the ground Unmount any protective cover and loosen the nut Notice any spacers and their location Mounting in...

Page 36: ...material damage To resume running normally with MC Concept the disengagement handle must be set in Normal position for driving Warning When the scooter is disengaged the braking system is deactivated...

Page 37: ...e Deceleration can be set to the wrong value in the programming The magnetic brake can be worn Change the value in the program Replace the magnetic brake see section Replacing the magnetic brake Stole...

Page 38: ...ist Tilt Dismantling the central wheel See section Checking the central wheel Dismount the cover It is held in place with Velcro tape There are no screws Cut the cable ties Cut the Heat shrink tubing...

Page 39: ...rotation When a motor gear is replaced please be aware that this number is the same on both motor gears on the vehicle Remount the central wheel again Important When the plug to the motor gear unit is...

Page 40: ...mantle the seat Hoist Tilt See section Dismantling Hoist Tilt Dismantling the central wheel See section Checking the central wheel Dismount the cover It is held in place with reclosable band There are...

Page 41: ...ble for the magnetic brake trough the sock A new magnetic brake is delivered without plugs Do the following Cut the old cable Adjust the cable length Solder the new cable with the old cable on the plu...

Page 42: ...Service manual P9 0270 S 42 of 78 Version 2 0 2 2012 Medema Production A S Checking the bolts Before the seat tilts forward check and tighten all visible bolts on the side of MC Concept...

Page 43: ...ore disassembly begins Loosen the two thumb screws behind the seat Demount the two connectors behind the bellow Loosen the bellow and pull it up Take of the hand screw Dismount leg rests before tiltin...

Page 44: ...th the hoist and tilt functions it is recommended to remove the bellow from the frame Loosen the bellow all the way along the frame Lift it up and push it forward towards the seat Reclosable band Now...

Page 45: ...nder the seat These must be intact If you have to change a pin or other bolts where a security discs are used the security discs must be replaced with a new ones Beneath the seat is 8 security discs m...

Page 46: ...sure that it clicks when you press this If not it has to be replaced Checking for fractures and cracks in the Lubricate also the opposite side hoist tilt t is also important that you check the frame t...

Page 47: ...be checked tightened If any of the bolts are replaced all bolts must be secured with Loctite 243 Note That countersunk must be used in the back end Otherwise it will get in the way of the hoist Check...

Page 48: ...ist tilt Afterwards the MC Concept should be tested in all its positions preferably with a person in the seat Replacing batteries You get to the batteries as described in the previous section Remove t...

Page 49: ...Service manual P9 0270 S 49 of 78 Version 2 0 2 2012 Medema Production A S Dynamic G90A and G90T Motor control Dynamic...

Page 50: ...scription Qty 1 CR 00305 Anti tilt fork w wheel for 1170 II right 1 1 CR 00306 Anti tilt fork w wheel for 1170 II left 1 2 CR 00768 Motorclamp 1170 II 1 3 CR 00769 U hook for motorclamp 1170 II 1 4 CR...

Page 51: ...iption Qty 1 CR 00220 Motor gear 10km right 1170 II 1 1 CR 00221 Motor gear 10km left 1170 II 1 1 CR 00244 Motor gear 8km right 1170 II 1 1 CR 00243 Motor gear 8km left 1170 II 1 2 CR 00583 Coal for m...

Page 52: ...e Pos Art No Description Qty 1 C5 0098 Joystick mount for Europa joystick REM 90 op 1 2 CR 00171 Actuatorbox 1103 1121 1170 II model 2008 1 3 CR 01185 Hanger for joystick Europa REM 90 op 1 4 SR 00892...

Page 53: ...01312 Plastic cover for rear bumper right 1170 II 1 3 CR 01311 Plastic cover for rear bumper left 1170 II 1 4 CR 01313 End cover plastic rear bumper 1170 II 2 5 CR 01081 Bushes for rear bumper 1170 I...

Page 54: ...1 Service manual P9 0270 S 54 of 78 Version 2 0 2 2012 Medema Production A S Mounting the cover Pos Art No Description Qty 1 CR 02773 Cover for 1170 II 1...

Page 55: ...Medema Production A S Mounting the central wheel Pneumatic Pos Art No Description 1 CR 01302 Central wheel pneumatic 1170 II complete 2 CR 01303 Tyre central wheel 1170 II 3 CR 01307 Inner tube for c...

Page 56: ...2 2 Service manual P9 0270 S 56 of 78 Version 2 0 2 2012 Medema Production A S Mounting the central wheel solid Pos Art No Description 1 CR 01301 Central wheel solid 1170 II complete 2 CR 01308 Rim f...

Page 57: ...1 Service manual P9 0270 S 57 of 78 Version 2 0 2 2012 Medema Production A S Seat module 1170 II electric tilt Pos Art No Description 1 CR 00063 Actuator for tilting the seat...

Page 58: ...e manual P9 0270 S 58 of 78 Version 2 0 2 2012 Medema Production A S Seat module 1170 II electric hoist Pos Art No Description 28 CR 00063 Actuator for tilting the seat 29 CR 00062 Actuator for liftin...

Page 59: ...st w ajustable pad junior fabric 1 1 C2 0273 Headrest w ajustable pad junior PU 1 2 CR 00731 Headrest ajustable junior fabric 1 2 CR 00815 Headrest ajustable junior PU 1 3 5 127 7 535 U bracket for he...

Page 60: ...adrest w ajustable pad adult fabric 1 1 C2 0271 Headrest w ajustable pad adult PU 1 2 CR 00730 Headrest ajustable adult fabric 1 2 CR 00814 Headrest ajustable adult PU 1 3 5 127 7 535 U bracket for he...

Page 61: ...ator part left 1 5 CR 00874 Mounting Bracket f footrest right electric 1 6 CR 00875 Mounting Bracket f footrest left electric 1 7 CR 00880N Footplate right SB40 45 1 7 CR 00980 Footplate right SB50 1...

Page 62: ...st toppart left manual 1 5 CR 00874 Mounting Bracket f footrest right 1 6 CR 00875 Mounting Bracket f footrest left 1 7 CR 00880N Footplate right SB40 45 1 7 CR 00980 Footplate right SB50 1 7 CR 00880...

Page 63: ...1 1 CR 00879 Footrest actuator part left 1 2 5 200 6 014 Legrest head left 1 3 5 200 6 015 Legrest head right 1 4 CR 00890 Actuator part electric legrest complete 1 5 5 200 6 031 Spring for lock legr...

Page 64: ...012 Medema Production A S Mounting bracket for footrest Pos Art No Description Qty 1 CR 00874 Mounting bracket for footrest right 1 1 CR 00875 Mounting bracket for footrest left 1 2 CR 00889 Plug for...

Page 65: ...1 1 CR 00980 Footplate right SB50 1 1 CR 00981 Footplate left SB50 1 1 CR 00884 Footplate junior child right 1 1 CR 00885 Footplate junior child left 1 2 5 200 6 005 Footrest aluminum 1 3 CR 00897 He...

Page 66: ...CR 00877N Calf rest left complete SB40 45 1 1 CR 00996 Calf rest right complete SB50 1 1 CR 00997 Calf rest left complete SB50 1 2 5 200 06 027 Arm for calf rest for legrest right SB40 45 1 2 5 200 0...

Page 67: ...CR 01200 Footplate for adult out in up down 1 2 CR 01212 Torque joint complete adult right 1 3 CR 01213 Torque joint complete adult left 1 4 CR 01232 Calf rest II complete right 1 5 CR 01239 Calf res...

Page 68: ...d electric Pos Art No Description Qty 1 CR 01201 Footplate for child out in up down 1 2 CR 01214 Torque joint complete child right 1 3 CR 01215 Torque joint complete child left 1 4 CR 01202 Footmat fo...

Page 69: ...Service manual P9 0270 S 69 of 78 Version 2 0 2 2012 Medema Production A S Central footplate manual Pos Art No Description Qty 1 CR 01083 Footplate small 1103 1170 1 2 CR 01084 Footplate big 1103 117...

Page 70: ...on 2 0 2 2012 Medema Production A S Swing away joystick mount adult Pos Art No Description Qty 1 C2 0070N Swing away joystick mount right adult 1 1 C2 0071N Swing away joystick mount left adult 1 2 CR...

Page 71: ...1 Service manual P9 0270 S 71 of 78 Version 2 0 2 2012 Medema Production A S Joystick mount Europa joystick up Pos Art No Description Qty 1 C5 0098 Joystick mount for Europa joystick up 1...

Page 72: ...manual P9 0270 S 72 of 78 Version 2 0 2 2012 Medema Production A S Armrest low adult hight ajustable Pos Art No Description Qty 1 SR 04523 Armrest mount low left adult 1 1 SR 04522 Armrest mount low r...

Page 73: ...nual P9 0270 S 73 of 78 Version 2 0 2 2012 Medema Production A S Armrest high adult hight ajustable Pos Art No Description Qty 1 SR 04489 Armrest mount high left adult 1 1 SR 04488 Armrest mount high...

Page 74: ...ice manual P9 0270 S 74 of 78 Version 2 0 2 2012 Medema Production A S Armrest junior hight ajustable Pos Art No Description Qty 1 SR 04525 Armrest mount left junior 1 1 SR 04524 Armrest mount right j...

Page 75: ...MiniCrosser A S Service manual P9 0270 S 75 of 78 Version 2 0 2 2012 Medema Production A S Wiring diagram...

Page 76: ...m Change of level 10 cm Turning circle 120 cm Motor 2 motors with central drive Max user weight standard 155 kg Maks personv gt HD uden hejs og tilt 200 kg custom made Suspension Yes Dynamic stability...

Page 77: ...s Spinalus Seat width 35 40 45 50 55 60 cm Seat depth 32 52 cm Height of backrest 36 48 56 cm Lights Indicators Extra equipment Lights Extra equipment Bulb headlight 3 W Bulb rear light 5 W Bulb indic...

Page 78: ...medemagroup...

Reviews: