background image

  2
  4
  3
  9

10

5
6
1A
3
7
8

1B

  2
  4

  3

10

5
6
1

9
11

7
8

Quick guide P9-0158-Q

 7 of 16

Version 1.0.0/2011 

Medema Production A/S

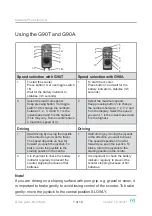
Using the G90T and G90A

Speed selection with G90T

Speed selection with G90A

1

To start the scooter:
Press button 1A or use toggle switch 
1B
Wait for the battery indicator to 
stabilise (3-5 seconds)

1

To start the scooter:
Press button 1 and wait for the 
battery indicator to stabilise (3-5 
seconds)

2

Select the maximum speed:
Keep pressing button 3 or toggle 
switch 10 to change the numbers 
between 1, 2, 3, 4 and 5. 1 is the 
lowest speed and 5 is the highest. 
(This may vary. Some scooters have 
a maximum speed of 3).

2

Select the maximum speed:
Keep pressing button 3 to change 
the numbers between 1, 2, 3, 4 and 
5 on the display. Select the speed 
you want. 1 is the lowest speed and 
5 is the highest.

Driving

Driving

1

Start driving by moving the joystick 
in the direction you want to travel. 
The speed depends on how far 
forward you push the joystick. To 
brake, return the joystick to the 
starting position in the centre.

1

Start driving by moving the joystick 
in the direction you want to travel. 
The speed depends on how far 
forward you push the joystick. To 
brake, return the joystick to the 
starting position in the centre.

2

It is important to check the battery 
indicator regularly to prevent the 
scooter stopping because of fl at 
batteries. 

2

It is important to check the battery 
indicator regularly to prevent the 
scooter stopping because of fl at 
batteries.

Note!

If you are driving on a sloping surface with poor grip, e.g. gravel or snow, it 

is important to brake gently to avoid losing control of the scooter. To brake 

gently: move the joystick to the central position SLOWLY.

Summary of Contents for M Joy

Page 1: ...P9 0158 Q ver 1 0 0 January 11 GB Quick guide Mini Crosser M Joy medemagroup...

Page 2: ...Quick guide P9 0158 Q 2 of 16 Version 1 0 0 2011 Medema Production A S...

Page 3: ...ions 5 Joystick parts 6 Using the G90T and G90A 7 General care and maintenance 8 Charging 9 Note 9 Safety check 10 Troubleshooting the Dynamic 10 Serial number 11 Driving the Mini Crosser M Joy 11 Get...

Page 4: ...ser Manual carefully As a new user you should pay particular attention to the section entitled Driving the Mini Crosser M Joy Note This Quick Guide is to be regarded as a supplement to the User Manual...

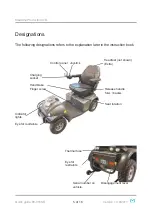
Page 5: ...not shown Extra Thermal fuse Disengagement lever Seat rotation Release handle forw backw Eye for restraints Indicator lights Finger screw Charging socket Serial number on vehicle Eye for restraints Ha...

Page 6: ...available 5 Battery indicator 5 Battery indicator 6 Magnetic lock 6 Magnetic lock 7 Horn 7 Horn 8 Joystick 8 Joystick 9 Lights hazard warning lights and indicators 9 Light hazard warning lights and i...

Page 7: ...elect the speed you want 1 is the lowest speed and 5 is the highest Driving Driving 1 Start driving by moving the joystick in the direction you want to travel The speed depends on how far forward you...

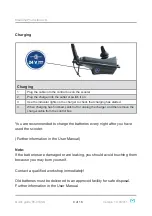
Page 8: ...tronics box under the seat dry Battery charging Never wash the Mini Crosser with a high pressure cleaner or direct water jet This could damage the Mini Crosser s electronics To keep the Mini Crosser i...

Page 9: ...fi nished switch off or unplug the charger and then remove the charger cable from the control box You are recommended to charge the batteries every night after you have used the scooter Further inform...

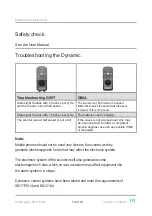
Page 10: ...batteries need charging The scooter runs at half speed or not at all If the cause is not a raised seat this may be a serious fault Contact a competent service engineer as soon as possible HMC or thera...

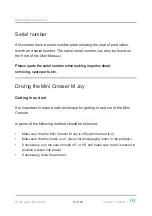
Page 11: ...iries about servicing spare parts etc Driving the Mini Crosser M Joy Getting in and out It is important to learn a safe technique for getting in and out of the Mini Crosser In general the following me...

Page 12: ...such as rain or snow Avoid driving on gradients with poor surfaces such as snow ice new mown grass wet grass and wet leaves Never drive when under the influence This applies not only to alcohol but al...

Page 13: ...her road users to see Make quite sure that other road users have seen you before driving onto the highway Keep an eye on traffic behind you Keep well over to the side of the road when driving on busy...

Page 14: ...ill cause very sharp braking The rear wheels will lock Must NOT be used in the normal course of driving The brake must never be disengaged mechanically using the disengagement lever on a slope This fu...

Page 15: ...Quick guide P9 0158 Q 15 of 16 Version 1 0 0 2011 Medema Production A S Own notes...

Page 16: ...medemagroup...

Reviews: