background image

Operation

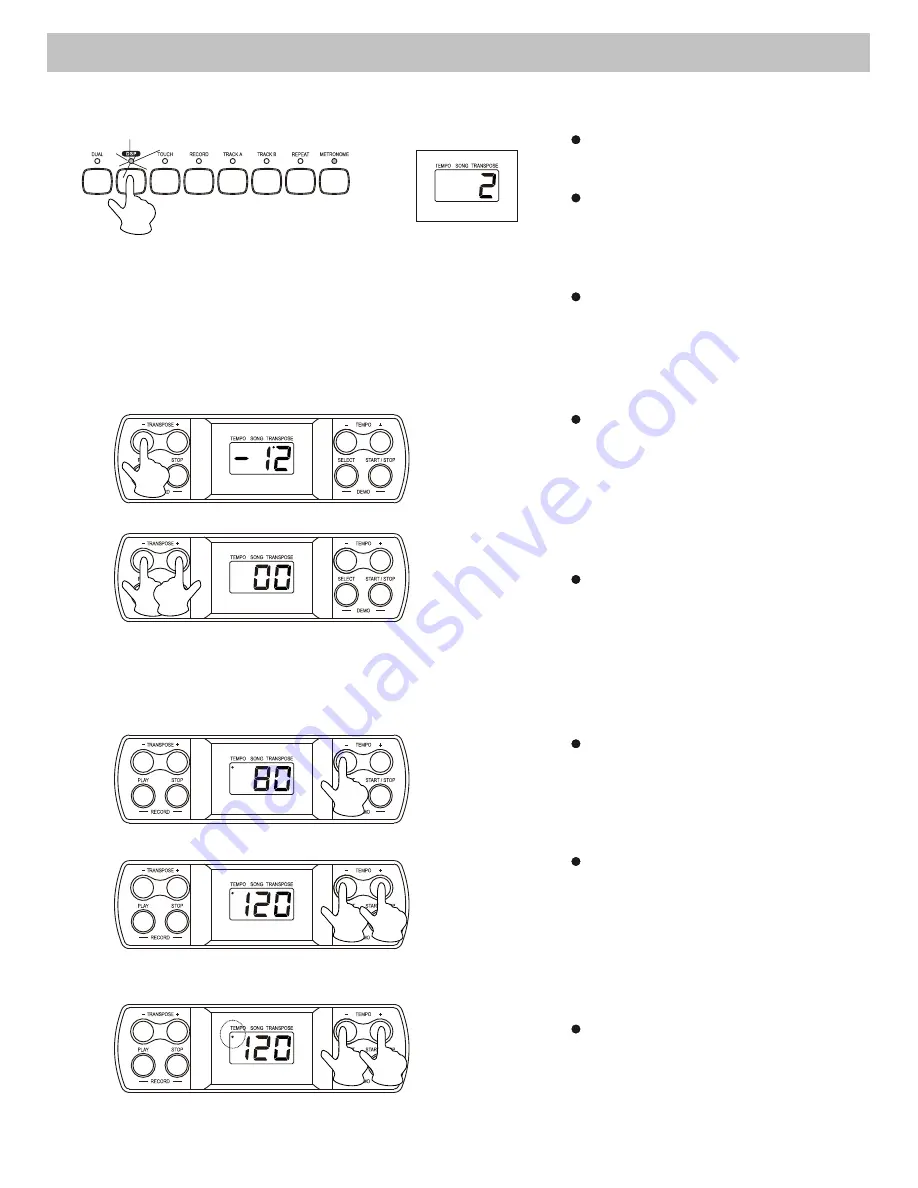
4. DSP (Digital Signal Processor)

There i s D

  SP r esponse f unction  

and it is a default setting.

P r e s s  t h e  [ D S P ]  b u t t o n  t o 
adjust the DSP response level 
in the range of 1 to 3. 2 is the 
default level.

To turn off the DSP response 
function,  press  the  [DSP] 
button repeatedly until "OFF" 
appearing on the display.

The Transpose function
allows you to change the 
pitch of the instrument 
in semi-tone steps, up to
a maximum setting of 12
semitones above or below 
standard pitch.

5. Transpose

To restore the normal 
Transpose position, press
both the +/- buttons 
simultaneously.

6. Tempo

You can speed up or slow 
down the tempo of a song
or metronome by pressing 
the [TEMPO +/-] buttons.

To restore the default tempo,
press both the +/- buttons 
simultaneously. When you
press both the +/- buttons 
when the song/metronome
is stopping, the tempo will
return to 120.

When you are adjusting the 
tempo, the tempo indicator
will appear on the display.

7

Summary of Contents for SP40A

Page 1: ......

Page 2: ...en the piano is not in use or in the time of thunderstorm please disconnect the power supply Avoid adjusting the volume level to the maximum or to the levels that you feel uncomfortable we recommend you to limit the volume level to two third of the max for preventing the damage of audiory sense Unplug the power cable before cleaning the piano Do not connect or disconnect the power cable with a wet...

Page 3: ... Operation 1 Power Switch Volume 2 Voice Dual Voice 3 Metronome 4 DSP Digital Signal Processor 5 Transpose 6 Tempo 7 Touch Response 8 Record Playback 9 Demo Song MIDI What is MIDI What you can do with MIDI Specifications Voice List Demo Song List Adaptor Using the AUX IN jack 3 4 5 4 4 4 5 5 5 6 10 6 6 6 7 7 7 8 8 9 9 10 11 11 11 12 13 13 ...

Page 4: ... RECORD PLAY STOP DEMO SELECT START STOP SUSTAIN PEDAL SOFT PEDAL AUX OUT L MONO AUX OUT RIGHT PHONES 1 2 MIDI IN MIDI OUT AUX IN POWER SUPPLY JACK DC in 12V 16 VOICE TYPE DEMO SONG SELECT 0 PIANO 1 1 PIANO 2 2 E PIANO 1 3 E PIANO 2 4 HARPSICHORD 5 VIBES 6 STRINGS ENSEMBLE 7 CHORUS 8 JAZZ ORGAN 9 CHURCH ORGAN LED TEMPO SONG TRANSPOSE 17 3 1 FRONT PANEL 2 LEFT PANEL 8 9 9 ...

Page 5: ...nect amplifiers to the AUX OUT L MONO and R jacks on the left panel The volume is adjusted with the VOLUME button For monaural playback use the L MONO jack For stereo playback connect both L MONO and R jacks 2 Ensure the piano is turned off when connecting and disconnecting the power Adaptor DC 12V There are two phones jacks speaker is shut off when headphone is plugged into the phones jack 2 spea...

Page 6: ...ument Digital Interface MIDI is a world wide standard that makes it possible for various electronic musical instruments and other devices MIDI IN MIDI OUT Data transmitted from other MIDI instrument via MIDI is received by this terminal Data produced by the Digital Piano is transmitted to other MIDI instruments via MIDI from this terminal 5 The audio output from a CD player connected to the AUX IN...

Page 7: ... the VOICE TYPE button the corresponding indicator will lighten up and the number of the selected voice will appear on the LED Press the DUAL button to enter the Dual Voice mode then select the second voice by pressing a VOICE TYPE button To quit the Dual Voice mode press the DUAL button again While recording Voice 2 will turn off automatically Press the METRONOME button to turn on off the metrono...

Page 8: ...e pitch of the instrument in semi tone steps up to a maximum setting of 12 semitones above or below standard pitch 5 Transpose To restore the normal Transpose position press both the buttons simultaneously 6 Tempo You can speed up or slow down the tempo of a song or metronome by pressing the TEMPO buttons To restore the default tempo press both the buttons simultaneously When you press both the bu...

Page 9: ... of record lightens up There are 2 tracks for recording They are track A and track B Select and press the TRACK A or TRACK B button to save your recording To remove the recorded data and record again press the RECORD and TRACK A or TRACK B simultaneously Their indicators lighten up and flash Play a key on the keyboard to start recording To stop recording press the STOP button Playback Select and p...

Page 10: ...ill appear on the display Use the Voice Select buttons 0 9 to select your desired demo song You must enter a 2 digit number 00 19 9 Demo Song Play the demo songs in sequence Press the DEMO ALL button to start playing the demo songs in sequence To stop the demo songs press the DEMO ALL or START STOP button When the demo songs is playing you can not change it to another one immediately Select a trac...

Page 11: ...en press the REPEAT button again to set the end point of the playback r B will appear on the display and the selected section of the demo song will playback repeatedly This function does not work after pressing the DEMO ALL button and its songs are playing Adjust the tempo of demo song When a demo song is playing you can adjust its tempo by pressing the TEMPO buttons 10 ...

Page 12: ...yboard is equipped with two types of MIDI terminals they are located on the rear panel MIDI IN Data transmitted from other MIDI instruments via MIDI is received at this terminal MIDI OUT Data produces by the keyboard is transmitted to other MIDI instruments via MIDI from this terminal What you can do with MIDI MIDI IN MIDI IN MIDI OUT MIDI OUT Record a data by using the Auto Accompaniment on an ex...

Page 13: ...ys 10 Voices 20 Demo Songs LED POWER SWITCH VOLUME SWITCH DUAL DSP TOUCH RECORD TRACKA TRACK B REPEAT METRONOME TRANSPOSE TEMPO DEMO ALL RECORD PLAY STOP DEMO SELECT START STOP VOICE SELECT 0 9 12 semitones Hard Medium Soft Off A HEADPHONES AUX OUTL MONO AUX OUT R MIDI IN OUT SUSTAIN PEDALS SOFT PEDAL 1358x350x140mm 23 5kg daptor DC 12V 12 ...

Page 14: ......

Reviews: