background image

9

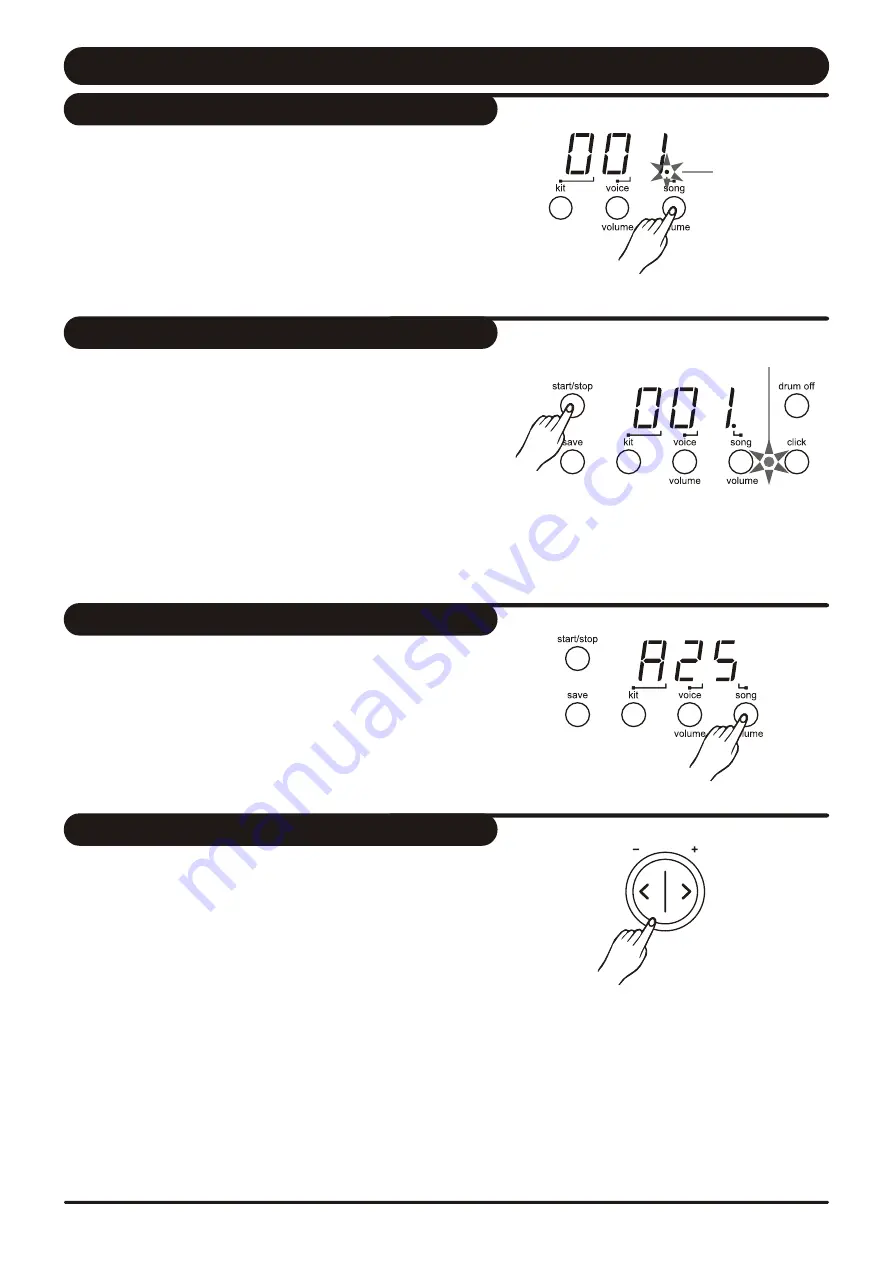
Play a Song

This drum module  has a total of 50 preset songs.
Note: The preset song setting is 001 after you slide on power.

1.

 Press [ song / volume ] button.

    The song indicator lights and the current song's number appears.

2. 

Press [ +] or [ - ] button to select one of the song and listen to it.

    Song numbers 001 - 050 are preset songs.
    (Reference song list : page 14.)

1

. Press [ start/stop ] button and the beat indicator is flashing.

    After the counting, the song will start playback from the
    beginning.

2.

 The song will stop when it reaches the end.

    You can stop the song during playback by pressing the
    [ start/stop ] button

*  

The ASSIGN pad's indicator flashes at the first beat of each

    measure

Note:

 The ASSIGN pad's indicator can be lighted off by pressing

both [hi-hat] and [kick] button at the same time.

Song indicator

1.

 Press the [ song / volume ] button to select the volume of

    song. Display shows : " A XX". 
    (XX = level value, 00 to 31)

2.

 Press [ + ] or [ - ] button to adjust the volume of song

    accompaniment.

1.

 Press the [ tempo + ] or [ tempo - ] button. D

[ tempo + ] or [ tempo - ] button to increase or

    decrease the tempo. ( tempo value in the range or 30 to 280)

*


isplay shows

    the current tempo value.

2.

 Press the 

Holding down either a [ tempo +] or [ tempo - ] button to

    change the setting in a high speed.

*

  Press [ tempo + ] and [ tempo - ] buttons at the same time

    to reset the tempo to default value.

Note:

 About 2 seconds after you stop pressing the [Tempo]

button, display changes to show your selected song or kit
number instead of tempo value.

Select a song

Listen to the song

Adjust the song's volume

Adjust the song's tempo

Beat indicator

tempo/t ap

Summary of Contents for DD502

Page 1: ...DIGITAL DRUM Instruction Manual tempo tap ...

Page 2: ...nd other devices to which it is connected turn the power switches of all related device OFF prior to connecting or disconnecting cables Handling and Transport Cleaning Electrical Interference Never apply excessive force to the controls connectors or other parts of the instrument Always unplug cables by gripping the plug firmly but not pulling on the cable Disconnect all cables before moving the in...

Page 3: ...a drum kit Play with a Metronome Creat a User Drum Kit Set a drum voice Adjust the volume of Pad Save your drum kit voices Voice list Preset kit list Song list MIDI implementation chart Play a Song Select a Song Listen to the Song Adjust the Song s volume Adjust the Song s tempo Tap tempo function Mute a Drum part Play with a Click voice Use the lighting guide function Specifications 4 4 5 5 6 6 7...

Page 4: ...de song volume button Display the song number or accompaniment volume value drum off button and indicator This button is used to turn on or turn off the percussion of song Beat indicator Beat of metronome or a song is playing click button Turn on or off the metronome and buttons These buttons are used to change the setting number of kit voice song and adjust the Pad volume Pad select buttons and i...

Page 5: ... use the L mono jack MIDI out jack Connect with external sound module Aux in jack Connect with external sound source Power supply jack DC in 9V Connect an AC adaptor to this jack Power switch Turn the power on off Phones jack Connect with to a pair of stereo headphones to this jack Connect the headphones will not mute the output jacks 5 Rear Panel Side Panel ...

Page 6: ...a closed hi hat 2 The valid striking area of a cymbal pad ride crash or hi hat is near the edge of the pad which is different from other pads Caution To prevent electric shock and damage to the device make sure the power is switched OFF on the drum and all related device before making any connection Setup 6 Connect the Pads and the Pedals Hi Hat control pedal Kick Trigger DD502 S Kick Trigger DD50...

Page 7: ...with the AUX IN jack on the rear panel can be mixed with the sound of the drum This function is convenient that lets you play along with a favourite song 2 The volume of the external signal is adjusted with the VOLUME knob Make sure the power is switched OFF and connect the power adaptor with the DC IN jack on the rear panel Note 1 To protect the speakers amplifier and the drum module from damage ...

Page 8: ...lect the drum kit number 001 020 you want to use 1 Press the click button to start the metronome The beat indicator is flashing and the click sound begins to play 2 Press the tempo or tempo buttons to set the metronome beat 3 Press the click button again to stop the metronome Adjust the volume of the click sound Hold down the click button and press the or buttons to adjust the volume of the click ...

Page 9: ...SIGN pad s indicator can be lighted off by pressing both hi hat and kick button at the same time Song indicator 1 Press the song volume button to select the volume of song Display shows A XX XX level value 00 to 31 2 Press or button to adjust the volume of song accompaniment 1 Press the tempo or tempo button D tempo or tempo button to increase or decrease the tempo tempo value in the range or 30 t...

Page 10: ...g song playing 1 Press the click button to start the metronome It will be played with tempo 2 Press the click button again to stop the metronome Note The click voice will not stop automatically once the song finished until you press the click button The lighting guide function provides you a valuable lesson to practice or learn the drum kit with playing the preset song 1 Select the song number you...

Page 11: ...ress or button to set the kit number 021 030 for saving your drum kit 3 Press save button again The flashing kit number stops Note To cancel the save operation press the voice button If there is a fault the display will show Err Volume level value The unit comes with 215 high quality percussion sounds that you can assign to any of the drum pad 3 cymbals hi hat control and bass drum This way you ca...

Page 12: ...voices 20 preset kits 10 user kits 50 preset songs POWER SWITCH START STOP SAVE SONG VOLUME DRUM OFF CLICK HI HAT CRASH RIDE HI HAT CONTROL SNARE TOM 1 TOM 2 TOM3 KICK VOLUME TEMPO TAP LED display Output R L MONO Aux in AC adaptor DC 9V KIT VOICE VOLUME MIDI OUT Hi hat control Hi hat Crash Ride Snare Tom 1 Tom 2 Tom 3 Kick Specifications 12 ...

Page 13: ...om 2 097 Tom Rom 1 098 Tom Rm 2 L 099 Tom Rm 2 F Electronic Tom 100 TomH A 101 Tom A 5 102 Tom A 4 103 Tom A 3 104 Tom A 2 105 Tom A 1 106 Tom T 1 M 107 Tom T 3 L 108 Tom T 3 F 109 Tom El 4 110 T om El 3 111 Tom El 2 112 T om El 1 Cymbal 113 CrashStd 114 CrashBrt 115 CrashSt 2 116 SftCrash 117 CrashSt 3 118 CrashSht 119 CrshThin 120 CrashRev 121 CrashRol 122 CrashSt 4 123 RideBel 1 124 RK Ride 2 1...

Page 14: ... Beat 4 4 4 006 Newage 4 4 031 8 Beat 2 4 4 007 Reggae Funk 4 4 032 16 Beat 4 4 008 Drum Bass 4 4 033 March 4 4 009 Pop 8 Beat 4 4 034 Latin 6 4 4 010 Dance 4 4 035 Funk 3 4 4 011 Drk 2 4 4 036 Fusion 2 4 4 012 Pop 3 4 4 037 Rock N Roll 2 4 4 013 Pop 5 4 4 038 Hard Rock 3 4 4 014 Jazz 1 4 4 039 Rock Pop 2 4 4 015 Rhythm Blues 4 6 8 040 Funk 1 4 4 016 Ballad 1 4 4 041 Funk 4 4 4 017 Ballad 2 4 4 04...

Page 15: ... Portamento Time 6 X Data Entry 7 X Volume 10 X Pan 11 X Expression 64 X Sustain Pedal 65 X Portamento ON OFF 66 X Sostenuto Pedal 67 X Soft Pedal 80 X Reverb Program 81 X Chorus Program 91 X Reverb Level 93 X Chorus Level 120 X All Sound OFF 121 X Reset All Controller 123 X All Notes OFF Program X Change True X System Exclusive X System Song Position X Common Song Select X Tune X System Clock X R...

Page 16: ...ART NO DD502 VER V010 ...

Reviews: