background image

2

Select a Pad/Pedal

SONG

KITS

PAD ASS.

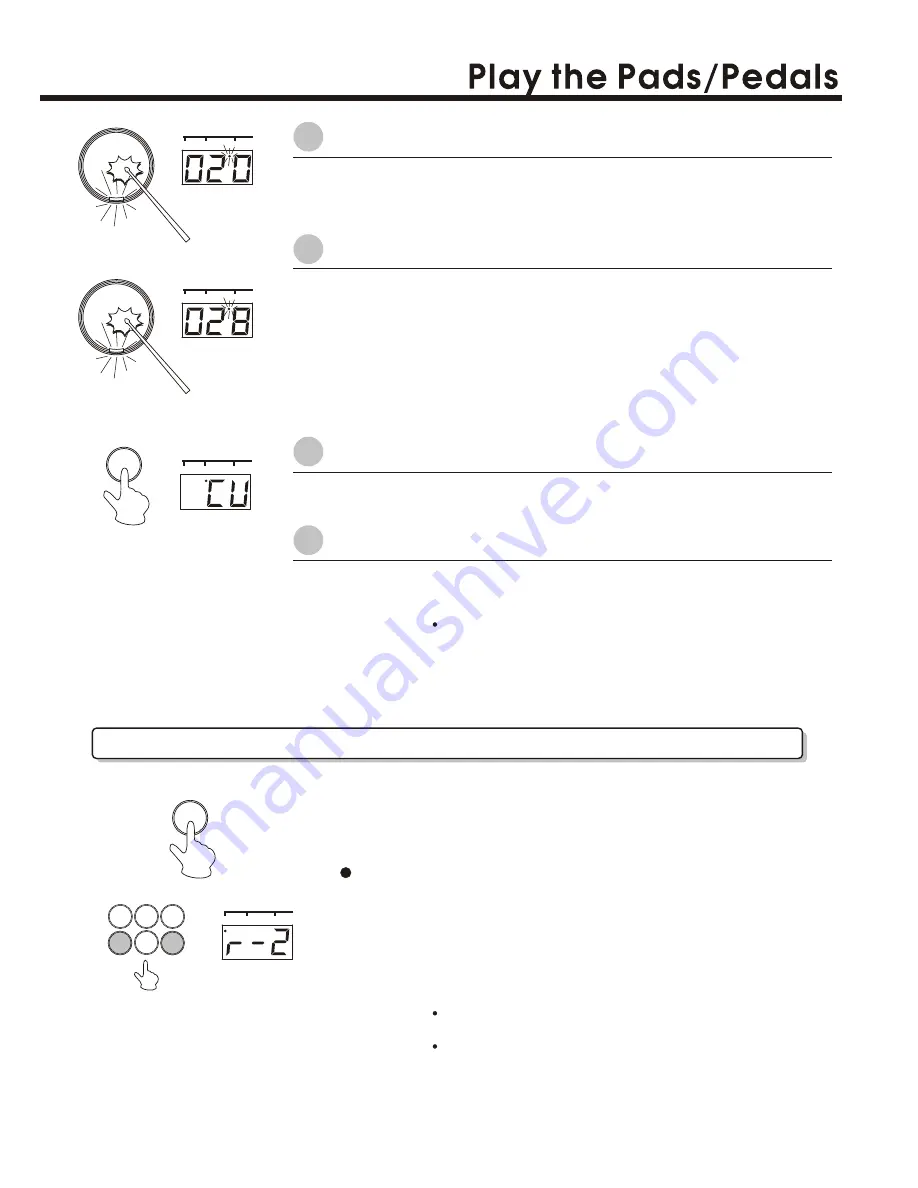
Strike the Drum Pad that you want to assign once, for example, Drum
Pad 7, the indicator on PAD 7 light up, the display show the current
Percussion number.

3

Select a Percussion

You can select the voice by repeatedly striking the pad, repeatedly
pressing the pedal (while listening to the voice) or by pressing the
number keys.

Strike the Drum Pad until you reach the voice that you desired.

Enter the percussion number by pressing the number keys shown 
on the Drum Voice List on page 16)

SONG

KITS

PAD ASS.

4

Press the KITS Button

Press the 

[KITS]

 button, "CU" (Custom Kit) appears on the display

and the DRUM KIT indicator light up instead of PAD ASSIGN indicator.

KITS

SONG

KITS

PAD ASS.

5

Play the Pads and Pedals

Now you can play your drum with the custom drum kits.
Repeat steps 2-4 if you want to assign another drum pad.

REVERB

REVERB

Different depths of the Digital Drum's reverb effect can be selected
to the instrument's overall sound.
The REVERB effect is turned on automatically every time you turn
the power on and the default level is set to [r-2].

Select the REVERB Depth

Press the reverb button to display the current setting, use the "-" 
or "+" button on the keypad to select one of the four reverb depths 
that appear in the display. [r-0],

1], [r-2], [r-3]; [r-0] means 

reverb off.

Select [r-3] adds the most reverb depth to the effect.

[r-

Note

You should adjust the level of Reverb while reverb level is showing 
on the display.

REVERB Depth data is not transmitted or received via MIDI.

7

8

9

-

0

+

SONG

KITS

PAD ASS.

8

1.

2.

OR

Note

Your "CU" Drum Kit will be preserve even you turn off the power.
To recall the "CU" Drum Kit, press the [KITS] button to enter the 
"Kits" mode, then press "-" or "+" button on the numeric keypad until 
"CU" show on the display.

Summary of Contents for DD-306

Page 1: ......

Page 2: ...multi plug adaptors since these can result in reduced sound quality operation errors and possibly damage Turn Power OFF When Making Connections To avoid damage to the instrument and other devices to w...

Page 3: ...ning a Drum Kit to the Pads and Pedals Assigning a Voice to Individual Pads and Pedals REVERB ON OFF Select the REVERB Depth METRONOME ON OFF Selecting a SONG SUPER BASS Adjusting the TEMPO TRACK ON O...

Page 4: ...care to follow the polarity markings in the illustration 3 Close the battery compartment securely OP EN NOTES Power will be automatically drawn from the AC adaptor if an optional AC adaptor is connect...

Page 5: ...P METRONOME REVERB DEMO 1 2 3 4 5 6 7 8 9 0 1 2 3 4 5 6 7 8 9 PEDAL 1 2 Jacks MIDI IN MIDI OUT Terminals PHONES OUTPUT Jack DC IN 12V AC Adaptor Jack 3 4 5 6 7 8 9 Connecting the Foot Pedals 1 2 The s...

Page 6: ...UME MASTER VOLUME The overall volume level of the instrument is controlled by a MASTER VOLUME button Turn the MASTER VOLUME clockwise to increase the overall volume To decrease volume turn anti clockw...

Page 7: ...ash Cymbal 1 16 High Tom 1 18 Mid Tom 1 43 Ride Cymbal 7 Snare Drum High 40 Hi Hat Open Close Pedal 2 Off On 20 Low Tom 1 Ex Shown Drum Kit 001 Standard 1 A hi hat sound is assigned to the Pad 6 Drum...

Page 8: ...nter two digit to select the Drum Kit There are 20 Drum Kits 01 20 can be select if you enter a number other than 01 20 the unit will not accept and the drum kit number fails to change Assigning a Voi...

Page 9: ...the custom drum kits Repeat steps 2 4 if you want to assign another drum pad REVERB REVERB Different depths of the Digital Drum s reverb effect can be selected to the instrument s overall sound The R...

Page 10: ...mprove your timing while playing the pads To hear the metronome vocal sound press the METRONOME button once to hear the click sound press the METRONOME button twice To turn off press the button again...

Page 11: ...OP button after a count in the song will playback As the song is playing the song s current measure will be shown in the display Try playing the pads and pedals along the song To stop playback of the...

Page 12: ...RUM 1 DRUM 2 PEDAL 2 BASS CHORD SONG KITS PAD ASS BEAT Pressing a Track button DRUM 1 DRUM 2 BASS CHORD will mute the corresponding track and its indicator lamp will turn off Muting DRUM 1 and DRUM 2...

Page 13: ...LEARNING button and play the song When you are on SONG mode choose a song from the Song List then press the LEARNING button the LEARNING button indicator will light up 2 Start Learning Press the START...

Page 14: ...ss the START STOP button the light stop flashing and the recording process starts 3 Stop Recording To stop recording press the START STOP or RECORD button The record indicator will turn off When the m...

Page 15: ...an do with MIDI MIDI OUT MIDI IN MIDI OUT MIDI IN MIDI Keyboards Digital Drum Sequencer MIDI OUT MIDI IN MIDI OUT MIDI IN Connect the Digital Drum s MIDI OUT jack to a MIDI keyboard s MIDI IN terminal...

Page 16: ...1 Custom 100 1 POWER ON OFF MASTER VOLUME SONG VOLUME TEMPO START STOP TAP START NUMERIC KEYS SONG PAD ASSIGN KITS LEARNING SUPER BASS RECORD PLAY STOP METRONOME REVERB DEMO TRACK DRUM1 DRUM2 BASS CH...

Page 17: ...1 42 43 44 45 46 47 48 49 50 51 52 53 54 55 56 57 58 59 60 61 62 63 64 65 66 67 68 69 70 71 72 73 74 75 76 TR 808 Low Tom 1 TR 808 Low Tom 2 Hi Hat Open Closed Crash Cymbal 1 Crash Cymbal 2 Ride Cymba...

Page 18: ...go 808 Cowbell Crash Cymbal 1 Ride Cymbal Cabasa Ride Bell Pad5 Pad6 Pad7 Pedal 1 7 6 7 7 7 7 6 6 7 8 10 9 70 58 7 11 12 13 64 7 Snare Drum High Snare Drum Low Snare Drum High Snare Drum High Snare Dr...

Page 19: ...R B Hip Hop Funk Country Big Band 53 54 55 56 57 58 59 60 61 62 63 64 65 Reggae 1 Reggae 2 Bossa Nova 1 Bossa Nova 2 Samba Salsa Latin Rock Cha Cha Mambo Rhumba 1 Rhumba 2 Afro Cuban Tango 80 81 82 83...

Page 20: ...1 93 120 121 123 Bank select Modulation Volume Pan Expression Sustain Pedal Sostenuto Pedal Soft Pedal Reverb Program Chorus Program Reverb level Chorus level ALL SOUND OFF Reset all controllers All n...

Reviews: