background image


17


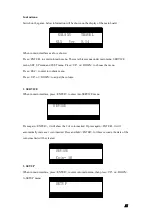
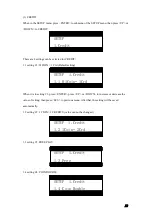
This is for confirming if set the game to default setting. If yes, press <ENTER>. If not, press 

<ESC> to exit. 


After enter into the menu, press <UP> and <DOWN> at the same time to confirm default setting. 


After several seconds:   


After several seconds, it will return to main menu automatically:   


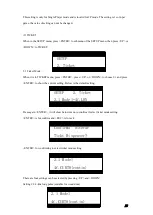
(5) SOUND DEMO   

When in the SETUP menu, press <ENTER> to submenu of the SETUP menu, then press <UP> or 

<DOWN> to SOUND DEMO: 


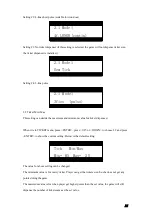
Press again <ENTER> to below menu: 


  Press Up+Dw


  OK


  Wait......

  GLX   Ver  5.14

    GALAXY     TRAVEL    

   GLX   Ver   5.14

  SETUP

   5. Sonud Dem Yes

   5. Sonud Dem 

    Yes

Summary of Contents for GALAX TRAVEL

Page 1: ...MANUAL FOR GALAX TRAVEL...

Page 2: ...he game must be located properly to avoid damages Improper Locations Place directly exposed to sunshine Humid area Place with high temperature Place with corrossive air and liguid Rough area or place...

Page 3: ...2 4V 6 Check whether the game has creepage and the voltage before repairing the PCB Notes of Clean 1 Please use clean and soft colth to clean the game 2 Prevent damaging the surface of the game please...

Page 4: ...o pass Level 1 and the game will automatically enter into Level 2 3 Level 2 move the gun to aim the target and then press button to shoot the target The targets in this level will randomly stand up or...

Page 5: ...2 The points for P1 and P2 will be calculated by the targets shot down 1 target 1 point 3 Level 2 Level 2 move the gun to aim the target and then press button to shoot the target The targets in this...

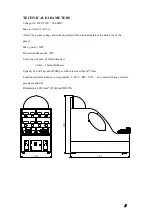
Page 6: ...ate at the back door of the game Max power 120W Power standby mode 70W Coin size 21mm 31mm diameter 1 2mm 2 5mm thickness Capacity of coin box about 5000 pcs with coin size 25mm 1 5mm Location require...

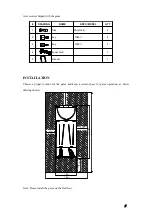
Page 7: ...game and keep a certain space for game operation as below drawing shown Note Please install the game on the flat floor DRAWING NAME SPEC MODEL QTY 1 fuse 5A small 2 2 key 1285 2 3 key 1396 2 4 power c...

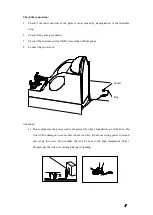
Page 8: ...s is more than 100 megohm 4 Connect the power cord Attentions a Please make sure the power cord is not pressed by wheel foundation etc Otherwise the wire will be damaged to cause short circuit even fi...

Page 9: ...e power switch 3 Properly adjust the coin mech and confirm it can work properly 4 Check and confirm all the display board and lights can work properly 5 Adjust the setting according to the game settin...

Page 10: ...is properly fixed 3 Confirm the cabinet of game is without damages and burrs 4 Confirm the surface of game is clean and with proper marks Daily operation Please properly refer to the instructions abo...

Page 11: ...etting ENTER enter into the menu DW to next item decrease the value of setting UP to previous item increase the value of setting ESC exit the menu back to previous menu ESC UP DW ENTER Main board Main...

Page 12: ...o enter into check menu Press UP or DOWN to adjust the volume 1 SERVICE When in main interface press ENTER to enter into SERVICE menu Press again ENTER it will show the of coin inserted If press again...

Page 13: ...s in setting 1 press ENTER press UP or DOWN to increase or decrease the value of setting then press ECS to previous menu After that the setting will be saved automatically 1 2 setting 2 1 COIN 2 CREDI...

Page 14: ...DOWN to choose 2 1 and press ENTER to show the current setting Below is the default setting Press again ENTER it will show below menu to confirm if select ticket mode setting ENTER is for confirm and...

Page 15: ...menu press ENTER press UP or DOWN to choose 2 2 and press ENTER to show the current setting Below is the default setting The value for above setting can be changed The minimum value is for mercy tick...

Page 16: ...cording to the set value of maximum and minimum of ticket 2 4 LEVEL START This setting decides the lowest point for ticket dispensed If player can not get the set lowest points the game will not dispe...

Page 17: ...ult setting is 40S and can be changed from 20S to 90S Game time for Level 3 default setting is 7S and can be changed from 4S to 10S Game time for Level 4 default setting is 40S and can be changed from...

Page 18: ...time to confirm default setting After several seconds After several seconds it will return to main menu automatically 5 SOUND DEMO When in the SETUP menu press ENTER to submenu of the SETUP menu then...

Page 19: ...u of the SETUP menu then press UP or DOWN to TICKET BOUNUS Press again ENTER to below menu Please keep the setting as Nao all the time to avoid any mistake 7 LANGUAGE When in the SETUP menu press ENTE...

Page 20: ...ng saucers can move by press UP and DOWN Press START button for one time the game will dispense 1 ticket 4 CHECK When the game is in main menu press ESC to below CHECK menu Coin 00030 of coins inserte...

Page 21: ...N D set the pulse of COIN signal to 50MS E following the drawing to adjust the resistance for sensitivity of coin acceptance turn clockwise for increasing and counterclockwise for decreasing adjusting...

Page 22: ...ockwisely to decrease the volume Instruction 2 Switch on the game below information will be shown on the display of the main board When in main interface as above shown press UP or DOWN to adjust the...

Page 23: ...nfrared can aim each target Button on joystick Check if the button can work properly Infrared head Check if the infrared head can shoot the rays properly Target s movement Check if target can move up...

Page 24: ...drive board Main board is bard Repair or replace the main board Motor is bad Replace the motor Bad connection of the switch check and reconnect the wires of button The switch is bad replace the switch...

Page 25: ...eel 2 5 2 23 light strip 10cm 12 08 speaker 4 30W 2 24 marquee 1 09 chasing light 2 25 LOGO bracket 3 10 acrylic cover 2 26 LOGO acrylic 1 11 wire mesh 2 27 green light strip 65cm 1 12 fixed wheel 2 5...

Page 26: ...Y 01 coin door 1 02 hinge 4 2 03 coin selector 1 04 lock 1285 1 PARTS QTY 01 lock 1285 2 02 ticket door 2 03 ticket dispenser 2 04 hinge 4 2 PARTS QTY 01 power supply 12V 8 3A 1 02 holder 1 03 power s...

Page 27: ...reaction metal 12 02 washer for PCB 24 03 bearing 626 24 04 motor shaft 12 05 target 12 06 right bearing base 12 07 coupler 12 08 motor bracket 12 09 motor 12V 80r 12 10 motor chassis 12 11 left bear...

Page 28: ...emitter board 2 17 motor cover 2 18 light strip 6 19 limit sleeve 4 20 center shaft 2 PARTS QTY 01 flashing light strip 2 02 acrylic 1 03 blister 1 04 target receiver 1 set 05 flashing light control...

Page 29: ...eve 2 06 fixed board w wheel 2 19 reaction metal 1 07 shaft w wheel 1 20 supporting for flying saucer 2 08 washer 2 21 belt for saucer 1 09 sensor holder 4 22 spring 1 5 13 50 1 10 bearing 626 2 23 mo...

Page 30: ...29...

Page 31: ...30...

Reviews: