background image

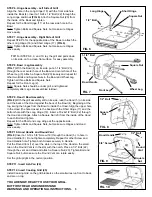
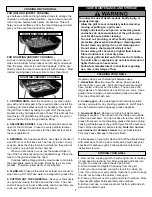
STEP 6. Hinge Assembly - Left Side of Grill

Align the hole in the Long Hinge (18) with the front side hole
inside the Bowl (4). Insert a 10-24 x 1/2” Bolt (22) through the
Long Hinge and Bowl 

(FIG. 6)

. Attach a Square Nut (20) from

the inside of the Bowl and tighten.
Repeat for the Short Hinge (17) at the rear side hole in the
Bowl.

Note:

Tighten Bolts and Square Nuts, but make sure Hinges

move easily.

STEP 7. Hinge Assembly - Right Side of Grill

Repeat STEP 6 for the opposite side of the Bowl, to attach the
other Long Hinge (18) and Short Hinge (17). 

(FIG. 6)

.

Note:

Tighten Bolts and Square Nuts, but make sure Hinges

move easily.

FIG. 6

Long Hinge

Short Hinge

1/2” Bolt

Square Nut

STEP 8. Bowl / Leg Assembly
(FIG. 7)

With the Bowl (4) on its side, put a 1-1/4” Bolt (23)

through the rear center hole of the Bowl and center hole of the
Wheel Leg (3). Attach a Square Nut (20) loosely and repeat for
other two Bolts and Square Nuts in the Bowl and Wheel Leg.
Tighten all three Bolts and Square Nuts.
Repeat for the Front Leg (2).

Note:

Square Nuts should be under grill, and tightened 

completely after Legs are assembled to Bowl.

FIG. 7

FIG. 8

STEP 9. Hood / Bowl Assembly
(FIG. 8)

With the grill assembly still on its side, lean the Hood (5) on its side

and the back of the Hood against the back of the Bowl (4). Beginning at the
top, swing the hinges from the Bowl to inside the Hood. Align the upper hole
in the Hood (the hole closest to the back) with the Short Hinge (17) and the
bottom hole with the Long Hinge (18). Insert a 10-24x1/2” Bolt (22) through
the Hood and Hinges. Attach a Square Nut (20) from the inside of the Hood
to each Bolt and tighten.
Repeat for the Short and Long Hinge at the opposite side.

Note:

Tighten Bolts and Square Nuts, but make sure Hinges and Hood 

move easily.

FIG. 9

STEP 10. Hood Handle and Round Vent
(FIG. 9)

Insert a 10-16 x 5/8” Screw (19) through the Hood (5), to hole in

Hood Handle (8). Do not tighten completely. Repeat for other Screw and
Hood Handle hole. Tighten both Screws securely in Handle.
Put the Round Vent (12) over the slots in the top of the Hood so the small
tab on the Round Vent is in the slot with the notch. Place a 1/2” Bolt (22)
through the vent and Hood and attach a Square Nut (20). Tighten Bolt and
Square Nut, but make sure the Round Vent can rotate easily.

TIP:

For STEPS 8, 9, and 10, lay the grill and parts down

on its side, onto a clean, flat surface, for easy assembly.

Set the grill upright in the normal position.

STEP 11. Insert Ash Pan (24)

STEP 12. Insert Cooking Grid (25)

Install Cooking Grid on the grid brackets so the small wires run front to back,
and are on top.

5

FIG. 10

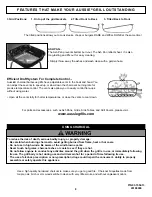
YOU ARE NOW READY TO USE YOUR GRILL.
BUT FIRST READ AND UNDERSTAND 
WARNINGS AND OPERATIONAL INSTRUCTIONS

.

Wheel Leg

Front Leg

1-1/4” Bolt

Square Nut

Square

Nut

1/2” Bolt

Hood Handle

5/8” Screw

Round

Vent

1/2” Bolt

Square

Nut

Bowl Handle

Summary of Contents for AUSSIE 3340

Page 1: ...d should never be used as a heater This instruction manual contains important information necessary for the proper assembly and safe use of this appliance Failure to follow these instructions could result in death or serious injury from explosion or fire Read and follow all warnings and instructions carefully before assembly or use Do not use this product for any other purpose than which it is int...

Page 2: ... opened the flames could leap out and burn DO NOT wear loose clothing example hanging shirt tails clothing with frills etc around a charcoal grill while in use or hot DO NOT lean your body over the charcoal grill when lighting it while it is hot or is in use DO NOT touch hot surfaces Use heat resistant gloves long handled tongs or barbecue mitts at all times since the grill will become very hot Ke...

Page 3: ...f the parts listed in the Parts List Read manual instructions and warnings before assembly and use The extra holes in the side of the bowl are for mounting accessories side tables etc Do not throw away any of the packaging until you have located all the parts 1 2 3 4 5 6 7 8 9 10 11 12 13 14 15 16 17 18 19 20 21 22 23 25 24 Note the Wheel Leg has hole at bottom of each leg and is shorter than Fron...

Page 4: ... Assembly With the hinge holes in bowl toward the back align bottom dimple and upper hole of Rear Grid Bracket 10 with holes inside Bowl 4 in the bowl back Insert 8 Screw 21 through the upper hole of Bowl and Rear Grid Bracket FIG 4 and FIG 5 Tighten screw into bracket Repeat for second Rear Grid Bracket Note Rear Grid Brackets have one hole and one indented dimple each STEP 5 Bowl Handle and Fron...

Page 5: ...es from the Bowl to inside the Hood Align the upper hole in the Hood the hole closest to the back with the Short Hinge 17 and the bottom hole with the Long Hinge 18 Insert a 10 24x1 2 Bolt 22 through the Hood and Hinges Attach a Square Nut 20 from the inside of the Hood to each Bolt and tighten Repeat for the Short and Long Hinge at the opposite side Note Tighten Bolts and Square Nuts but make sur...

Page 6: ... fluid an electric fire starter solid or chimney starters with instant light charcoal This could cause flame ups and unpleasant fumes Use protective gear such as barbecue mitts when installing or removing the grid of a hot grill If there is any type of fire that threatens either personal safety or property call the fire department STEP 4a For regular charcoal or wood Apply charcoal lighter fluid f...

Page 7: ... storing Note Do not use oven cleaner or abrasive cleaner on your Aussie grill This may cause damage to the paint finish If rust appears on your grill clean and buff the affected area with steel wool Touch up bare metal with a high heat paint specified for barbecue grills Follow paint manufacturer s instructions for use 1 Remove the cooking grid Rub with a light coat of cooking oil and wrap in alu...

Page 8: ... cool down To reduce the risk of death serious bodily injury or property damage Be careful when burning charcoal to avoid getting burned from flame heat or hot coals Do not use in high winds Be aware of the wind blown sparks Never touch hot grates charcoal ashes or coals to see if they are hot Do not allow anyone to conduct any activities around the grill when the grill is in use or immediately fo...

Reviews: