Meade LXD55 Series Instruction Manual Download Page 18

18

Observe a Star using the Automatic Tracking Feature

In this example, Autostar's Arrow keys are used to find a star, and then Autostar's
tracking capability automatically keeps the star centered in your telescope's eyepiece.
EC handbox users, see 

APPENDIX D

, page 55, for  information about tracking with the

EC handbox.

1.

If you have activated the Arrow keys and completed setting the telescope in the
polar home position, Autostar's display now reads "Align: Easy." Go to Step 2.

If you have not used Autostar yet or have just plugged it into the HBX port, per-
form the procedures described in 

ACTIVATE THE ARROW KEYS

, page 16 and 

SET-

TING THE POLAR HOME POSITION

, page 17. Then go to Step 2 of this procedure.

If you have been using Autostar to perform other functions and the display does
not read "Align: Easy," follow these steps:

a. Press MODE (3, Fig. 2) repeatedly until "Select Item: Object" displays.
b. Press the Scroll Up key (7, Fig. 2) once. "Select Item: Setup" displays.
c. Press ENTER (2, Fig. 2). "Setup: Align" displays. Go to Step 3.

2. Press 

MODE 

(3, Fig. 2). "Setup: Align" displays.

3.

Press the Scroll Down key repeatedly until "Setup: Targets" displays. Press
ENTER (2, Fig. 2).

4.

"Targets: Terrestrial" displays. Press one of the Scroll keys once (7, Fig. 2).
"Targets: Astronomical" now displays. 

5.

Use the Arrow keys (5, Fig. 2) to locate a bright star in the night sky. Use the
viewfinder to help line up on the star. You may choose any unobstructed, bright
star for the purposes of this example. Use Autostar's Arrow keys to center the star
in the eyepiece. Once the star is centered, press ENTER to select
"Astronomical." The telescope's tracking motors then engage. It may take the
tracking motors several seconds to begin tracking. When they do, it may be nec-
essary to once again center the star in the eyepiece. The tracking motors will
then keep any star you choose in the center of the eyepiece. 

6.

Press and hold the ENTER key for a few seconds and then release to stop track-
ing. You may also stop tracking by choosing "Terrestrial" in the Targets menu.

Using Autostar's GO TO Capabilities (Autostar Models Only)

Before you can use Autostar's GO TO capabilities, you must first:

Learn how Autostar's keys move through the menus

Initialize Autostar 

• 

Place the telescope in the polar home position, if you have not already done so
(see 

SETTING THE POLAR HOME POSITION

page 17)

Select "Align: Easy" from Autostar's menus

Which One’s the Alignment Star?

If Autostar has chosen an alignment star with which you are unfamiliar, how can
you be sure if the star in your eyepiece is really the alignment star?

The rule of thumb is that an alignment star is usually the brightest star in that
area of the sky. If you perform a GO TO to an alignment star and you're not sure
if you have located the alignment star or it isn't in the eyepiece, look through your
viewfinder. When you view an alignment star in the viewfinder, it stands out dra-
matically from the rest of the stars in that portion of the sky. The viewfinder will
help you locate a star more quickly than the eyepiece, because it has a much
wider field of view than the eyepiece. Using Autostar, set the slew speed to 6 or
higher and use the Arrow keys to center the alignment star in the viewfinder.  If
your viewfinder has been aligned with the telescope, the alignment star should
now be in the eyepiece. Set the slew speed to 4 or less and center the star in
the eyepiece. Also see the "Spiral Search" tip on page 21.

If you have an obstruction, such as a tree or a building blocking your view of the
alignment star, or if you have any doubts at all about the star that has been cho-
sen, no problem. Just press the Scroll Down key and Autostar will find another
star to align upon.

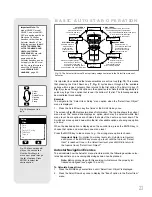
Important Note: While
performing the automatic
tracking procedure, you
may use the Arrow keys
to move the telescope or
you may also loosen the
telescope locks (17 and
33, Fig. 1d) and move
the optical tube manually
to locate another object
in the sky. The tracking
function will continue to
be operational and the
telescope will track the
new object.

Tip:
You can change the tele-
scope's slew rate while
centering an object in the
eyepiece. See SLEW
SPEEDS
, page 16 for
more information.

LXD55 TIPS

Summary of Contents for LXD55 Series

Page 1: ...Meade Instruments Corporation Instruction Manual LXD55 Series Telescopes...

Page 2: ......

Page 3: ...Axis Alignment Method 1 50 Axis Alignment Method 2 53 Appendix C Latitude Chart 54 Appendix D EC Handbox 55 Appendix E Mounting the Model SC 8 Optical Tube 59 Appendix F Basic Astronomy 60 CONTENTS W...

Page 4: ...own Electronic Controller model users see Appendix D page 55 Fig 1c The LXD55 Series Tripod B C g d f I 1 1 1 e H J 1 1 3 3 4 3 3 Fig 1b Close up of Focuser and Viewfinder Assembly Scmidt Newtonian sh...

Page 5: ...5 Fig 1e The LXD55 Series Computer Control Panel see 2 above Fig 1d The LXD55 Series Mount 2 2 1 1 1 2 2 2 2 2 2 2 2 3 3 3 3 3...

Page 6: ...djust the alignment of the viewfinder Viewfinder Front Cell and Locking Ring Adjust the front cell to focus the viewfinder See step 3 page 14 for more details The viewfinder is supplied with a small d...

Page 7: ...bly also may be powered from either a 12v DC auto cigarette lighter plug using the optional 607 Cigarette Lighter Adaptor or from a standard 115v AC home outlet using the optional 547 Power Adapter wi...

Page 8: ...se knobs to slide the inner leg extension Tighten the knobs to a firm feel to lock in the height of the tri pod 4 Battery Pack and holder see Fig 1f Plug into the 12v DC power connector B Fig 1e of th...

Page 9: ...a pos itive feel The LCD Liquid Crystal Display is backlit with a red LED Light Emitting Diode for easy viewing in the dark The backlit display key arrangement and sequential menu structure make Auto...

Page 10: ...s dis played on the first line of the screen Options in that menu are displayed one at a time on the second line Press the Scroll keys to move through the options Press and hold a Scroll key to move q...

Page 11: ...unting knob from the center of the leg braces 39 Fig 1c Place the triangular accessory shelf on top of the leg braces so that each corner of the triangle lies over a leg brace Notice that there is pro...

Page 12: ...e dust cover 9 Fig 1a over it is oriented as depicted in Fig 1a Then close the cradle rings 14 Fig 1a over the optical tube Loosely tighten the cradle ring lock knobs just to hold the tube securely in...

Page 13: ...the two batteries to protect battery life Unthread both the thumbscrew F and the threaded lid E Remove the plastic strip before using Refer to the reti cle assembly in Fig 13b and note the orientatio...

Page 14: ...f the main telescope for a detailed view To align the viewfinder perform steps 1 through 4 during the daytime perform step 5 at night Both the 6 x 30mm and the 8 x 50mm viewfinders align in an identic...

Page 15: ...he movement of an equatorial mount is not intuitive Use the aligned viewfinder to sight in on the object you wish to observe When the object is centered in the viewfinder s crosshairs re tighten the R...

Page 16: ...ite Use the Scroll keys to cycle through the database of cities Press ENTER when the correct city appears on the display 6 Autostar then prompts you to enter the model number of your telescope Use the...

Page 17: ...f the three tripod legs 2 Unlock the R A Lock 33 Fig 1d Rotate the Optical Tube Assembly until the counterweight shaft is pointing straight down over the mount See Figs 16a and 16b 3 If you have not a...

Page 18: ...rial in the Targets menu Using Autostar s GOTO Capabilities Autostar Models Only Before you can use Autostar s GO TO capabilities you must first Learn how Autostar s keys move through the menus Initia...

Page 19: ...r use the Left Arrow key to move in the other direction across the display if necessary b Use the Right Arrow key 5 Fig 2 to move the cursor to the month Use the Scroll keys 7 Fig 2 to cycle through t...

Page 20: ...hs to maintain the highest level of telescope pointing accuracy 1 If you have just performed INITIALIZING AUTOSTAR go to step 2 If you have not yet initialized Autostar go to page 19 and follow the pr...

Page 21: ...lignment stars based on the date time and loca tion entered The alignment stars may change from night to night All that is required is for the observer to center the selected star in the eyepiece when...

Page 22: ...ys 3 Press ENTER Guided Tour Tonight s Best displays Press ENTER Note If you wish to try out other Guided Tours press the Scroll Down key to scroll through other tour choices When the tour you wish to...

Page 23: ...Calculate Sunset time 1 Press the MODE key several times until Select Item Object is displayed 2 Press the Scroll Down key once to display the Event option in the Select Item menu BASIC AUTOSTAR OPERA...

Page 24: ...avigation Press ENTER 2 Fig 2 to go deeper into Autostar s menu levels Press MODE 3 Fig 2 to move back toward the top menu level Press the Scroll keys 7 Fig 2 to move up and down through the options o...

Page 25: ...A Accretion Disk Etc B C D E F G H I J K L M N O P Q R S T U V W X Y Z Timer Set Start Stop Alarm Set On Off Eyepiece Calc Field of View Magnification Suggest Display Options Sun Warning Getting Start...

Page 26: ...tore in memory deep sky objects of spe cific interest that are not currently in the Autostar libraries See Using Autostar to Find Objects Not in the Libraries page 33 for more information Landmarks st...

Page 27: ...a major change in apparent magnitude as one of the two stars passes behind the other The combined magnitude of the two stars thus dips from 2 1 to a minimum of 3 4 halfway through the eclipse as the...

Page 28: ...t the survey While a slew is in progress press any key to skip that object and go to the next landmark on the list To observe a landmark for a longer period press MODE when paused on the object to sto...

Page 29: ...or declination axes Train Drive Trains the Altitude Declination and Azimuth R A motors to locate objects with more precision If you are experiencing any problems with pointing accuracy follow the proc...

Page 30: ...te from the database Edit Edits a selected site including the name latitude longitude and time zone Time Zone refers to the Greenwich Mean Time GMT time zone shift Users West of Greenwich England use...

Page 31: ...elating to astronomy on the internet Try the following key word searches NASA Hubble HST astronomy Messier satellite nebula black hole variable stars etc Check out Meade s website for the latest produ...

Page 32: ...me latitude lon gitude and the time zone shift You will then select the site to enable it You will need to know the latitude and longitude of your location to perform this pro cedure 1 Using the Add o...

Page 33: ...scribed to enter the name of the object you wish to add to the database When you are finished press ENTER 6 Right Asc 00 00 0 displays Use the Number keys to enter the digits for the Right Ascension c...

Page 34: ...to view the object Satellite orbits change and new satellites including the Space Shuttle are launched Visit the Meade website www meade com approximately once a month to get updated information and...

Page 35: ...rks repeat steps 5 through 7 To Select a landmark from the database 1 Make sure the telescope is located and aligned exactly as when the desired land mark was entered into memory 2 Display the Landmar...

Page 36: ...the subject through the cam era s reflex viewfinder turn the telescope s focus knob 3 Fig 22 to achieve the sharpest possible focus Note that some 35mm cameras may have an optional focusing screen av...

Page 37: ...2 02 41 1 62 32mm 67 2 O D 24 2 81 25 2 64 32 2 11 40mm 67 2 O D 19 3 52 20 3 30 25 2 64 Ultra Wide Angle Eyepieces 8 elements 1 25 O D except as noted 4 7mm 84 162 0 52 173 0 49 216 0 39 6 7mm 84 114...

Page 38: ...iewing this prism presents a correctly oriented image at a comfortable 45 viewing angle 505 AstroFinder Software and Cable Connector Kit With Meade AstroFinder loaded into your PC Autostar equipped te...

Page 39: ...d battery 1209 Microfocuser For use with LXD55 Schmidt Cassegrain SC 8 model Supplied with a handbox the microfocuser threads directly to the rear cell of model SC 8 Permits precise focusing of the im...

Page 40: ...imply allow the telescope to sit for some time in the warm indoor air so that the wet optical surfaces can dry unattended f If your LXD55 is not to be used for an extended period perhaps for one month...

Page 41: ...irection or else the diagonal mirror may become loosened from its support Note that the diagonal mirror collimation adjustments are very sensitive generally turning a collimation screw 1 2 turn will h...

Page 42: ...ou the best optical performance As part of final optical testing every Meade Schmidt Cassegrain is precisely colli mated at the Meade factory before shipment However vibrations in shipping can cause t...

Page 43: ...you are turn ing the screw the wrong way Turn the opposite direction and bring the image back to the center of the field e If the screw you are turning becomes very loose tighten the other two screws...

Page 44: ...ical quality can only be conducted through careful star testing Meade Customer Service If you have a question concerning your LXD55 Series telescope contact the Meade Instruments Customer Service Depa...

Page 45: ...olar Finder Reticle Batteries Maxell LR41 or equivalent Net telescope weight 13 lbs Net tripod weight 35 lbs 8 f 4 Model SN 8 SN 8EC Specifications Optical design Schmidt Newtonian Clear aperture 8 20...

Page 46: ...omatic Refractor Clear aperture 5 127mm Focal length 1180mm Focal ratio photographic speed f 9 3 Resolving power 0 90 arc secs Coatings Meade EMC Super Multi Coatings Mounting Die cast aluminum Input...

Page 47: ...optional Mounting Die cast aluminum Input Voltage 12v DC Alignment German type equatorial mount Slew Speeds 1x sidereal to 4 5 sec in 9 increments Tripod Variable height field tripod Accessories 8 x 5...

Page 48: ...further and further East of the zero R A grid line 0hr 0min 0sec carry higher R A coordinates Declination Dec This celestial version of latitude is measured in degrees arc minutes and arc seconds e g...

Page 49: ...tostar Locating the Celestial Pole To get basic bearings at an observing location take note of where the Sun rises East and sets West each day After the site is dark face North by pointing your left s...

Page 50: ...to how far the optical tube and mount can be moved 8 Tighten the R A Lock 33 Fig 1d Return the optical tube to the home position Note Remember to turn off the polar alignment reticle LED Axis Alignmen...

Page 51: ...ocedure beginning at Step 2 Rotate the telescope 180 in the R A axis ONLY until the optical tube is in position B See Fig 40 Note the position of your target in the eyepiece 6 Using the Autostar Up an...

Page 52: ...e once the distance between the object in position A and position B is less than one third the width of the eyepiece 9 As a final check select another object and place it into the center of the eyepie...

Page 53: ...ss ENTER A message displays that tells you to center a landmark If the landmark is not visible in your eyepiece lift and move the entire telescope and tripod assembly try not to move the tube too far...

Page 54: ...New York New York 41 N Oklahoma City Oklahoma 35 N Ottawa Ontario 45 N Philadelphia Pennsylvania 40 N Phoenix Arizona 33 N Portland Oregon 46 N Salt Lake City Utah 41 N San Antonio Texas 29 N San Dieg...

Page 55: ...eeds see SPEED KEY below Important Note If you reverse directions while using the Arrow keys to slew to objects there may be a slight pause as the telescope motors com pensate for the reversal of the...

Page 56: ...in the field of a low to moderate power eyepiece such as the standard SP 26mm Light 4 The slowest speed Use to center an object in the field of view of high power eyepieces such as the optional 6 7mm...

Page 57: ...and look through the eyepiece Continue pressing IN and MODE until the object remains centered with little or no drifting in the eyepiece Note The tracking rate can be increased by up to 65 4 To use a...

Page 58: ...Use the SPEED key as described in the above steps to cycle among these three modes Southern Hemisphere polar Northern Hemisphere polar or Tracking Disabled until the desired mode is shown by the appro...

Page 59: ...cradle locking knob will enter the groove when the knob is tight ened Tighten both the cradle locking knob and the secondary locking knob to a firm feel See Fig 48 If you are using heavy accessories s...

Page 60: ...cret waiting to be revealed Autostar Glossary Be sure to make use of Autostar s Glossary feature The Glossary menu provides an alphabetical listing of definitions and descriptions of common astronomic...

Page 61: ...seeing were rings Instead he believed that Saturn had ears Saturn s rings are composed of billions of ice particles ranging in size from a speck of dust to the size of a house The major division in S...

Page 62: ...comets come from 8 How old is our Sun Will our Sun evolve into a planetary nebula or go super nova 9 What is the Inflationary Big Bang What is dark matter What are MACHO s 10 How are extrasolar plane...

Page 63: ......

Page 64: ...overed under separate warranties issued by Meade international distributors RGA Number Required Prior to the return of any product or part a Return Goods Authorization RGA number must be obtained from...

Reviews: