11
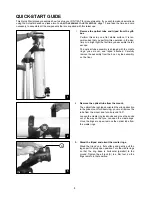
12. Connect Autostar: Plug the coil cord of the Autostar Controller into the HBX port (C,
Fig.1b) of the computer control panel.
WARNING: Make sure you plug in Autostar before you plug in the battery pack.
NOTE: Autostar does not require batteries; the telescope’s batteries supply power
to Autostar.
13. Insert batteries: Install 10 AA user-supplied batteries into the battery pack (Fig.12), ori-
ented as shown on the diagram on the battery slots of the battery holder.
CAUTION: Use care to install batteries as indicated by the battery compartment.
Follow battery manufacturer's precautions. Do not install batteries backwards or
mix new and used batteries. Do not mix battery types. If these precautions are not
followed, batteries may explode, catch fire, or leak. Improperly installed batteries
void your Meade warranty. Always remove the batteries if they are not to be used
for a long period of time.
14. Connect battery pack: Plug the battery pack into the 12V port (B, Fig.1b) of the comput-
er control panel. Attach the pack to one of the tripod legs using the Velcro fastener or set
it on the utility tray.
15. Adjust tripod: Adjust the height of the tripod to a convenient viewing height by lifting the
clip on each leg and extending the sliding inner section of the leg to the desired length.
Then press the clip back against the leg to lock in place.
15. Remove the dust cover: Pull out the dust cover (23, Fig. 1) from the optical tube.
Assembly of the telescope is now complete.
Some Notes About the Dual-Motor System
•
For the motors to be operational, the Az and Alt lock-knobs (19, Fig. 1) and (22, Fig. 1)
must be in their locked positions. Firm-feel tightening of these locks is sufficient. Do not
overtighten. If these are not sufficiently tightened, Autostar may display a motor fault mes-
sage.
•
When setting up the telescope, always plug in the battery pack to the control panel last,
after plugging in the two motors and Autostar. Connecting the battery pack to the control
panel before the motors and Autostar are connected may result in false electrical signals
being sent to the motors, causing them to malfunction. In this case unplug the battery pack
from the control panel, wait a few seconds, and plug the battery pack back into the control
panel. This operation clears the motors of any false signals.
•
Take care that cords do not become wrapped around the telescope; keep the cords “loose”
at all times. Do not allow the telescope to slew into the tripod or other fixed object. Do not
touch or hold the telescope tube while it is moving.
•
If the motors stall or do not have sufficient power to move the telescope, place fresh bat-
teries in the battery pack. Long-life alkaline batteries are recommended.
•
The first time you initialize your system, make sure you train the drives. This allows
Autostar to move the telescope precisely to objects. See page 16 for detailed infofrmation.
The Viewfinder
Because the main telescope has a fairly narrow field of view, locating objects directly in the
main telescope can sometimes be difficult. The viewfinder (5, Fig. 1) is a small, wide-field tele-
scope with crosshairs that permits you to locate objects more easily. When the viewfinder and
optical tube are aligned to each other, both point to the same position in the sky. An object locat-
ed in the viewfinder is therefore also positioned within the field of the main telescope. Before
aligning the viewfinder to the optical tube, focus the viewfinder.
Focusing the Viewfinder:
1. Turn the viewfinder eyepiece on its internal thread. Generally a few turns are sufficient to
achieve proper focus.
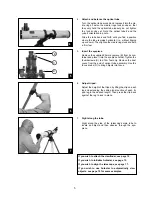
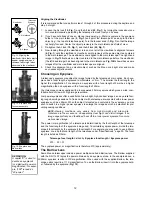
Fig. 9: Attach Az motor.
Fig. 11: Attach the viewfind-
er tube to bracket and tight-
en thumbscrews.
Fig. 10: Attach the viewfind-
er bracket to the optical
tube.
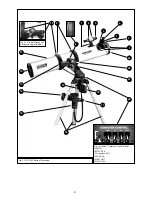
Fig. 12: Insert 10 AA batter-
ies into battery pack.
Fig. 8: Attach Alt motor.


