7
Looking at or near the Sun will cause irreversable damage to your eye. Do not point this telescope at or near the
Sun. Do not look through the telescope as it is moving.
6. Avoid setting up the telescope inside a room and observing through a closed window pane. Images may appear
blurred or distorted due to temperature differences between inside and outside air. Also, it is a good idea
to allow your telescope a chance to reach the ambient (surrounding) outside temperature before starting an
observing session.
7. We repeat the warning stated at the outset of this manual:
NEVER POINT THE TELESCOPE DIRECTLY AT OR NEAR THE SUN AT ANY TIME!
OBSERVING THE SUN, EVEN FOR THE SMALLEST FRACTION OF A SECOND, WILL RESULT
IN INSTANT AND IRREVERSIBLE EYE DAMAGE, AS WELL AS PHYSICAL DAMAGE TO THE
TELESCOPE
ITSELF.
8. Planets and other objects viewed low on the horizon often lack sharpness — the same object, when observed
higher in the sky, will appear sharper and have greater contrast. Turbulent air in the atmosphere can cause
images to “shimmer” in the eyepiece. Try reducing power (change your eyepiece) until the image steadies. Keep
in mind that a bright, clear, but smaller image is more interesting than a larger, dimmer, fuzzy one.
9. Astronomical software or a good star atlas will assist you in locating many interesting celestial objects. These
objects include:
•
The Moon, covered with craters, mountain ranges, and fault lines. The Moon is best observed during its crescent
or half phase when Sunlight strikes the Moon’s surface at an angle. It casts shadows and adds a sense of depth
to the view. No shadows are seen during a full Moon, causing the bright Moon to appear flat and uninteresting.
•
Cloud belts across the surface of the planet Jupiter.
•
The 4 major moons of Jupiter, visible around the planet, changing position each night.
•
Saturn and its famous ring system.
•
Deep-Space: Nebulae, galaxies, multiple star systems, star clusters — hundreds of such objects are visible
through the Meade 50AZ-P.
•
Terrestrial objects: Your Meade telescope may also be used for high-resolution land viewing. Important Note:
Using that the diagonal mirror results in an image which is reversed left-for-right, but which is correctly oriented
up-and-down. For a fully corrected image, the 35X erecting eyepiece (.965” O.D.) is required.
Terrestrial observations should almost always be made using the 25mm low-power eyepiece for bright, sharp
images. Observing horizontally through the Earth’s atmosphere distorts images in higher-power eyepieces (such
as 12.5mm).
10. The T-18mm erecting eyepiece is also a stand-alone 14X microscope. To use, place the clear base on top of the
object to be examined and look through the eyepiece.
CALCULATING POWER
The power, or magnification, at which a telescope is operating is determined by two factors: the focal length of the
telescope’s main (objective) lens and the focal length of the eyepiece being used.
The focal length of the Meade 50AZ-P’s objective lens is 625mm. To figure out the power you are using, divide the
the focal length of the objective lens by the focal length of the eyepiece. For example, if you are using the H 25mm
eyepiece with the Meade 50AZ-P, the resulting power will be:
Power = 625mm ÷ 25mm = 25X.
Similarly, if you are using the H 12.5mm eyepiece, the resulting power will be:
625mm ÷ 12.5mm = 50X.
Note: The letter “H” refers to the “Huygens” optical design which yields well-corrected images with refracting
telescopes.
With the 3.5x Barlow lens, an eyepiece’s power is multiplied 3.5 times. For example, the H 25mm (25X) eyepiece,
when used in conjunction with the 3.5x Barlow lens, produces a magnification of 88X. The H 12.5mm (50X)
eyepiece produces a magnification of 175X when used with the Barlow lens. To use the 3.5x Barlow lens, remove
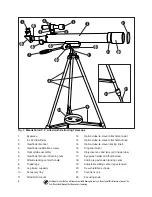
the diagonal mirror from the eyepiece holder (17, Fig. 1), then insert the 3.5x Barlow lens, followed by the diagonal
mirror (15, Fig. 1) and eyepiece (1, Fig. 1). Refocus until the image is sharp.


