background image

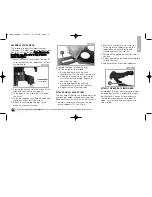
1. Note the two thumbscrews 
(16, Fig. 4) thread onto two bolts 
on the optical tube. Remove the
thumbscrews from the tube.

2. Line up the two holes on the red dot

viewfinder bracket over the two bolts.
Slide the bracket over the bolts.

3. Replace the thumbscrews on to the

bolts and tighten to a firm feel.

INSERT THE EYEPIECE

1. Slide the MA25mm eyepiece (19) into

eyepiece holder on the focuser (17).

2. Tighten the focuser thumbscrew to

hold the eyepiece securely.

ATTACH THE COUNTERWEIGHT

1. Hold the counterweights (5) firmly 

in one hand, (one by one) slide the
counterweights onto the
counterweight shaft (6).

2. Threading the shaft into the base of

the declination axis (Fig. 5). Be sure to
support the counterweight with one
hand while performing this step.

3. Slide the counterweight to a 

position about 2" from the bottom of
the shaft.

4. Secure in place by tightening the

counterweight lock (7). 

N

No

otte

e:: Make sure the safety washer and

screw (8) always remain in place on
the shaft. T

Th

hiis

s  s

sa

affe

ettyy  ffe

ea

attu

urre

e

p

prre

evve

en

ntts

s  tth

he

e  c

co

ou

un

ntte

errw

we

eiig

gh

htt  ffrro

om

m

a

ac

cc

ciid

de

en

nttllyy  s

slliip

pp

piin

ng

g..

BALANCING THE TELESCOPE

In order for the telescope to move
smoothly on its mechanical axes, it
must first be balanced as follows:

N

No

otte

e::  If the counterweight is

positioned as recommended
previously then the telescope is
already approximately balanced.

1.  Loosen the right ascension lock

(22). The telescope mount will turn
freely about the polar axis.  Rotate
the telescope about the polar axis so
that the counterweight shaft (6) is
parallel to the ground (horizontal).

2.  Loosen the counterweight's locking

4

(on reverse side)

(see p. 2 for
feature 
names)

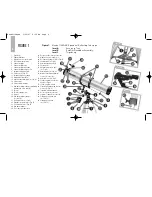
Fig. 5

Looking at or near the 

Sun

will cause 

irreversable

damage to your eye. Do not point this telescope at or near the Sun. Do not look through the telescope as it is moving.

Meade114EQAR  3/28/07  9:52 AM  Page 6

Summary of Contents for 114EQ-AR

Page 1: ...MEADE INSTRUCTION MANUAL 114mm 4 5 Equatorial Reflecting Telescope 114EQ AR www meade com Meade114EQAR 3 28 07 9 52 AM Page 1 ...

Page 2: ...our eye Eye damage is often painless so there is no warning to the observer that damage has occurred until it is too late Do not point the telescope at or near the Sun Do not look through the telescope or SmartFinder as it is moving Children should always have adult supervision while observing Meade114EQAR 3 28 07 9 52 AM Page 2 ...

Page 3: ...4mm The lens diameter is one of the most important pieces of information about the telescope The size of the primary mirror determines how much detail you will be able to see in your telescope The focal length information will help later on to calculate magnification Setting up your telescope involves these simple steps Assemble your tripod Attach the accessory tray Attach the red dot viewfinder A...

Page 4: ... Fig 5 24 Red dot viewfinder 25 Telescope front dust cover 26 Eyepiece holder slots see Inset A 27 Right Ascension setting circle 28 Declination setting circle see Fig 5 29 Latitude dial see Fig 5 30 Azimuth adjustment lock 31 Focus knobs 32 Optional motor drive gear see Fig 5 33 Azimuth base see Fig 5 34 Red dot viewfinder alignment screws see Inset B 35 Azimuth circle see Fig 5 36 Cradle ring at...

Page 5: ...he screwdriver tool 5 Repeat with the other two leg braces ATTACH THE RED DOT VIEWFINDER An eyepiece 19 has a narrow field of view A viewfinder 24 has a wider field of view which makes it easier to locate objects The red dot viewfinder has a red dot to make it easier to line up more precisely with a target 6 Spread the legs out evenly apart 7 Set the height of your tripod a Rotate and loosen the l...

Page 6: ...eight lock 7 N No ot te e Make sure the safety washer and screw 8 always remain in place on the shaft T Th hi is s s sa af fe et ty y f fe ea at tu ur re e p pr re ev ve en nt ts s t th he e c co ou un nt te er rw we ei ig gh ht t f fr ro om m a ac cc ci id de en nt tl ly y s sl li ip pp pi in ng g BALANCING THE TELESCOPE In order for the telescope to move smoothly on its mechanical axes it must f...

Page 7: ...VER THAT DAMAGE HAS OCCURRED UNTIL IT IS TOO LATE DO NOT POINT THE TELESCOPE OR ITS VIEWFINDER AT OR NEAR THE SUN DO NOT LOOK THROUGH THE TELESCOPE OR ITS VIEWFINDER AS IT IS MOVING CHILDREN SHOULD ALWAYS HAVE ADULT SUPERVISION WHILE OBSERVING 5 Fig 6 thumbscrew 7 and slide the counterweights 5 along the shaft until the telescope remains in any given position without tending to drift up or down ar...

Page 8: ... IO ON N R R A A This Celestial version of longitude is measured in units of hours hr minutes min and seconds sec on a 24 hour clock similar to how Earth s time zones ar determined by longitude lines The zero line was chosen to pass through the constellation Pegasus a sort of cosmic Greenwich meridian R A coordinates range from 0hr 0min 0sec to 23hr 59min 59sec UNDERSTANDING CELESTIAL MOVEMENTS AN...

Page 9: ...two of the pole is more than sufficient with this level of pointing accuracy the telescope can track accurately by slowly turning the telescope s R A flexible cable control and keep objects in the telescopic field of view for perhaps 20 to 30 minutes POLAR ALIGNMENT OF THE EQUATORIAL MOUNT To line up the Meade 114 EQ AR with the pole follow this procedure THE MEADE 4M COMMUNITY You haven t just bo...

Page 10: ...escope Have Fun 8 TOO MUCH POWER Can you ever have too much power If the type of power you re referring to is eyepiece magnification yes you can The most common mistake of the beginning observer is to overpower a telescope by using high magnifications which the telescope s aperture and atmospheric conditions cannot reasonably support Keep in mind that a smaller but bright and well resolved image i...

Page 11: ... you have the object lined up in the viewfinder look through the optical tube s eyepiece If you have aligned your viewfinder you will you see the object in your eyepiece Focus Look through the eyepiece and practice focusing on the object you have chosen Try out the slow motion flexible cable control Practice using the right ascension control cable 3 and declination control cable 4 to move the tele...

Page 12: ...e number of planets in our solar system The four planets closest to the Sun are rocky and are called the inner planets Mercury Venus Earth and Mars comprise the inner planets Venus and Mars can be easily seen in your telescope Venus is seen before dawn or after sunset because it is close to the Sun You can observe Venus going through crescent phases But you cannot see any surface detail on Venus b...

Page 13: ...er it passed Jupiter and looked back at it It turns out only with the sunlight shining through them can the rings be seen Uranus and Neptune also have faint rings Optional color filters help bring out detail and contrast of the planets Meade offers a line of inexpensive color filters What s Next Beyond the Solar System Once you have observed our own system of planets it s time to really travel far...

Page 14: ...n Hemisphere are the Orion nebula during the winter and the Triffid nebula during the summer These are large clouds of gas in which new stars are being born Some nebulas are the remains of stars exploding These explosions are called supernovas When you become an advanced observer you can look for other types of objects such as asteroids planetary nebula and globular clusters And if you re lucky ev...

Page 15: ...the object to be viewed is again placed at the edge of the field ready to be further observed Vibrations Avoid touching the eyepiece while observing through the telescope Vibrations resulting from such contact will cause the image to move Avoid observing sites where vibrations cause image movement for example near railroad tracks Viewing from the upper floors of a building may also cause image mov...

Page 16: ...al What do the specifications mean Optical tube focal length is simply a measurement of the length of the optical JOIN AN ASTRONOMY CLUB ATTEND A STAR PARTY One of the best ways to increase your knowledge of astronomy is to join an astronomy club Check your local newspaper school library or telescope dealer store to find out if there s a club in your area Many groups also hold regularly scheduled ...

Page 17: ...he Eyepiece Magnification Look at the specifications You will see that the focal length of your scope is 900mm Let s say that you have obtained a 13mm eyepiece You can tell that what the focal length of your eyepiece is as it is always printed on the side of an eyepiece Divide 900 13 which equals 69 2 Round this off to the nearest whole number and your new eyepiece magnifies objects 69 times If yo...

Page 18: ...required Fingerprints and organic materials on the lens or mirror may be removed with a solution of 3 parts distilled water to 1 part isopropyl alcohol You may also add 1 drop of biodegradable dishwashing soap per pint of solution Use soft white facial tissues and make short gentle strokes Change tissues often CAUTION Do not use scented or lotioned tissues or damage could result to the optics DO N...

Page 19: ...ll Fig 11 B DIAGONAL HOLDER ADJUSTMENTS If the diagonal mirror 1 Fig 15 is centered in the drawtube 2 Fig 15 but the primary mirror is only partially visible in the reflection 3 Fig 15 the 3 Phillips head diagonal tilt screws To adjust these screws you must first remove an adhesive backing 17 Fig 13 3 2 Fig 14 4 5 3 2 2 1 Fig 15 3 1 2 Fig 16 2 1 3 4 Fig 17 A B C Collimation Primary Mirror Misalign...

Page 20: ...ection of your eye Once centered as in Fig 14 turn the 3 hex head primary mirror cell locking screws 2 Fig 13 to relock the tilt angle adjustment D STAR TESTING THE COLLIMATION With the collimation performed you will want to test the accuracy of the alignment on a star Use the 25mm eyepiece and point the telescope at a moderately bright second or third magnitude star then center the star image in ...

Page 21: ...r disk image is in the center of the eyepiece field With the star testing of the collimation complete tighten the 3 hex head primary mirror locking screws 2 Fig 13 OPTIONAL ACCESSORIES Additional Eyepieces 1 25 barrel diameter For higher or lower magnifications with the telescopes that accommodate 1 25 eyepieces Meade Series 4000 Super Plössl eyepieces available in a wide variety of sizes provide ...

Page 22: ... purchased outside North America are not included in this warranty but are covered under separate warranties issued by Meade international distributors RGA Number Required Prior to the return of any product or part a Return Goods Authorization RGA number m mu us st t be obtained from Meade by writing or by calling 800 626 3233 Each returned part or product must include a written statement detailin...

Page 23: ...OBSERVER OBJECT NAME DATE TIME OBSERVED CONSTELLATION EYEPIECE SIZE SEEING CONDITIONS EXCELLENT GOOD POOR NOTES DRAWING OF IMAGE OBSERVATION LOG Meade114EQAR 3 28 07 9 52 AM Page 23 ...

Page 24: ...OBSERVER OBJECT NAME DATE TIME OBSERVED CONSTELLATION EYEPIECE SIZE SEEING CONDITIONS EXCELLENT GOOD POOR NOTES DRAWING OF IMAGE OBSERVATION LOG Meade114EQAR 3 28 07 9 52 AM Page 24 ...

Page 25: ...OBSERVER OBJECT NAME DATE TIME OBSERVED CONSTELLATION EYEPIECE SIZE SEEING CONDITIONS EXCELLENT GOOD POOR NOTES DRAWING OF IMAGE OBSERVATION LOG Meade114EQAR 3 28 07 9 52 AM Page 25 ...

Page 26: ...OBSERVER OBJECT NAME DATE TIME OBSERVED CONSTELLATION EYEPIECE SIZE SEEING CONDITIONS EXCELLENT GOOD POOR NOTES DRAWING OF IMAGE OBSERVATION LOG Meade114EQAR 3 28 07 9 52 AM Page 26 ...

Page 27: ...Meade114EQAR 3 28 07 9 52 AM Page 27 ...

Page 28: ...www meade com Meade Instruments Corporation 6001 Oak Canyon Irvine California 92618 1 800 626 3233 Meade114EQAR 3 28 07 9 52 AM Page 28 ...

Reviews: