background image

20

VS-M1

Nederlands

1

7

4

2

8

5

8

3

9

6

1 2

3

4

1 2

3

4

1 2

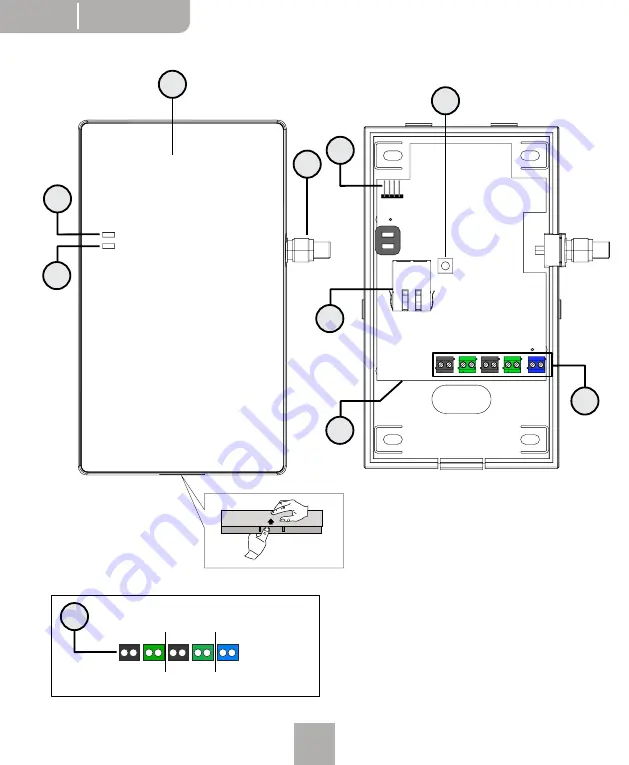
1 = +15V
2 = GND
3 = Audio
4 = Video

EINGANG

AUSGANG

POWER

1 = VS-M1
2 = Stroom-LED
3 = LED netwerkverbinding
4 = Aansluiting antenne
5 = VTX module slot
6 = Netwerkaansluiting (RJ-45)
7 = RESET knop
8 = Schroefklemmen
9 = SD-kaartsleuf

Fig.1

Summary of Contents for VS-M1

Page 1: ...VS M1 IP ERWEITERUNGFÜR VISTUS VISTADOOR MONTAGEANLEITUNG INSTRUCTIONS MODED EMPLOI AANWIJZING ...

Page 2: ...1 2 3 4 1 2 3 4 1 2 1 15V 2 GND 3 Audio 4 Video EINGANG AUSGANG POWER 1 VS M1 2 Power LED 3 LED Netzwerkverbindung 4 Anschluss Antenne 5 Steckplatz VTX Modul 6 Netzwerkbuchse RJ 45 7 RESET Taste 8 Schraubklemmen 9 SD Karten Einschub Abb 1 ...

Page 3: ...2000 Außenstation Outdoor unit VS M1 Innenstation Indoor unit 1 2 3 4 A1 A2 A3 A4 Steckernetzteil Model ST 1000 oder Hutschienennetzteil Modell DT 2000 1 2 3 4 Außenstation Outdoor unit A1 A2 A3 A4 Innenstation Indoor unit 1 2 3 4 1 2 3 4 1 2 3 4 1 2 EINGANG AUSGANG POWER A B Abb 2 ...

Page 4: ...beigelegte Patchkabel zur Verbindung der VS M1 mit Ihrem Router nutzen Für die Erstinbetriebnahme ist es nicht erforderlich die VS M1 Box schon mit der Türsprechanlage verbunden zu haben Lediglich die Stromzufuhr und eine LAN Kabelverbindung zu ihrem Router muss dafür gewährleistet sein Nach der Inbetriebnahme Einbindung in ihre APP können sie die VS M1 Box alternativ auch auf W LAN Betrieb umstel...

Page 5: ...rch kann jede Partei Ihr eigenes Netzwerk benutzen Nachdem Sie die VS M1 angeschlossen und mit Ihrem Netzwerk verbunden haben stellen Sie die Stromversorgung Ihres Türsprechanlagensystems wieder her und fügen anschließend die VS M1 zur App hinzu siehe App Anleitung Vistasmart2 INITIALISIERUNG Jedes Mal wenn die Stromversorgung des Türsprechanlagensystems getrennt war und wieder hergestellt wird mu...

Page 6: ...NWEISE Aus Sicherheits und Zulassungsgründen CE ist das eigenmächtige Umbauen und oder Verändern des Produkts nicht gestattet Zerlegen Sie das Produkt nicht Lassen Sie das Verpackungsmaterial nicht achtlos liegen Plastikfolien tüten Styroporteile etc könnten für Kinder zu einem gefährlichen Spielzeug werden Vermeiden Sie das Feucht oder Nass werden des Geräts Wenden Sie sich an eine Fachkraft wenn...

Page 7: ...cht werden erlischt der Garantieanspruch Für Folgeschäden übernehmen wir keine Haftung Bei Sach oder Personenschä den die durch unsachgemäße Handha bung oder Nichtbeachten der Sicher heitshinweise verursacht werden über nehmen wir keine Haftung In solchen Fällen erlischt jeder Garantieanspruch HAFTUNGSBESCHRÄNKUNG Der Hersteller ist nicht für den Verlust oder die Beschädigung irgendwelcher Art ein...

Page 8: ...9 6 1 2 3 4 1 2 3 4 1 2 1 15V 2 GND 3 Audio 4 Video EINGANG AUSGANG POWER 1 VS M1 2 Power LED 3 Network connection LED 4 Antenna connection 5 VTX module slot 6 Network socket RJ 45 7 RESET button 8 Screw terminals 9 SD card slot Fig 1 ...

Page 9: ...2000 Außenstation Outdoor unit VS M1 Innenstation Indoor unit 1 2 3 4 A1 A2 A3 A4 Steckernetzteil Model ST 1000 oder Hutschienennetzteil Modell DT 2000 1 2 3 4 Außenstation Outdoor unit A1 A2 A3 A4 Innenstation Indoor unit 1 2 3 4 1 2 3 4 1 2 3 4 1 2 EINGANG AUSGANG POWER A B Fig 2 ...

Page 10: ... and use the enclosed patch cable to connect the VS M1 to your router For the initial start up it is not necessary to have already connected the VS M1 box to the door intercom Only the power supply and a LAN cable connec tion to your router must be ensured for this After commissioning integration into your app you can alternatively switch the VS M1 Box to WLAN operation Only then do you have to in...

Page 11: ...etwork restore power to your door intercom system and then add the VS M1 to the app see app instructions Vistasmart2 INITIALISATION Each time the power supply to the door intercom system was disconnected and is restored the system must be initial ised Wait until LED 2 lights up permanently red and LED 3 lights up permanently blue on the VS M1 Then press a bell button on the front door station The ...

Page 12: ...le the product Do not leave the packaging material lying around carelessly plastic film bags polystyrene parts etc could become dangerous toys for children Avoid getting the unit damp or wet Consult a professional if you have any doubts about the operation safety or connection of the appliance Handle the product with care bumps knocks or falling from even a small height will damage it WARRANTY Thi...

Page 13: ...im becomes invalid We accept no liability for con sequential damage We accept no liabil ity for damage to property or personal injury caused by improper handling or non observance of the safety instruc tions In such cases all warranty claims are invalidated LIMITATION OF LIABILITY The manufacturer is not liable for loss or damage of any kind including incidental or consequential damages resulting ...

Page 14: ... 2 3 4 1 2 1 15V 2 GND 3 Audio 4 Video EINGANG AUSGANG POWER 1 VS M1 2 LED d alimentation 3 LED de connexion réseau 4 Connexion de l antenne 5 Emplacement pour module VTX 6 Prise réseau RJ 45 7 Bouton RESET 8 Bornes à vis 9 Fente pour carte SD Fig 1 ...

Page 15: ... 2000 Außenstation Outdoor unit VS M1 Innenstation Indoor unit 1 2 3 4 A1 A2 A3 A4 Steckernetzteil Model ST 1000 oder Hutschienennetzteil Modell DT 2000 1 2 3 4 Außenstation Outdoor unit A1 A2 A3 A4 Innenstation Indoor unit 1 2 3 4 1 2 3 4 1 2 3 4 1 2 EINGANG AUSGANG POWER A B Fig 2 ...

Page 16: ...et utiliser le câble de rac cordement fourni pour connecter le VS M1 à votre routeur Pour la première mise en service il n est pas nécessaire d avoir déjà connecté le boîtier VS M1 à l interphone de porte Pour cela il suffit d assurer l alimentation électrique et une connexion LAN câble à votre routeur Après la mise en service intégration dans votre APP vous pouvez alternati vement faire passer la...

Page 17: ...et à chaque partie d utiliser son propre réseau Après avoir connecté le VS M1 et l avoir relié à votre réseau rétablissez l alimen tation de votre système d interphone de porte puis ajoutez le VS M1 à l App voir les instructions de l App Vistasmart2 INITIALISATION Chaque fois que l alimentation électrique de l interphone de porte a été déconnec tée et est rétablie le système doit être initialisé A...

Page 18: ... équipement l appareil CONSIGNES DE SÉCURITÉ Pour des raisons de sécurité et d homo logation CE toute transformation et ou modification non autorisée du produit est interdite Ne pas démonter le produit Ne laissez pas le matériel d emballage traîner négligemment les films sacs en plastique les pièces en polystyrène etc pourraient devenir des jouets dangereux pour les enfants Évitez de rendre l appa...

Page 19: ...ructions d utilisation le droit à la garantie devient caduc Nous n acceptons aucune responsabilité pour les dommages consécutifs Nous décli nons toute responsabilité pour les dom mages matériels ou corporels causés par une manipulation incorrecte ou le non respect des consignes de sécurité Dans ce cas tous les droits de garantie sont annulés LIMITATION DE LA RESPONSABILITÉ Le fabricant n est pas r...

Page 20: ...9 6 1 2 3 4 1 2 3 4 1 2 1 15V 2 GND 3 Audio 4 Video EINGANG AUSGANG POWER 1 VS M1 2 Stroom LED 3 LED netwerkverbinding 4 Aansluiting antenne 5 VTX module slot 6 Netwerkaansluiting RJ 45 7 RESET knop 8 Schroefklemmen 9 SD kaartsleuf Fig 1 ...

Page 21: ...T 2000 Außenstation Outdoor unit VS M1 Innenstation Indoor unit 1 2 3 4 A1 A2 A3 A4 Steckernetzteil Model ST 1000 oder Hutschienennetzteil Modell DT 2000 1 2 3 4 Außenstation Outdoor unit A1 A2 A3 A4 Innenstation Indoor unit 1 2 3 4 1 2 3 4 1 2 3 4 1 2 EINGANG AUSGANG POWER A B Fig 2 ...

Page 22: ...an uw router monteren en de meegeleverde patchkabel gebruiken om de VS M1 met uw router te verbinden Voor de eerste ingebruikneming is het niet nodig de VS M1 box reeds op de deurintercom aangesloten te hebben Alleen de stroomvoorziening en een LAN kabelverbinding met uw router moeten hiervoor worden gewaarborgd Na inbedrijfstelling integratie in uw APP kunt u de VS M1 Box ook omschakelen op WLAN ...

Page 23: ...tion Hierdoor kan elke partij haar eigen netwerk gebruiken Na het aansluiten van de VS M1 en het verbinden met uw netwerk herstelt u de stroomtoevoer naar uw deurintercomsysteem en voegt u vervolgens de VS M1 toe aan de App zie App instructies Vistasmart2 INITIALISATIE Telkens wanneer de stroomtoevoer naar het deurspreeksysteem werd onderbroken en opnieuw wordt hersteld moet het systeem worden geï...

Page 24: ...t toestel nadelig beïnvloeden VEILIGHEIDSVOORSCHRIFTEN Om veiligheids en goedkeuringsredenen CE is ongeoorloofde ombouw en of wijziging van het product niet toegestaan Haal het product niet uit elkaar Laat het verpakkingsmateriaal niet achteloos rondslingeren plastic folie zakken polystyreen onderdelen enz kunnen gevaarlijk speelgoed voor kinderen worden Voorkom dat het toestel vochtig of nat word...

Page 25: ...zing vervalt de aanspraak op garantie Wij aanvaarden geen aansprakelijkheid voor gevolgschade Wij aanvaarden geen aansprakelijkheid voor materiële schade of persoonlijk letsel veroorzaakt door ondeskundige behandeling of het niet in acht nemen van de veiligheidsinstructies In dergelijke gevallen vervalt elke aanspraak op garantie BEPERKING VAN AANSPRAKELIJKHEID De fabrikant is niet aansprakelijk v...

Page 26: ...26 VS M1 ...

Page 27: ...VS M1 27 ...

Page 28: ...m e GmbH dass dieses Gerät den folgenden Richtlinien entspricht RoHS 2011 65 EU EMC 2014 30 EU RED 2014 53 EU Die KONFORMITÄTSERKLÄRUNG kann unter folgender Adresse abgerufen werden http www m e de download ce vs m1ce pdf ...

Reviews: