background image

www.themdsports.com

TTT215_117D

4

Français

Español

English

TTT215_117D PRE-INSTALLED PARTS / PIEZAS PREINSTALADAS / LISTE DES PIÈCES

INSTRUCCIONES DE ENSAMBLAJE:

ASSEMBLY INSTRUCTIONS:

1. Encuentre un lugar limpio y nivelado para comenzar el ensamblaje de su producto.
2. Retire todas las piezas de la caja y verifique que cuente con todas las piezas enumeradas en las páginas de la Lista de piezas. 
    Corte o rasgue cuidadosamente las cuatro esquinas de la caja de modo que el fondo de la caja pueda ser usado como su superficie de trabajo.

INSTRUCTIONS D’ASSEMBLAGE:

1. Trouvez un endroit propre et plat pour commencer à assembler votre produit.
2. Enlevez toutes les pièces de la boîte et assurez-vous que vous avez toutes les pièces listés sur la page de liste des pièces. 
    Coupez soigneusement les quatre coins de la boîte; le fond de la boîte peut être utilisé comme surface de travail.

1. Find a clean, level place to begin the assembly of your Product.
2. Remove all the parts from the box and verify that you have all of the listed parts as shown on the  Parts list pages. 
    Carefully cut or tear the four corners of the box so that the bottom of the box can be used as your work surface.

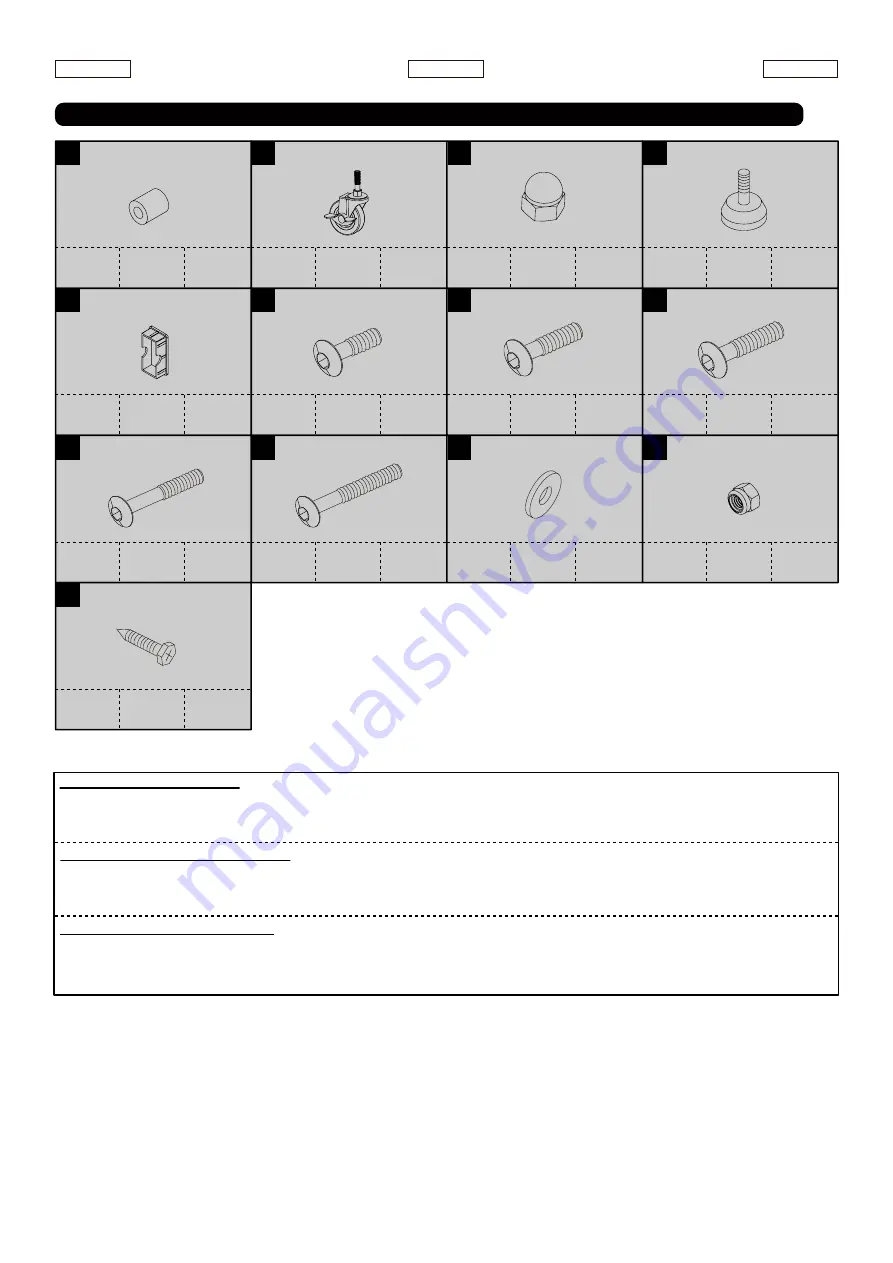
x8

FOR FIG. 4

P14

Caster

with Lock

Ruedecita con

Cerradura

Roulette avec

verrou

x12

FOR FIG. 2

P13

Spacer

Espaciador

Boulon

d’espacement

x8

FOR FIG. 4

P15

M10 Lock Nut

Tuerca de

cerradura M10

Écrou de

verrouillage

M10

x4

FOR FIG. 3

P16

Leg Leveler

Nivelador

de Pierna

Niveleur 

de Pied

x4

FOR FIG. 2

P18

M6x15mm

Bolt

Cerrojo

M6x15mm

Boulon

M6x15mm

x24

FOR FIG. 2, 4

P17

Tube Cap

Gorra de Tubo

Capuchon

 de Tube

x4

FOR FIG. 2

P19

M6x35mm

Bolt

Cerrojo

M6x35mm

Boulon

M6x35mm

x4

FOR FIG. 2

P20

M6x55mm

Bolt

Cerrojo

M6x55mm

Boulon

M6x55mm

x4

FOR FIG. 2

P22

M6x100mm

Bolt

Cerrojo

M6x100mm

Boulon

M6x100mm

x4

FOR FIG. 2

P21

M6x65mm

Bolt

Cerrojo

M6x65mm

Boulon

M6x65mm

x96

FOR FIG. 2

P25

M5x12mm

Screw

Tornillo

M5x12mm

Vis

M5x12mm

x40

FOR FIG. 2

P23

M6 Washer

Arandela

M6

Rondelle

M6

x20

FOR FIG. 2

P24

M6 Nut

Tuerca M6

Ecrou M6

Summary of Contents for TTT215_117D

Page 1: ...nd Frequently Asked Questions please visit us at themdsports com ATENCIÓN Contacto MD Sports Servicio al Cliente NO DEVOLVERLO A LA TIENDA Por mayor información y Preguntas Frecuentes favor visitarnos en themdsports com ATTENTION Contactez MD Sports Service Clientèle NE PAS RAPPORTER EN MAGASIN Pour toute information complémentaire ou réponse aux questions fréquentes veuillez vous rendre sur themd...

Page 2: ...acement parts at no cost to you the customer The only exceptions to the warranty include mainframes table tops playing surfaces batteries or tools The above warranty will not apply in cases of damages due to improper usage alteration misuse abuse accidental damage or neglect This Limited Warranty gives you specific legal rights and you may also have other rights which vary from one State province ...

Page 3: ...r les pieds 4 Veuillez n utiliser que du poli à meubles en aérosol pour nettoyer les surfaces extérieures du produit 5 Ceci n est pas un jeu d enfant et la surveillance d adultes est requise pour les enfants jouant à ce jeu 1 Veuillez lire avec attention les instructions et suivre à la lettre les instructions de montage et de sécurité pour éviter dommages ou blessures L assemblage nécessite au min...

Page 4: ... TTT215_117D PRE INSTALLED PARTS PIEZAS PREINSTALADAS LISTE DES PIÈCES x2 FORFIG 1 P1 Leg A Pierna A Pied A x2 FORFIG 1 P2 Leg B Pierna B Pied B x4 FORFIG 1 P3 Leg Support Soporte de Pierna Support de pied x2 FORFIG 1 P4 End Panel Panel Final Panneau inférieur x4 FORFIG 1 P5 Side Panel Panel Lateral Panneau latéral x4 FORFIG 2 P6 Big Bracket Corchete Grande Grand support x4 FORFIG 2 P7 Small Brack...

Page 5: ...a clean level place to begin the assembly of your Product 2 Remove all the parts from the box and verify that you have all of the listed parts as shown on the Parts list pages Carefully cut or tear the four corners of the box so that the bottom of the box can be used as your work surface x8 FORFIG 4 P14 Caster with Lock Ruedecita con Cerradura Roulette avec verrou x12 FORFIG 2 P13 Spacer Espaciado...

Page 6: ...nçais Español English 1 1 P2 P1 P3 P5 P4 P5 P3 P13 P20 P6 P22 P7 P17 P19 P21 P18 P10 P25 P24 P23 X 2 P1 X 2 P2 X 4 P3 X 2 P4 X 4 P5 Note Playfield graphic should be face down when assembling Nota El gráfico del campo de juego debe quedar cara abajo para el ensamblaje Note Le graphique du terrain de jeu doit être face vers le bas pendant l assemblage FIG 2 ...

Page 7: ...mitad de mesa Note Répétez les étapes précédentes sur l autre moitié de table P9 P9 P8 P16 FIG 3C Note To unfold the leg Make sure that the Safety Supports P8 P9 are locked in the correct position Nota Para desplegar la pierna Asegúrese de que el Soporte de Seguridad P8 P9 esté bloqueado en la posición correcta Note Pour déplier le pied Assurez vous que les Supports de Sécurité P8 P9 sont verrouil...

Page 8: ...ançais Español English 2 2 P17 P14 P15 Short Corto Courte Long Largo Longue Short Corto Courte Long Largo Longue Note Repeat the steps for another table half Nota Repita dichos pasos para la otra mitad de mesa Note Répétez les étapes précédentes sur l autre moitié de table ...

Page 9: ...e time on the ground PRECAUCION Recomienda voltea la mesa por dos adultos fuertes como mostrado 1 Levante la mesa desde el piso 2 Voltee la mesa 3 Coloque los cuatro pies de la mesa sobre el piso al mismo tiempo ATTENTION La présence de deux adultes robustes est recommandée pour rourner la table comme sur Fig 1 Soulevez la table du sol 2 Retournez la 3 Placez ses quatre pieds sur le sol simultaném...

Page 10: ...FIG 6 FIG 6A www themdsports com TTT215_117D 9 Français Español English Locked Bloqueado Verrouillé FIG 6B ...

Page 11: ...215_117D 10 Français Español English FIG 7 X 1 3 X 2 4 4 3 4 3 4 FIG 7A FIG 7B Note Slide the Net 3 onto the Net Post 4 Nota Deslice la Red 3 sobre el Poste de la Red 4 Note Faites glisser le Filet 3 sur le Poteau de Filet 4 ...

Page 12: ...m TTT215_117D 11 Français Español English FIG 8 HOW TO FOLD THE GAME FOR STORAGE See FIG 8A 8I CÓMO DOBLAR EL JUEGO PARA EL ALMACENAMIENTO Vea la FIG 8A 8I COMMENT PLIER LE JEU POUR LE RANGER Voir FIG 8A 8I FIG 8B FIG 8A ...

Page 13: ...utre moitié de table FIG 8C Note Fold the leg Make sure that the Safety Supports P8 P9 are unlocked in the correct position Nota Doble la pierna Asegúrese de que el Soporte de Seguridad P8 P9 esté desbloqueado en la posición correcta Note Pliez le pied Assurez vous que les Supports de Sécurité P8 P9 sont déverrouillés dans la bonne position FIG 8D Note Fold parts as shown Nota Pliegue las partes c...

Page 14: ...www themdsports com TTT215_117D 13 Français Español English FIG 8I FIG 8G FIG 8H FIG 8F ...

Page 15: ...TO UNFOLD THE TABLE SEE FIG 9A 9I PARA DESDOBLAR LA MESA VEA LA FIG 9A 9I POUR DÉPLIER LA TABLE VEA LA FIG 9A 9I www themdsports com TTT215_117D 14 Français Español English FIG 9A FIG 9 FIG 9B ...

Page 16: ...com TTT215_117D 15 Français Español English Note Repeat the steps for another table half Nota Repita dichos pasos para la otra mitad de mesa Note Répétez les étapes précédentes sur l autre moitié de table FIG 9C FIG 9D ...

Page 17: ...TTT215_117D 16 Français Español English FIG 9E Note To unfold the leg Make sure that the Safety Supports P8 P9 are locked in the correct position Nota Para desplegar la pierna Asegúrese de que el Soporte de Seguridad P8 P9 esté bloqueado en la posición correcta Note Pour déplier le pied Assurez vous que les Supports de Sécurité P8 P9 sont verrouillés dans la bonne position FIG 9F ...

Page 18: ...www themdsports com TTT215_117D 17 Français Español English YOU ARE NOW READY TO PLAY VOUS POUVEZ MAINTENANT COMMENCER A JOUER USTED ESTA AHORA LISTO PARA JUGAR FIG 9H FIG 9G FIG 9I ...

Reviews: