background image

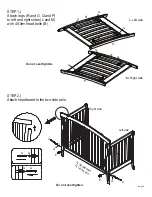
STEP 1.) Remove the side panel 

assemblies.


STEP 2.) Attach the conversion rails 

as shown using eight 3” bolts and 

barrel nuts.

Do not overtighten.

 3” Bolt (8)

HARD

WARE

Barrel Nut (8)

page 8

*For all 4 in 1 cribs, please contact a retailer to order your full size adult wooden bed rails

 for your full size bed conversion.


Conversion Rails (4799-Sold Separately) Assembly Instructions 

The mattress intended for use on the bed shall be a full-size crib mattress having 

minimum dimensions of 51 5/8 in. (1310mm) in length, 27 1/4 in. (690mm) in width 

and 4 in. (100mm) in thickness, or a greater thickness not exceeding 6 in (152mm). 

The intended user’s minimum age must be at 

least 15 months old and maximum weight must not exceed 50 lbs (22.7 kg).

WARNING :

Failure to follow these warnings and the assembly instructions could result in 

serious injury or death from entrapment or strangulation.

DO NOT place bed near windows where cords from blinds or drapes may strangle a child. DO NOT place 

items with a string, cord, or ribbon, around a child’s neck, such as hood strings or pacifier cords. DO NOT 

suspend strings over a toddler bed for any reason. If guard rails are used as the mattress containment 

means, guard rails provided must be used to avoid the formation of a gap between the mattress and the bed 

that could cause an entrapment.

Summary of Contents for Crib 2701

Page 1: ...s for residential use only Any institutional use is strictly prohibited Please be sure to follow the instructions for proper assembly Use a Phillips head screwdriver for assembling the crib in additio...

Page 2: ...Phillips screwdriver I 2 Allen head bolts 4 B 1 1 2 Allen head bolts 8 page 2 K Front Rail N Headboard O Front Left leg P Front Right Leg Q Rear Right leg R Rear Left leg T Guard Rail U Spring frame C...

Page 3: ...ght sides L and M with 4 Allen head bolts B L Left side O R P Q B B B Do not overtighten M Right side STEP 2 Attach headboard to the two side rails Right side Left side N Headboard N Cabecera A A E E...

Page 4: ...id scratching the crib finish Attach spring frame FLAT SIDE UP Choose the height of the spring frame Start at the highest level and adjust accordingly Bolt the spring frame U to headboards using Allen...

Page 5: ...er of your crib the name of the store where you made the purchase the date of purchase and the wood finish in the box to the lower right WE WILL ASK YOU FOR YOUR SERIAL NUMBER FOR ALL WARRANTY AND REP...

Page 6: ...o NOT remove any wood screws in the normal disassembly of the crib WARNING ONE YEAR LIMITED WARRANTY We will replace any missing parts at the time of purchase or any defective item within a one year p...

Page 7: ...anel facing the left or the right The illustration shows the guard rail with the panel to the left Recheck all screws and bolts to be sure they are fastened securely STEP 2 Install the guard rail usin...

Page 8: ...ss or a greater thickness not exceeding 6 in 152mm The intended user s minimum age must be at least 15 months old and maximum weight must not exceed 50 lbs 22 7 kg WARNING Failure to follow these warn...

Reviews: