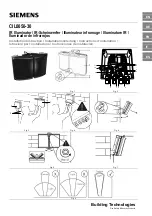
background image

FIG.3

8. Tear off the backside paper of the Pads (#17) and stick them 

at the bottom of the Table Tennis Surface (#5). See FIG.3A.

9. Press the Net Posts (#16) onto the sides of the Table Tennis 

Surface (#5). See FIG. 3B.

10. Slide the Table Tennis Net (#15) onto the Net Posts.

FIG. 3

5

5

5

15

17

16

x1

x1

5

15

x12

17

22

21

24

23

x2

16

FIG. 3A

FIG. 3B

YOU ARE NOW READY TO PLAY!

5

Summary of Contents for WM37503 CAN

Page 1: ...s plaît nous contacter avant de retourner le produit au magasin Toll Free 877 472 4296 Estimated Assembly Time 0 5 hour Estimation de l Assemblée temps 0 5 heure hour 0 5 Assembly Required Recommended 2 adults Assemblage requis 2 adultes recommandée 1 2 MODEL MODÈLE WM37503 CAN box Easy to Assemble Facile à Assembler ...

Page 2: ...ses of damages due to improper usage alteration misuse abuse accidental damage or neglect Attention Since you build all tables upside down please inspect table tops and playing surfaces right away before putting together PLEASE SAVE THESE INSTRUCTIONS AND PURCHASE RECEIPT A PURCHASE RECEIPT or other proof of purchase date will be required before any warranty service is initiated All requests for w...

Page 3: ...nis Net x 1 Pre installed Right Leg x 2 Cue x 2 Billiard ball x 1 Chalk x 2 3 5 Leg Leveler x 4 5 16 Washer x 12 T4 X 5 8 Screw x 12 Table Tennis Ball x 2 Pad x 12 23 24 19 20 21 22 Table Tennis Paddle x 2 Allen Key x 2 Rail Corner x 4 Apron Corner x 4 Corner Pocket Cap x 4 Side Pocket Cap x 2 25 26 Square Nut with Screw x 4 T Nut x 12 Pre installed Pre installed Pre installed Pre installed Pre in...

Page 4: ...all of the parts from box and verify that you have all of the listed parts as shown on the Parts List Carefully cut or tear the four carton corners so that the bottom of the box can act as your work area 3 Place the Main Frame 1 upside down on a clean flat surface as shown in FIG 1 4 Attach the Right Legs 2 and Left Legs 3 to the frame using three Bolts 6 and three Washers 7 per Leg FIG 1 x2 x1 1 ...

Page 5: ...ver and set table on its legs in the location where you play Go back and make sure that all connections are tight HOLD TABLE CABINET DO NOT HOLD THE LEGS DO NOT LEAN THE TABLE ON ITS LEGS CAUTION Two strong adults are recommended to turn the table over as shown 1 Lift the table off the ground 2 Turn the table over 3 Place it on all four feet at the same time on the ground x12 x2 4 4 8 8 x4 9 9 4 ...

Page 6: ...ttom of the Table Tennis Surface 5 See FIG 3A 9 Press the Net Posts 16 onto the sides of the Table Tennis Surface 5 See FIG 3B 10 Slide the Table Tennis Net 15 onto the Net Posts FIG 3 5 5 5 15 17 16 x1 x1 5 15 x12 17 22 21 24 23 x2 16 FIG 3A FIG 3B YOU ARE NOW READY TO PLAY 5 ...

Page 7: ...Outils Electriques Réglez à Basse Torque ATTENTION Haute Torque Trop serré Haute Torque Trop serré Les Tournevis Electriques peuvent être utiles pendant l assemblage mais s il vous plaît installer une basse torque et l utiliser avec prudence RISQUE D ÉTOUFFEMENT Ce produit comprend de petites pièces et or ne con vient pas aux enfants de moins de 3 ans IMPORTANTE MISE EN GARDE Ne retournez pas ce p...

Page 8: ...s de Table x 1 Pré installé Pied Droite x 2 Queue x 2 Balle Billard x 1 Craie x 2 Redresseur de Pied 3 5 x 4 Rondelle 5 16 x 12 Vis T4 5 8 x 12 Balle de Tennis de Table x 2 Tampon x 12 23 24 19 20 21 22 Palette de Tennis de Table x 2 Clé Allen x 2 Coin de Rail x 4 Coin de Tablier x 4 Couvercle de Poche de Coin x 4 Couvercle de Poche Latérale x 2 25 26 Ecrou Carré avec vis x 4 Ecrou T x 12 Pré inst...

Page 9: ...e la boîte et assurez vous que vous avez toutes les pièces présentées dans la liste de pièces ci dessus Coupez soigneusement les quatre coins de la boîte donc le fond de la boîte peut être utilisé comme votre surface de travail 3 Placez le Cadre Principal 1 sur une surface propre et plate comme l a montré dans FIG 1 4 Attachez les Pieds Droites 2 et les Pieds Gauches 3 au Cadre avec trois Boulons ...

Page 10: ...aller la table sur ses pieds dans l endroit où vous jouez Retournez et assurez vous que toutes les connexions sont serrées TENIR LA TABLE CABINET NE PAS TENIR LES PIEDS NE PAS PENCHER LA TABLE SUR LES PIEDS ATTENTION Deux adultes robustes sont recommandés pour renverser la table comme l a montré 1 Levez la table sur le plancher 2 Renversez la table 3 La placez sur tous les quatre pieds à la fois s...

Page 11: ...ennis de Table 5 Voir FIG 3A 9 Pressez les Postes de Filet 16 dans les côtés de la Surface de Tennis de Table 5 Voir FIG 3B 10 Glissez le Filet de Tennis de Table 15 sur les Postes de Filet FIG 3 5 5 5 15 17 16 x1 x1 5 15 x12 17 22 21 24 23 x2 16 FIG 3A FIG 3B VOUS ETES MAINTENANT PRET A JOUER 10 ...

Reviews: