background image

13

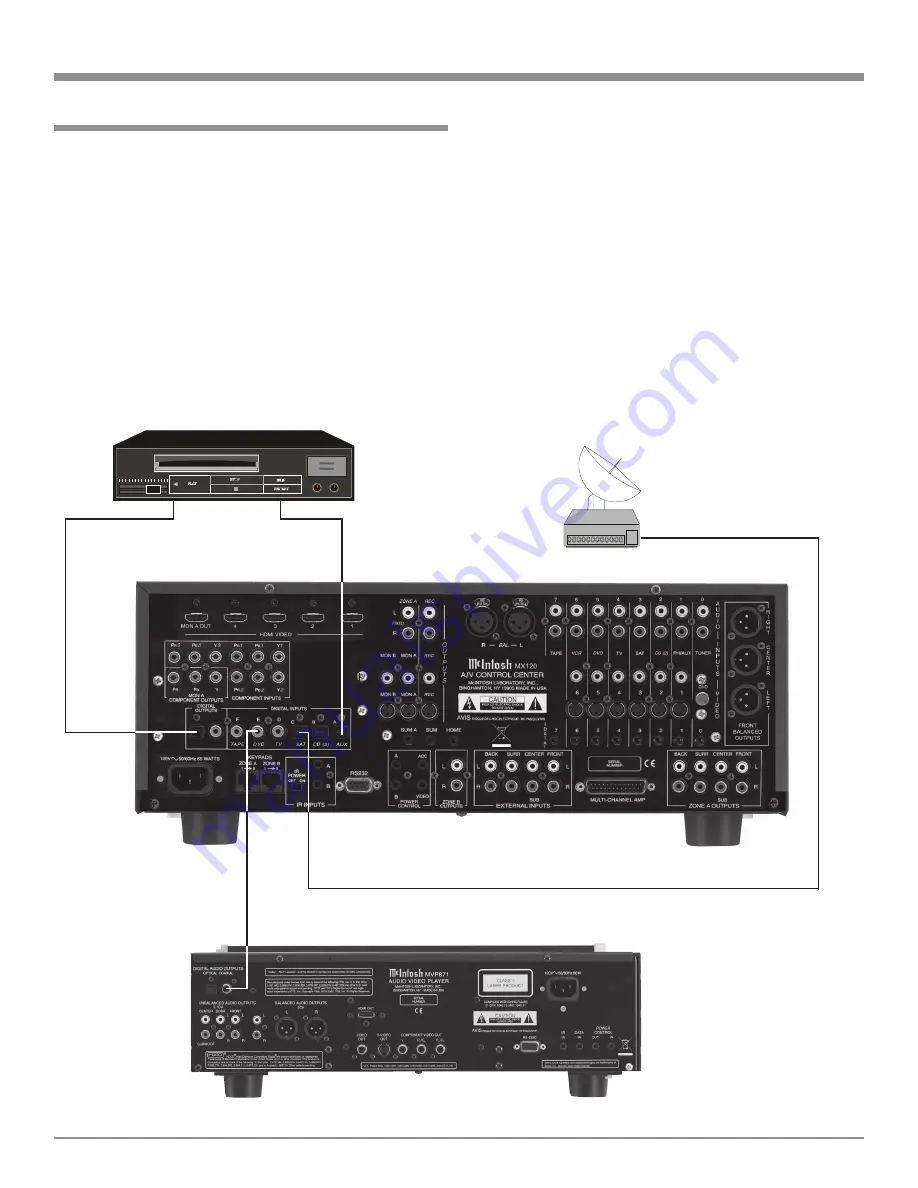
How to Connect Digital Audio Components

How to Connect Digital Audio Components

1. Connect a cable from the MX120 DIGITAL COAXIAL

DVD INPUT (Input E) to the McIntosh Coaxial Digital
Output of the McIntosh Audio/Video Player.

2. Connect a cable from the MX120 SAT INPUT (Input

C) OPTICAL DIGITAL INPUT to the Optical Digital
Output of a Satellite Receiver.

3. Connect a cable from the MX120 AUX INPUT (Input

A) OPTICAL DIGITAL INPUT to the Optical Digital
Output of a Digital Audio Recorder.

4. Connect a cable from the Digital Audio Recorder Input

to the MX120 OPTICAL DIGITAL OUTPUT.

McIntosh Audio Video Player

Digital IN

Digital OUT

Digital Audio Recorder

Satellite Receiver

Summary of Contents for MX120

Page 1: ...rk 13903 2699 Phone 607 723 3512 FAX 607 724 0549 A V Control Center Manufactured under license from Dolby Laboratories Dolby Pro Logic and the double D symbol are trademarks of Dolby Laboratories DTS and DTS Digital Surround are registered trademarks of Digital Theater Systems Inc ...

Page 2: ...e wider than the other A grounding type plug has two blades and a third grounding prong The wide blade or the third prong are provided for your safety If the provided plug does not fit into your outlet consult an electrician for replacement of the obsolete outlet 10 Protect the power cord from being walked on or pinched particularly at plugs convenience receptacles and the point where they exit fr...

Page 3: ... Your decision to own this McIntosh MX120 A V Control Center ranks you at the very top among discriminating mu sic listeners You now have The Best The McIntosh dedi cation to Quality is assurance that you will receive many years of musical enjoyment from this unit Please take a short time to read the information in this manual We want you to be as familiar as possible with all the features and fun...

Page 4: ...with 1 8 inch mini phone jacks are configured for non McIntosh IR sensors such as a Xantech Model 291 80 To avoid possible interaction disable the MX120 Front Panel Sensor with the switch recessed in the bottom panel behind and to the left of the Sensor 10 System Setup operations must be performed in the order they appear in the Main System Setup Menu as they are interactive 11 In order to hear ba...

Page 5: ...20 Left Back Surround Gnd 7 Left Back Surround 21 Right Back Surround Gnd 8 Right Back Surround 22 N C 9 N C 23 N C 10 N C 24 System Calibrate Gnd 11 N C 25 Power Control Gnd 12 System Calibrate 13 Power Control In 14 Left Front Gnd XLR Connectors Below is the Pin configuration for the XLR Balanced Input and Output Connectors on the MX120 Refer to the dia gram for connection PIN 1 Shield Ground PI...

Page 6: ... audio and video switching The McIntosh MX120 sets new standards for accuracy in a Home Theater System Pure Stereo Mode When the Stereo Mode of Operation is selected for an ana log source the signal is amplified with no digital processing placed in the signal path Adjustable Channel Level and Time Delay A built in test signal generator allows all eight channels to be calibrated for precise volume ...

Page 7: ...he next page pertaining to installing the MX120 into cabinets Dimensions 17 1 2 44 45cm 6 5 16 16 03cm 7 5 8 19 37cm 18 1 2 46 99cm 3 16 0 48cm 13 1 4 33 66cm 17 43 18cm Front View of the MX120 Rear View of the MX120 Side View of the MX120 7 1 8 18 10cm 13 16 2 06cm 6 1 2 16 51cm 12 5 8 32 07cm 17 43 18cm 1 1 4 3 18cm 12 1 4 31 12cm ...

Page 8: ... definite asset in maintaining all the system components at the coolest possible operating tempera ture A custom cabinet installation should provide the following minimum spacing di mensions for cool op eration Allow at least 2 inches 5 08cm above the top 2 inches 5 08cm be low the bottom and 1 6 5 8 16 83cm 17 1 16 43 34cm Cutout Opening for Custom Mounting MX120 Front Panel Custom Cabinet Cutout...

Page 9: ...le source components to allow remote control operation RS232 connector for connection to a computer or other control device HOME Data Port connects to the optional HC 1 Home Controller SUM A Data Port for connections to other McIntosh Compo nents IR INPUTS for Zone A or B external sensors KEYPADS ZONE A and B for a McIn tosh Keypad or IR room sen sor VIDEO sends a turn On Off sig nal to McIntosh V...

Page 10: ... channel EXTERNAL IN PUTS accept audio signals from a com ponent or external processor ZONE A OUTPUTS send all eight audio channel signals to power amplifier in puts RECord OUTPUTS supply analog audio record signals for recorders DIGITAL OUTPUTS both optical and coaxial provide a digital audio signal to an ex ternal digital processor ZONE A FIXED OUTPUTS send a fixed line level two channel analog ...

Page 11: ...B sends a Composite or S Video Signal to a monitor TV located in Zone B COMPONENT INPUTS receive Component Video Y PR and PB Signals from three Component Video Sources COMPONENT OUTPUTS send Component Video Y PR and PB Signals to the ZONE A Video Monitor INPUTS for S Video Signals from a VCR 1 DVD TV SAT CD 2 or PHono AUX components HDMI VIDEO OUT PUT MONitor A sends a Digital Video Signal to a mo...

Page 12: ...hielded cable from the MX120 ZONE A KEYPAD Socket to a McIntosh WK 4 Key pad How to Connect Data and Power Control 5 Connect a Power Control Cable from the MX120 POWER CONTROLACC Jack to the McIntosh Audio Video Player Power Control In Jack 6 Connect a Power Control Cable from the MX120 Audio Video power Control Out Jack to the McIntosh AM FM Tuner Power Control In Jack 7 Connect a Power Control C...

Page 13: ... a cable from the MX120 SAT INPUT Input C OPTICAL DIGITAL INPUT to the Optical Digital Output of a Satellite Receiver 3 Connect a cable from the MX120 AUX INPUT Input A OPTICAL DIGITAL INPUT to the Optical Digital Output of a Digital Audio Recorder 4 Connect a cable from the Digital Audio Recorder Input to the MX120 OPTICAL DIGITAL OUTPUT McIntosh Audio Video Player Digital IN Digital OUT Digital ...

Page 14: ... the channel identifica tions between both units Note In place of the unbalanced cables a DB25 cable may be used 3 Connect a cable from the MX120 Tuner Analog Audio INPUTS Input 0 to the Tuner 1 Outputs Fixed of the McIntosh AM FM Tuner 4 Connect a cable from the MX120 Analog Audio IN PUTS Input 5 to the McIntosh 2 CH Audio Outputs of the McIntoshAudio Video Player 5 Connect balanced cables from t...

Page 15: ...15 How to Connect Audio Components for eight channels McIntosh Seven Channel PowerAmplifier Analog OUT Digital Audio Recorder McIntosh Powered Subwoofer Satellite Receiver IN OUT VCR ...

Page 16: ...cIntosh 2 CH Audio Outputs of the McIntoshAudio Video Player 4 Connect balanced cables from the MX120 BALanced INPUT to the McIntosh Balanced Audio Outputs of the McIntoshAudio Video Player 5 Connect cables from the MX120 EXTERNALAudio INPUTs to the McIntosh 5 1CH Audio Outputs of the McIntoshAudio Video Player 6 Connect a cable from the MX120 Analog Audio SAT INPUT Input 3 to the Analog Audio Out...

Page 17: ...dio Video Player 2 Connect video cables from the MX120 DVD VIDEO INPUTS to the McIntosh Video Outputs of the McIn toshAudio Video Player IN OUT VCR To AC Outlet 3 Connect video cables from the MX120 DVD COMPO NENT INPUTS 3 to the McIntosh Component Video Outputs of the McIntoshAudio Video Player 4 Connect video cables from the MX120 SAT VIDEO INPUTS to the Video Outputs of a Satellite Receiver 5 C...

Page 18: ... wires are individually shielded Note If Zone B will not be connected at this time proceed to step 5 1 Connect a cable from the MX120 POWER CONTROL B Jack to the McIntosh Power Amplifier Power Control In Jack 2 Connect a cable from the MX120 ZONE B OUTPUTS Left and Right to the McIntosh Power Amplifier Unbal anced Left and Right Inputs McIntosh Keypad McIntosh Power Amplifier Left Loudspeaker Righ...

Page 19: ... or Tuner Signal is available at the Zone A and B Audio Video Outputs and for the RECord Outputs Adjusts the Listen Volume Level of all eight channels for Zone A and both chan nels for Zone B Selects the desired audio operating mode and selects the external eight channel input Selects the Trim Func tion for making audio and front panel display adjustments ...

Page 20: ...pression circuit supported by selected Dolby Digital sound tracks Switches On and Off Zones A or B Switches all AC Power On or Off Trim Up and Down adjusts the various functions se lected by the Trim Select control Front Panel Push buttons and Switch Activates control of Zone B both Input Selection and Volume Adjustment ...

Page 21: ...is active Indicates when the Late Night Processing has been selected Indicates when the MX120 is in Standby On Mode Indicates Input Selection Status Volume Trim Adjustments Sur round Modes Setup Functions Indicates when the Input Source selected is processing a Digital Signal Indicates the name or type of the Operating Decoding Modes that are in use ...

Page 22: ...e are for use with other McIntosh Products Selects AM Tuner Operating Functions and Disc Selection on certain McIntosh CD Play ers Selects On Screen Func tions for McIntosh DVD Players and certain CD Players Press TRIM and then the LEVEL Push but tons to select and ad just various functions Selects the FF Fast For ward or REWind Mode on a Disc Player Music Server or Tape Recorder tunes Up or Down ...

Page 23: ...e installation and operation of the Remote Control Translator RCT Mute Press the MUTE Push button to mute audio in the Zone where the command is issued The RECord OUTPUTS are not affected by the MUTE function The MX120 Front PanelAlphanumeric Display will indicate the word Mute for Zone A Press MUTE a second time to unmute audio Mode Press the MODE Push button to select the Surround Mode from Cine...

Page 24: ...Power Switch 3 Press and hold the MX120 Front Panel SETUP Push button for approximately three seconds to enter the Setup Mode The word SETUP will appear on the Front Panel Alphanumeric Display and the MAIN SYSTEM SETUP Menu will appear on the Monitor TV Screen Refer to figures 4 5 and 6 Note When viewing the On Screen Setup Menu the Component Video S Video or Composite Video Output connections may...

Page 25: ...mber Setting Refer to Page 0 7 RCA 32 Surr Surround Mode Default Number Setting Refer to Page 0 7 LAST 33 Video Power Control Number Power Control Refer to Page 0 7 ON 33 HDMI Video Inputs Zone A Number Name Refer to Page 1 SAT 34 2 TV 34 3 VCR 34 4 DVD 34 Component Video Inputs Zone A Number Name Refer to Page 1 SAT 34 2 TV 34 3 DVD 34 Volume Setup Description Initial Setting Refer to Page Zone A...

Page 26: ...ack Output Left Channel will have audio output 3 Select the appropriate Loudspeaker location and type by using the Up or Down directional push buttons to select first the menu item and then press the Left or Right directional push buttons to change the current setting Notes When the Front Loudspeakers are set to Small the options in the Speaker Size Setup Menu for the Center and Surround Loudspeak...

Page 27: ...e them The MX120 will then return to normal op eration Refer to figure 7 on page 25 SETUP con t Loudspeaker Default Setting New Setting Front L R Small Center Small Surround L R Small Back Surround Small 2 Subwoofer Yes Sub Crossover 80Hz MC Bass Off Loudspeaker Size MC Bass Mode When a Home Theater System contains Loudspeakers that are refered to as Large the Bass Management Circuitry will direct...

Page 28: ... be rounded up or down to the nearest whole number for this procedure 4 Select the appropriate Loudspeaker location and type by using the Up or Down directional push buttons to select first the menu item and then press the Left or Right directional push buttons to change the current setting When all of the settings on the SPEAKER TIME DELAY Menu agree with the Loudspeaker mea sured distances in yo...

Page 29: ... the Automatic re quires less push button presses or Manual quicker when used with a sound pressure meter Loudspeaker Level switching mode ForAutomatic switching pro ceed to Step 4 For Manual switching proceed to Step 11 on the next page Automatic Loudspeaker Level Switching 4 Using the Left or Right directional push buttons select AUTO MODE from the SPEAKER LEVEL On Screen Menu followed by pressi...

Page 30: ...p or Down directional push buttons select the next Loudspeaker and perform the level ad justing procedure Continue this for each of the remain ing Loudspeakers Repeat this as often as necessary un til you are satisfied that the volume levels of all the Loudspeakers are the same 14 Press the SELECT OK Push button to switch Off the Manual Loudspeaker Level Switching Mode 15 Continue next to the INPU...

Page 31: ... by the SELECT OK Push but ton Refer to figure 6 on page 24 3 Using the Up or Down directional push buttons select SOURCE INPUT from the On Screen Menu fol lowed by pressing the Left or Right directional push buttons to select Input Number 4 IR TV Refer to figure 15 Note The information displayed after the Source Input Number indicates which IR Remote Control Command selects the input AnalogAudio ...

Page 32: ...ntinue next to the ZONE A Analog Input Setting If you do not wish to perform ZONE AAnalog Input Set ting at this time proceed to the SURR MODE setting ZONE AAnalog Input The MX120 has one Stereo Balanced Input that may be as signed to any of the eight Audio Inputs instead of unbal anced RCAType jacks The AUX Input also includes the option of connecting a Turntable with a Moving Magnet type Phono C...

Page 33: ...by pressing the Left or Right directional Push buttons to select the CINEMA 1 Surround Mode for DVD Input instead of the default setting of LAST 28 Continue next to the VIDEO POWER Control If you do not wish to perform VIDEO POWER Control Ad justments at this time proceed to the Component Video Input Video Power The MX120 has a VIDEO POWER CONTROL Jack and its activation is controllable by selecti...

Page 34: ...hing for three Com ponent Video Sources and they may be assigned to any of the eightAnalogAudio Digital Inputs The following ex ample describes how to reassign COMPONENT 1 IN Video Input which by default has been assigned to SAT Input 3 over to the VCR Input 6 Note The MX120 allows for assigning a Component Video Input to multiple Analog Audio Digital Inputs or switched Off 36 Using the Up or Down...

Page 35: ...Right directional push buttons to select COMP Refer to figure 24C 42 Using the Up or Down directional push buttons select MAIN MENU on the On Screen Menu and press the SELECT OK Push button 43 Continue next to the VOLUME SETUP on page 37 If you do not wish to perform VOLUME SETUPAd justments at this time select MAIN MENU from the menu The MAIN SYSTEM SETUP Menu will reap pear on the Monitor TV scr...

Page 36: ...tting 0 TUNER ON 1 PH AUX ON 2 CD 2 ON 3 SAT ON 1 1 4 TV ON 2 2 5 DVD ON 3 4 6 VCR ON 3 7 TAPE ON Video Power Control Component Video Source HDMI Video Source Video Inputs Source Settings 44 Select EXIT from the MAIN SYSTEM SETUP Menu If you are satisfied with the changes that you may have made select YES to save those changes or NO not to save them The MX120 will then return to normal operation R...

Page 37: ...buttons may also be used 4 Using the Up or Down directional push buttons select ZONE A VOLUME MAXIMUM from the On Screen Menu followed by pressing the Left or Right directional push buttons to select the maximum volume level 5 If desired make similar adjustments for Zone B 6 Continue to the ADVANCED settings on page 38 If you do not wish to perform ADVANCED settings at this time select MAIN MENU f...

Page 38: ...u followed by the SELECT OK Push button 6 Use the Left or Right directional push buttons to Select ON Refer to figure 28 7 Using the Up or Down directional push buttons select ADVANCED MENU from the On Screen Menu How to change the Advanced Settings followed by pressing the SELECT OK Push button 8 Continue to the INPUT SELECT POWER ON Setting If you do not wish to perform INPUT SELECT POWER ON Set...

Page 39: ...r NO not to save them The MX120 will then return to normal op eration Refer to figure 7 on page 25 Restore Defaults The MX120 permits returning all of the previously entered On Screen Operating Settings back to the Factory Default Values by the following steps Note It is advisable to write down all current settings before proceeding in the event you desire to re enter them later 17 Using the Up or...

Page 40: ...program signal source for Zone A and is indicated on the right side of the Front Panel Alphanumeric Display The Selection of the source inputs for Zone A may also be accomplished by pressing the appropriate push button on the Remote Con trol Refer to figure 33 Note If the RC Digital Toggle feature in setup has been set to On an additional press of the source selection push button on the Remote Con...

Page 41: ...Off This feature suppresses loud sounds or music that might disturb neighbors or others not in the immediate area of the Home Theater Soft levels are also raised slightly so they are still listenable at reduced overall volume levels This works only on a Dolby Digital Sound Track with encoded data that supports the compres sion function Reset of Microprocessors In the event that the controls of the...

Page 42: ...S Encoded Signals G The NEO 6 Display will illuminate when the Sur round Mode Selector is turned to CINEMA2 or MU SIC 2 positions H The 2 CHANNEL Display will illuminate when the Surround Mode Selector is turned to STEREO 2 CHANNEL position How to Operate the MX120 con t ...

Page 43: ... Push button until the number 5 appears to the right of SUB TRIM on the Front Panel Alphanumeric Display This is an example of increasing the Subwoofer level by 5dB 3 Rotate the TRIM SELECT Control to the SURR SPKR position and SURR TRIM appears on the Front Panel Alphanumeric Display Refer to figure 38 Figure 38 Figure 40 Figure 37 4 Press the Front Panel TRIM LEVEL Up or Down Push button until t...

Page 44: ... the Front Panel Alphanumeric Display 2 Press the Front Panel TRIM LEVEL Up or Down Push button until the desired percent of Loudness is in dicated to the right of TRIMLOUD on the Front Panel Alphanumeric Display Center Width This mode takes some of the Center Channel Signal and adds it to the Left and Right Front Loudspeakers thus in creasing the width of the front sound field The effect can be v...

Page 45: ... Feature The Dis play brightness range extends from Off to a maximum brightness setting of 31 1 Rotate the TRIM SELECT Control clockwise until DISPLAY appears on the Front Panel Alphanumeric Display A number to the right of the display indicates the current brightness level Refer to figure 47 2 Press the Front Panel TRIM LEVEL Up or Down Push button until the desired display brightness is achieved...

Page 46: ...Setting for Center Width refer to page 47 to alter the settings Music 3 The Front Panel Alphanumeric Display will indicate MU SIC 3 Refer to figure 53 This processing Mode creates an effect of a party in a small room A Center Channel and Back Surround Channel are created from the sum of the Left and Right Front Channels The Left and Right Front Channel Information is also sent to the Surround Loud...

Page 47: ...d Mode is se lected Refer to figure 48 on page 46 Note The Front Panel Alphanumeric Display will indicate any changes made to the Dolby Digital Prologic II Music Processing Mode Figure 57a How to Operate the Surround Mode con t Figure 55 Figure 56 Pro Logic IIx Panorama This mode adds Surround Sound by spreading the sound field of the front speakers to the left and right of the listen ing position...

Page 48: ...sten to the tape playback of the program source just recorded ro tate the INPUT Selector Switch to select the Record Play device How To Make A Recording Note The MX120 record OUTPUTS are not affected by the VOLUME SURROUND or TRIM controls To listen to a different program source while recording rotate the INPUT Selector Switch to the desired source The recording process will not be affected and wi...

Page 49: ...Primary Home Theater Listening Area with Surround Sound Zone B is configured for a Secondary Remote Location providing two channel audio and video programs The MX120 Front Panel Alphanumeric Display indi cates the Zone A Program Source Selected on the right side and the Zone B Program Source Selected on the left side Refer to figure 58b on page 48 Operating Zone B from the MX120 Front Panel To act...

Page 50: ...e Gain Phono to REC Out 40dB Phono to Output Main 54dB High Level to REC Out 0dB High Level to Output Main 14dB Tone Controls Bass Control 12dB at 30Hz Treble Control 12dB at 10 000Hz PowerRequirements 100 Volts 50 60Hz at 65 watts 110 Volts 50 60Hz at 65 watts 120 Volts 50 60Hz at 65 watts 220 Volts 50 60Hz at 65 watts 230 Volts 50 60Hz at 65 watts 240 Volts 50 60Hz at 65 watts Note Refer to the ...

Page 51: ...the original shipping carton and interior parts only if they are all in good serviceable condition If a shipping car ton or any of the interior part s are needed please call or write Customer Service Department of McIntosh Labora tory Please see the Part List for the correct part numbers Packing Instructions Quantity Part Number Description 1 033888 Shipping carton only 4 033887 End cap 1 033697 I...

Page 52: ...cIntosh Laboratory Inc 2 Chambers Street Binghamton NY 13903 The continuous improvement of its products is the policy of McIntosh Laboratory Incorporated who reserve the right to improve design without notice Printed in the U S A ...

Reviews: