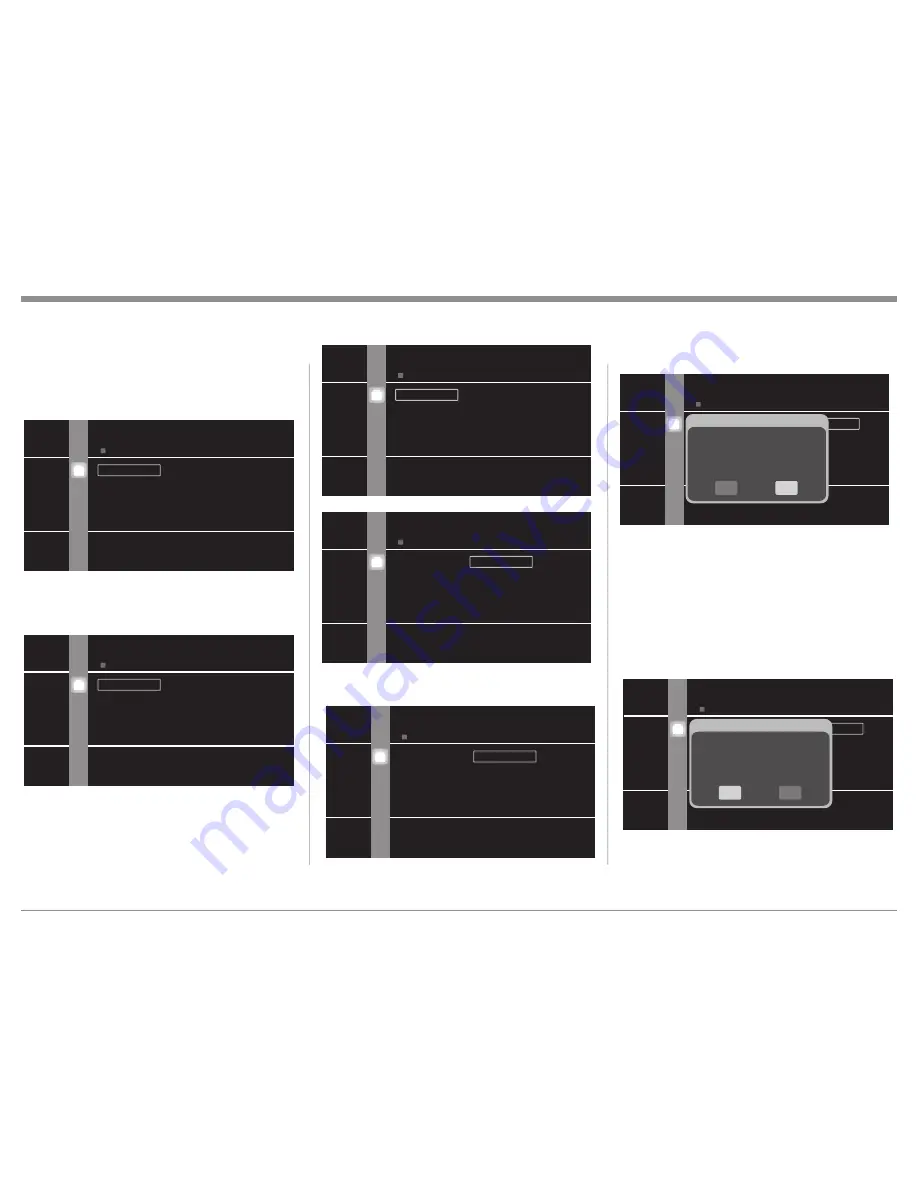
McIntosh MVP881BR Owner'S Manual Download Page 19

19

3. Press the Right

 Directional Push-button fol-

lowed by multiple presses of the Down

 Direc-

tional Push-button until the BD Data Utility Menu 

item appears at the top of the menu in a rectangu-

lar box. Refer to figure 5.

4. Press the Right

 Directional Push-button and a 

new menu will appear. Refer to figure 6.

5. Press the Down

 Directional Push-button to 

select the Initialize SD Card Menu item. Refer to 

figure 7.

6. Press the Right

 Directional Push-button and the 

rectangle box will now highlight the No choice. 

Refer to figure 8.

7. Press the Down

 Directional Push-button to 

select Yes. Refer to figure 9.

Introduction to the MVP881BR Setup Mode

OTHER SETUP

Firmware Update
Information

Power Saving

Auto Power Mode

Erases data on SD Memory Card, and initializes cards.

BD Data Utility

Initialize

BD Data Erase

Initialize SD Card

Figure 5

BD DATA UTILITY

Erases both internal memory and SD Memory Card storage.

BD Data Erase

Initialize SD Card

No

Yes

Figure 6

BD DATA UTILITY

Do not Initialize the SD Memory Card

Initialize SD Card

No
Yes

Figure 8

BD DATA UTILITY

Initializes the SD card to be used for the BD function

BD Data Erase

Initialize SD Card

No

Yes

Figure 7

8. Press the SELECT Push-button to select the 

Initialization Process. Refer to figure 10. A new 

window will appear on top of the previous on 

screen display. Once again you will be asked if 

you want to Initialize the SD Memory Card as 

this process will erease any data, photos or music 

already stored on the card.

9. Press the Left

 Directional Push-button and the 

Yes Push-button Icon will be highlighted. Refer to 

figure 11.

BD DATA UTILITY

Do not perform this operation when an SD card containing

MP3 or JPEG data is inserted.

Initialize SD Card

No

Yes

Initialize SD Card

Initialize SD Memory Card.
All SD Memory Card data is ereased.
OK to initialize?

No

Yes

Figure 10

BD DATA UTILITY

Do not perform this operation when an SD card containing

MP3 or JPEG data is inserted.

Initialize SD Card

No

Yes

Figure 9

BD DATA UTILITY

Do not perform this operation when an SD card containing

MP3 or JPEG data is inserted.

Initialize SD Card

No

Yes

Initialize SD Card

Initialize SD Memory Card.
All SD Memory Card data is ereased.
OK to initialize?

No

Yes

Figure 11

Summary of Contents for MVP881BR

Page 1: ...McIntosh Laboratory Inc 2 Chambers Street Binghamton New York 13903 2699 Phone 607 723 3512 www mcintoshlabs com MVP881BR Audio Video Player Owner s Manual...

Page 2: ...ED PERSONNEL To prevent the risk of electric shock do not remove cover or back No user serviceable parts inside CAUTION Invisible Laser Radiation when open DO NOT stare into the beam or view directly...

Page 3: ...the provided plug does not fit into your outlet consult an electrician for replacement of the obsolete outlet 10 Protect the power cord from being walked on or pinched particularly at plugs convenien...

Page 4: ...S and worldwide patents issued pending DTS is a registered trademark and the DTS logos Symbol DTS HD and DTS HD Master Audio are trademarks of DTS Inc 1996 2008 DTS Inc All Rights Reserved Trademark...

Page 5: ...t Binghamton New York 13903 Phone 607 723 1545 Fax 607 724 0549 Customer Service If it is determined that your McIntosh product is in need of repair you can return it to your Dealer You can also retur...

Page 6: ...nual s supplied with those component s for additional operation information 10 PCM Pulse Code Modulation is the name given to a specific type of Digital Audio Signal The CD Audio Disc and the suppleme...

Page 7: ...ard CD Audio Discs that conform to the Official Compact Disc Standards which is indicated by the Symbol 3 The MVP881BR will play most of the following discs however some recorded discs may not be able...

Page 8: ...lens assembly This unique design allows reading many different types of Audio and Video Disc For mats Advanced Transport The MVP881BR has a new vibration resistant Trans port housed in a Zinc Die Cas...

Page 9: ...ext page pertaining to installing the MVP881BR into cabinets 17 1 2 44 45cm 6 15 24cm Front View of the MVP881BR 5 3 8 13 69cm 4 5 8 11 75cm 13 1 4 33 65cm 17 43 18cm Rear View of the MVP881BR 14 1 2...

Page 10: ...g minimum spacing dimensions for cool opera tion Allow at least 6 inches 15 24cm above the top 2 inches 5 08cm below the bottom 3 inches 7 62cm behind the rear panel and 2 inch 5 08cm on each side of...

Page 11: ...to an Input of an A V Control Center or other audio video com ponent POWER CONTROL IN receives turn on signals from a McIntosh component and POWER CONTROL OUT sends turn on signals on to another McInt...

Page 12: ...Video Player HDMI OUT 1 to the HDMI Input 1 on the A V Control Center 7 Optionally MVP881BR Audio Video Player HDMI OUT 2 to the HDMI Input 2 on a Second ary TV Monitor HDMI Input Digital Audio Connec...

Page 13: ...13 Notes...

Page 14: ...brightness of the Front Panel Alphanumeric Display from bright to off Use to switch power On to the MVP881BR Use to view on screen the current title chapter group or track number along with direct acc...

Page 15: ...Push button to return to the previ ous setup menu Setup Press the SETUP Push button to access the Initial Setup Menu Subtitle Press the SUB Subtitle Push button to access the Subtitle menu and the Sub...

Page 16: ...of a disc or SD Card Use to Pause during playback of a disc or SD Card Stops disc or SD Card playback Selects the SACD or CD Audio Layer from a hybrid disc Selects the video signal output at the HDMI...

Page 17: ...HD Indicates when the two digits be low are display ing the Group or Title Number Indicates the programmed Track Group Play Mode is active Indicates when the numeric dis play is indicating the Total P...

Page 18: ...the menu items available for pos sible change the playback of the disc must be stopped which requires two presses of the STOP Push button Note The MVP881BR must be connected to a MONITOR TV either thr...

Page 19: ...ard Initialize SD Card No Yes Figure 8 BD DATA UTILITY Initializes the SD card to be used for the BD function BD Data Erase Initialize SD Card No Yes Figure 7 8 Press the SELECT Push button to select...

Page 20: ...e changes made to the menu options will not occur until after the SETUP Mode has been exited 2 A dot located to the left of the Menu Set ting Name indicates the current active setting Introduction to...

Page 21: ...er Auto 25 Digital Out Bitstream 25 1 These settings are not available while HDMI is the active Audio Output MENU SELECTION SETTING ADJUSTMENT SETTING PAGE Ratings A HDMI Password None 26 BD Rating Le...

Page 22: ...to a TV Monitor and Panel Res is selected the set with the larger screen size will determine the resolution Color Space YCbCr RGB Normal RGB Enhanced The vast majority of TVs will produce the best pic...

Page 23: ...aspect ratio for a 4 3 TV Monitor a 16 9 TV Monitor will display the 4 3 image centered with vertical Black Bars on either side 4 3 LB will display 480i source material with Black Bars on Top and bot...

Page 24: ...frequencies it is considered SMALL If a channel has no Loudspeaker connected then select NONE Note Contact your Dealer or the manufacture of the Loudspeaker s for additional information Channel Level...

Page 25: ...ned on some discs Off does not respond to the ID information contained on some discs MTRX creates surround sound by the matrix process for all discs BD Effect Sound On Off On provides click sounds whe...

Page 26: ...allows for entering manual settings for connection thru a Proxy Server IP Address 32 72 134 84 Displays the IP Address for the MVP881BR MAC Address Displays the MAC Address unique for each MVP881BR D...

Page 27: ...pond to HDMI or RS232 remote commands Normal Standby consumes more power than the Power Saving Standby Mode and responds to RS232 remote commands and does not respond to HDMI remote commands HDMI Cont...

Page 28: ...dy to begin operation Disc or SD Card Selection The MVP881BR plays Optical Discs and SD Cards One can select between the two sources by press ing the SOURCE Push button once The Front Panel Informatio...

Page 29: ...se Push button to temporarily stop playback Note After the Pause Feature is activated with a DVD Video Disc in the MVP881BR each ad ditional press of the Pause Push button will permit the video to adv...

Page 30: ...e selected by using the DIRECTIONAL NUMERIC and SELECT Push buttons on the Remote Control After the desired changes have been made the last press of the DISP TIME AUDIO or SEARCH Push button will swit...

Page 31: ...efer to the On Screen Text 3 To cancel the previously selected Repeat Mode press the REPEAT Push button until the Front Panel Information Display Repeat Sysmbol is extinguished Refer to figure 40 and...

Page 32: ...Control MP3 WMA Audio CD JPEG Photo CDs and Video CD Playback The MVP881BR has the ability of playing back spe cial types of disc formats that are created primarily on a computer The ability to succes...

Page 33: ...D Disc with JPEG file format To view a JPEG Photo disc perform the following steps 1 Load a JPEG Disc into the MVP881BR about 5 to 20 seconds later a Disc Information will appear on the Monitor TV ind...

Page 34: ...the various HDMI set tings Refer to the chart below along with figures 50 and 51 HDMI RES Video Signal Resolution Auto default Matches the native resolution of the TV Moni tor Source Direct Resolutio...

Page 35: ...lly 7 to 7 V Position Adjusts the centering of the image on the screen Verti cally 7 to 7 3 Effects the signal available at the VIDEO OUT S VIDEO OUT and COMPONENT VIDEO OUT Jacks only 4 Effects a 480...

Page 36: ...o signal To change between the HD Audio Output DTS HD Master or Dolby Digital True HD and Mix Audio Output PCM per the following steps 1 Press the MODE Push button Refer to figure 56 2 Use the Up or D...

Page 37: ...orm the following 1 Press the AUDIO Push button Refer to figure 58 2 Use the Up or Down Directional Push but tons to select Primary Audio first if there is a Secondary Sound Track available Then press...

Page 38: ...tialize Figure 81 LANGUAGE SETUP Dialog Subtitle GUI Language Disc Menus Set the language used for playback dialogs subtitles and menus a HDMI Figure 83 OTHER SETUP Firmware Update Information Power S...

Page 39: ...n try again 5 If figure 86 appears on screen press the SELECT Push button and you will be returned to the Other Setup Menu If figure 87 appears on the screen an Update is available To perform the upda...

Page 40: ...is finished After starting update note that GUI will shutdown Download firmware 15 Remain time 24min Figure 91 Firmware Update con t FIRMWARE UPDATE Firmware Update Set other items Check for Update St...

Page 41: ...41 Notes...

Page 42: ...Level 0 286Vp p 75 OHM NTSC Composite Video Output Level 1Vp p 75 OHM Digital Output Optical 15dbm to 21dbm Coaxial 0 5V p p 75 ohm Digital Signal Format Sampling Frequencies 44 1kHz 48 0kHz 96 0kHz...

Page 43: ...pping damage Use the original shipping carton and interior parts only if they are all in good serviceable condition If a shipping carton or any of the interior part s are needed please call or write C...

Page 44: ...cts is the policy of McIntosh Laboratory Incorporated who reserve the right to improve design without notice Printed in the U S A McIntosh Laboratory Inc 2 Chambers Street Binghamton NY 13903 www mcin...

Reviews: