21
Power On
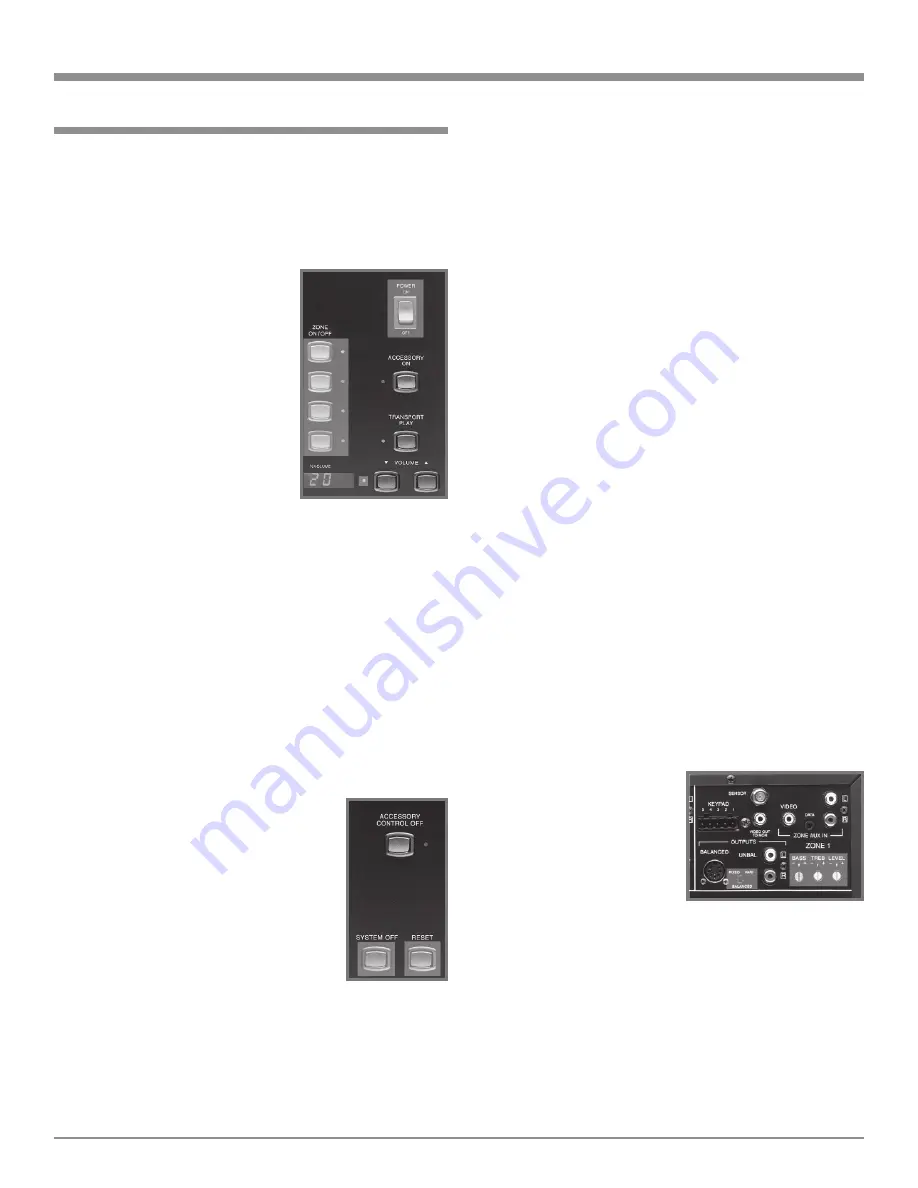
Press the POWER switch to ON. The Red LED, to the left
of the VOLUME Down
q
Push-button, lights to indicate
the CR16 is in Standby Mode. To turn ON the CR16 press
one of the ZONE ON/OFF push-buttons. Refer to figure 1.
Note: The POWER Switch is only intended to be switched OFF
when the CR16 Audio/Video
Multizone Control System is
not used for extended periods
of time, like while away on
vacation. During normal
operation, the POWER Switch
should stay in the ON position.
Press one of the ZONE ON/
OFF push-buttons for turning
the CR16 ON and OFF. The
CR16 may also be turned ON
or OFF from a McIntosh
Keypad or with the supplied
Remote Control.
Zone On/Off
Turn on and operate any of the four Zones by pressing a
ZONE ON/OFF Push-button. The LED to the right of the
ZONE ON/OFF Push-button will illuminate to indicate that
particular Zone is ON. The Zone will turn ON with the de-
fault (or programmed) signal source and volume level.
Press the ZONE ON/OFF Push-button a second time to
turn the Zone OFF. Refer to figure 1.
Note: If no programming has been performed, all Zones will
turn ON to the Tuner Source at a volume indication of
20.
System Off
Normally, remote zones are turned on and
off individually in each respective zone by
pressing the Power push-button on a key-
pad or remote control. If you desire to turn
off all zones of an entire CR16 system si-
multaneously, including a control center
and accessory source components, you can
press the Sys Off Push-button on the front
panel. You can also turn off the entire sys-
tem in any remote zone by pressing the Sys
Off push-button on a keypad. Refer to fig-
ure 2.
Note: Individual remote zones should normally be turned off
with the Power Push-button since there may be other
zones in use.
Select/Program
The SELECT/PROGRAM Push-buttons allow for two dif-
ferent functions for each Zone of the CR16. When a Zone
is first turned ON, the LED to the left of the SELECT/
PROGRAM Push-button will flash On and Off for about
10 seconds indicating the SELECT Mode is active for that
Zone. During this period of time, Source Selection, Volume
changes and Volume Muting are possible. At any time
when a given Zone is ON, Source Selection,Volume
changes and Volume Muting can be made by first pressing
the SELECT/PROGRAM Push-button followed by select-
ing a different source, muting and/or volume level for that
Zone. Pressing the SELECT/PROGRAM Push-button a
second time, during that 10 second period of time, the con-
trol of that Zone will switch Off. Refer to page 22 for infor-
mation on programming the CR16.
Note: Ten seconds after Zones 2, 3 or 4 are turned ON, all
front panel operating functions return to Zone 1 after 10
seconds even if Zone 1 is not active. For information on
programming refer to page 22.
Dedicated zone source components
If a specific CR16 zone has a source component dedicated
exclusively to that zone, it can be operated in that zone
with a keypad or remote control. When a dedicated zone
source component is connected, it replaces the source com-
ponent that is connected to the CR16 Aux inputs. If the
CR16 is connected with a Control Center which has a
source component connected to its Aux inputs, that compo-
nent will not be available in the zone with the dedicated
source component.
Bass, Treble and Level Controls
Adjust the bass and treble controls for the desired tone
shaping in each zone. Adjust
the zone level controls to in-
crease or decrease a maximum
of 6dB from the center detent
position. Volume changes with
the level controls add or sub-
tract from the turn on levels.
Refer to figure 3.
Balanced and UnBalanced Outputs
Place the slide switch to the correct position according to
the output hook-up, balanced or unbalanced connections.
Reset of Microprocessors
In the event that the controls of the CR16 stop functioning,
there is a user reset function built in. Press the Reset push-
button and this will reset the CR16 microprocessors. Refer
to figure 2.
How to Operate the CR16
How to Operate the CR16
Figure 3
Figure 1
Figure 2


