background image

Compact Refrigerators and Freezers Service and Installation Manual

7

For customer service, call (888) 732-2446, Fax (800) 669-0619, www.mccallrefrigeration.com

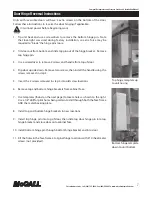
Door Hinge Reversal Instructions

Units with reversible doors will have 2 extra screws on the bottom of the door. 
Follow these instructions to reverse the door hinging if applicable. 

Disconnect power before beginning work.

1.  Tip unit back and use a screwdriver to remove the bottom hinge pin.  Note 

that lock-tight was used during factory installation, so extra force may be 
required to “break” the hinge pins loose.

2.  Tilt door out from bottom and slide top pin out of the hinge bracket.  Remove 

top hinge pin.

3.  Use a screwdriver to remove 2 screws and handle from top of door. 

4.  Flip door upside down. Remove two screws, then install the handle using the 

screws removed in step 3.

5.  Insert the 2 screws removed in step 4 into old screw locations.

6.  Remove top and bottom hinge brackets from cabinet face.

7.  Use templates (found on the next page) to locate holes as shown to the right. 

Use a 1/8” drill for pilot holes being certain to drill through both the face frame 
AND the metal backing plate.

8.  Install top and bottom hinge brackets in new locations.

9.  Install top hinge pin into top of door, then slide top door hinge pin into top 

hinge bracket and close door onto cabinet face.

10.  Install bottom hinge pin through bottom hinge bracket and into door.

11.  Fill the holes in the face frame at original hinge locations with #10 sheet metal 

screws (not provided). 

Top hinge template up 

to unit nosing

Bottom hinge template 

down to unit bottom

Summary of Contents for MCCF27

Page 1: ...ESE INSTRUCTIONS Compact Refrigerators Freezers Service Installation and Care Manual Please read this manual completely before attempting to install or operate this equipment Notify carrier of damage Inspect all components immediately See page 3 May 2011 ...

Page 2: ... 1 888 732 2446 2011 McCall All rights reserved Reproduction without written permission is prohibited Even though most equipment is shipped crated care should be taken during unloading so the equipment is not damaged while being moved into the building 1 Visually inspect the exterior of the package and skid or container Any damage should be noted and reported to the delivering carrier immediately ...

Page 3: ...enser area and out at the top rear of the unit Avoid hot corners and locations near stoves and ovens Any restriction of the proper air flow outlined above total or partial will void the warranty on the unit Leveling A level cabinet will perform better because the drain pan will drain properly the doors will line up with the frames and the cabinet will not be subject to undue strain All four legs a...

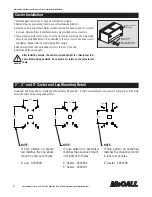
Page 4: ...e rear of the unit 6 Carefully lift the unit upright After installing casters the unit must stand upright for twenty four 24 hours before being powered up to assure oil return to the compressor sump Plate Casters W Locks Plate Casters W O Locks 14 x 75 Hex Head Screws 932 1116 Plate caster installation 400 4000 Series Caster Installation WARNING 2 3 and 5 Caster and Leg Mounting Detail A universal...

Page 5: ...f the doors will hamper the unit s ability to maintain optimum refrigeration temperature Refrigerators defrost automatically with every cycle of the compressor The water generated is routed to a pan on the rear of the unit and is evaporated by the heat given off by the compressor Service Alert During normal operation the evaporator fan may cycle and or pulse independently of the compressor Consult...

Page 6: ... the control enters the defrost mode whether manual or automatic it switches off the evaporator fan motor compressor and condenser fan motor and switches on the defrost heater to warm the evaporator coil and melt all frost accumulated during the previous refrigeration cycle The control will continue the defrost cycle for a MINIMUM of 8 minutes and a MAXIMUM of 30 minutes depending on the amount of...

Page 7: ... screws and handle from top of door 4 Flip door upside down Remove two screws then install the handle using the screws removed in step 3 5 Insert the 2 screws removed in step 4 into old screw locations 6 Remove top and bottom hinge brackets from cabinet face 7 Use templates found on the next page to locate holes as shown to the right Use a 1 8 drill for pilot holes being certain to drill through b...
Page 8: ...Compact Refrigerators and Freezers Service and Installation Manual For customer service call 888 732 2446 Fax 800 669 0619 www mccallrefrigeration com 8 Door Hinge Reversal Templates ...

Page 9: ...frequency of cleaning should be increased Clean the condenser with a vacuum cleaner or stiff brush If extremely dirty a commercially available condenser cleaner may be required Stainless Steel Care and Cleaning To prevent discoloration or rust on stainless steel several important steps need to be taken First we need to understand the properties of stainless steel Stainless steel contains 70 80 iro...

Page 10: ... 1 Tighten the screws 2 If the door needs to be higher at the handle use a 5 16 wrench to loosen the hinge screws and install a spacer inside of the hinge see illustration 2 Tighten the screws Drain Maintenance Each unit has a drain located inside the unit which removes the condensation from the evaporator coil and evaporates it at an external condensate evaporator pan Each drain can become loose ...

Page 11: ...37563 Hinge Btm RT McDonalds 3237516 Hinge Cartridge McDonalds 3237568 Hinge Top LT McDonalds 3237562 Hinge Top RT McDonalds 0420067 Hinge kit left or right hinged 3978271 Shelf 3235014 Shelf clip 2194759KT Temperature control Includes control knob and dial plate 2194761 Temperature control knob MCCSTR48 MCCR48 Part Description 3234025 3 Caster brake 3234024 3 Caster no brake 3234160 5 Caster no b...

Page 12: ...STF48 MCCF48 Part Description 3234025 3 Caster brake 3234024 3 Caster no brake 3234160 5 Caster no brake 3234161 5 Caster brake 000 B3I 0035 24 Door left hand 000 B3I 0034 24 Door right hand 3234791 6 Leg 0074058 Capillary tube 036 id x 168 3527000 Compressor 158 ATA 0050 Condensate coil hot gas 149 AWM 0040 Condensate pan 3516276 Condenser coil 3516172 Condenser fan blade clear lexan 2162715 Cond...

Page 13: ...ber with the service claim Labor Of 1 Hour Is Allowed To Replace Thermostat Contractor Relay Infinite Switch Transformer Door Jam Switch Evaporator Condenser Fan Motor and Blade Solenoid Coil Circulating Fan Motor and Blade Hi limit Thermal Protector Switch Microprocessor Control Fan Delay Defrost Termination Switch Water Level Sensor Probe Compressor Start Components and Overload Protector Door H...

Page 14: ...ragraph may void warranty coverage Procedures All claims for replacement parts or repair kits must be made through a McCall Parts Depot or an authorized McCall dealer The defective part invoice must be returned to McCall within 15 days after the date of service to be eligible for warranty coverage All claims must include the model number serial number an original date of installation and customer ...

Page 15: ...THORIZED SERVICE CENTER S THEN APPLICABLE TIME AND MATERIALS RATES CONSIDER CUSTOMER MAY INITIATE A SERVICE AGREEMENT WITHOUT PARTS COVERAGE If shipment of a replacement part is requested prior to the arrival in the McCall factory of the part claimed to be defective the Original Purchaser must accept delivery of the replacement part on a C O D basis with credit being issued after the part has been...

Page 16: ...______ S N ____________________ Installation Date _____________ For a list of McCall s authorized parts depots visit our website at www mccallrefrigeration com 980 S Isabella Rd Mt Pleasant MI 48858 U S A 888 732 2446 Fax 800 669 0619 www mccallrefrigeration com McCall reserves the right to make changes in design or specifications without prior notice 2011 McCall All rights reserved Printed in the...

Reviews: