background image


Export Multiple

 – 

lets you split your project 

into multiple files all in one step. You can either 
split them vertically (one new file per track), or 
horizontally (using labels in a Label Track) to 
indicate the breaks between exported files. 


Page Setup

 – 

configure how Audacity will 

print out the track waveforms using the Print 
option, and what printer to use. 


Print

  –

 Print out the main window view from 

audacity showing the tracks and waveforms. 


Exit (Quit)

 – 

closes all windows and exits 

Audacity, prompting you to save any unsaved 
changes first. 


Edit Menu 

Undo

 – 

This will undo the last editing 

operation you performed to your project. 
Audacity supports full unlimited undo – 
meaning you can undo every editing operation 
back to when you opened the window. 


Redo 

 This will redo any editing operations 

that were just undone. After you perform a new 
editing operation, you can no longer redo the 
operations that were undone. 


Cut

 – 

Removes the selected audio data and 

places it on the clipboard. Only one “thing” can 
be on the clipboard at a time, but it may 
contain multiple tracks. 


Copy

  –

 Copies the selected audio data to the 

clipboard without removing it from the project. 


Paste 

– 

Inserts whatever is on the clipboard at 

the position of the selection or cursor in the 
project, replacing whatever audio data is 
currently selected, if any. 
 

Trim 

– 

Removes everything to the left and 

right of the selection. 


Delete 

– 

Removes the audio data that is 

currently selected without copying it to the   


Silence 

– 

Erases the audio data currently 

selected, replacing it with silence instead of 
removing it. 


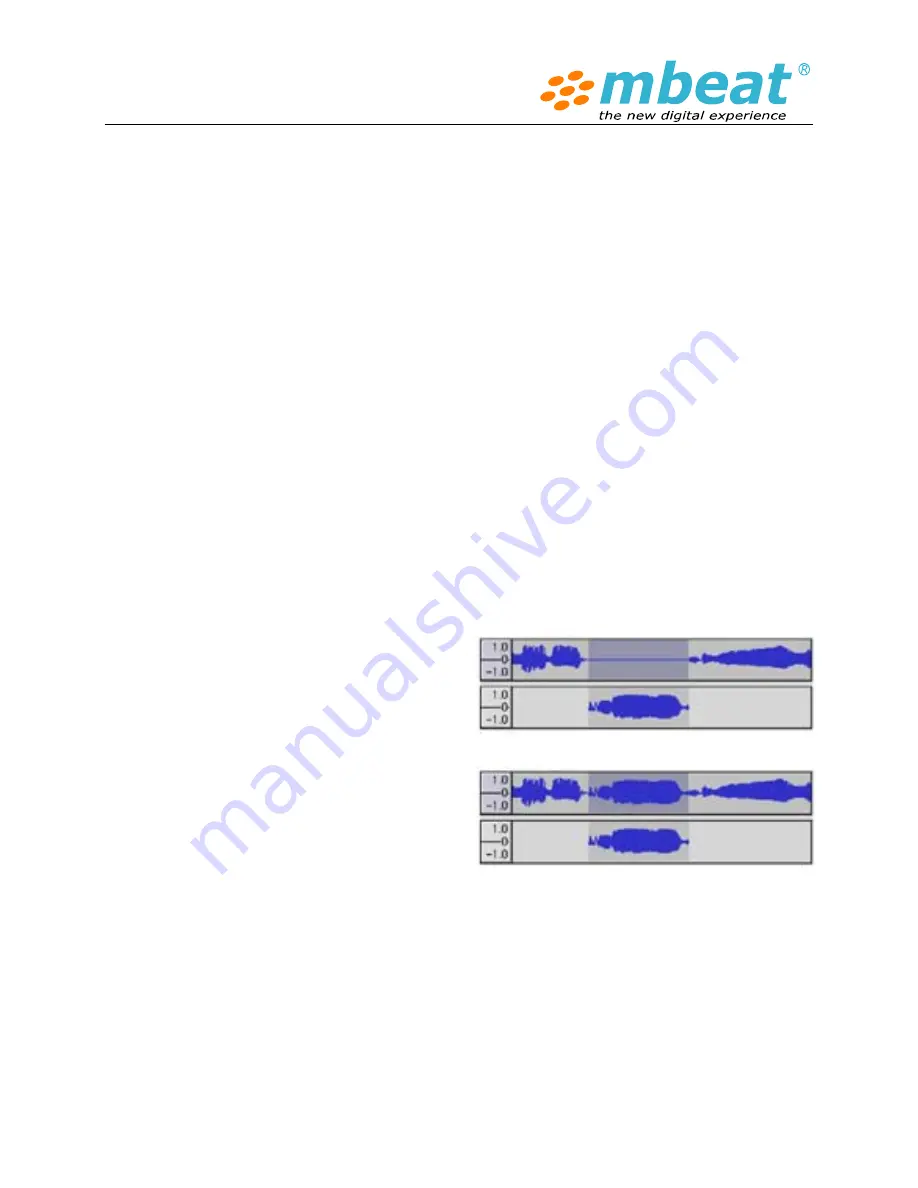
Split 

 Moves the selected region into its own 

track or tracks, replacing the affected portion of 
the original track with silence. See the figure 
below: 


Duplicate 

– 

Makes a copy of all or part of a 

track or set of tracks into new tracks. See the 
figure below: 


Select

…>

 ALL

-

Selects all of the audio in all 

of the tracks in the project. 


Select

…>

Start to Cursor

-

Selects from the 

beginning of the selected tracks to the cursor 
position. 


Select

…>

Cursor to End

 – 

Selects from the 

Summary of Contents for USB-TR01

Page 1: ...ly before use and store in a safe place for future reference Product color and specification are subject to change without prior notice The manufacturer or distributor reserves the right to amend the instruction manual at anytime to reflect the latest product design changes or limitations ...

Page 2: ...ee speed for choice 33 3 45 78 rpm 8 Ceramic cartridge with diamond style needle 9 Full range dual speakers 10 Power volume knob with LED backlit 11 USB interface USB 1 1 2 0 compatible 12 RCA output Connect this with the plugs to mixer or amplifier Red color indicates for R channel white color indicates for L for channel 13 AC power plug cord Connect to a grounded AC outlet of the proper voltage ...

Page 3: ...place the 45rpm adaptor on the record spindle 3 Choose the desired playing speed using the Speed select switch among 33 3 45 or 78rpm 4 Turn on the Rotary Power Volume Switch 5 Release the tone arm lock 6 Push in the arm with your hand lightly 7 Gently place the tone arm vertically over the first track of the record the turntable will start turning automatically 8 Put down the cartridge slowly to ...

Page 4: ...reen instructions to install this audio editing software program With the software installed you can record vinyl records into digital and store on your PC If you using Windows 7 OS or MAC OS X you can also download the free version of the latest Audacity software to install on your computer Details please refer Audacity Software Quick Guide later Download link http audacity sourceforge net downlo...

Page 5: ... different as our manual description please check it carefully and make prompt changes to suit your system Some software knowledge is required to operate software in handling more complicated functionalities 1 Turn on the USB turntable recorder connect the USB cable to the device and computer no extra driver is required to drive the tape recorder 2 Your computer should detect a new USB PnP Audio d...

Page 6: ...ey important and you can set up in Preference under Edit menu as well 5 Adjust the output and input volume to get your desire sound volume when you using computer speaker to play back please note that this setting will not effect the final recording track volume level only effect the computer speaker volume just works like your Windows OS volume and microphone controller panel 6 Important is to Se...

Page 7: ...nP Audio which indicated the audio source from the tape recorder when it is plugged into the computer Your system may show the name like Generic USB Audio device or USB PnP Device it does not matter Important is to find the proper recording source that is match with this USB turntable recorder Please also tick Software play through Play new track while you are recording this function enables you t...

Page 8: ...er speaker to monitor your records it is totally up to you 9 7 Select the PAUSE button to pause the recording 8 Select the STOP button to stop the recording 9 Select the to skip to start 10 Select the button to go to end 11 You can see the recorded file on your computer and convert the recorded file to other formats including WAV MP3 Ogg Vorbis Once the tape reaches its end the tape recorder will ...

Page 9: ...do I download and install the LAME MP3 encoder Because of software patents we cannot distribute MP3 encoding software ourselves Follow these instructions to use the free LAME encoder to export MP3 files with Audacity Windows OS Users z Check your CD disk there should have this file in the CD disk and you can copy into your computer somewhere that you can find to reload it on Audacity ...

Page 10: ... Export as MP3 command Audacity will ask for the location of lame_enc dll Navigate to C Program Files Lame for Audacity select lame_enc dll then click Open and OK z If you prefer the Zip option for the LAME download save the zip file to anywhere on your computer extract lame_enc dll to any location then show Audacity where to find it as in Step 5 above z In case of difficulty please view our more ...

Page 11: ...P3 or WMA files Turntable basic maintenance Replacing the stylus cartridge Refer to the figures 1 8 Installing a new stylus cartridge Refer to the figures 5 6 NOTE 1 We strongly advise you to clean your records with an anti static cloth to gain maximum enjoyment from them and to make them last 2 We would also point out that for the same reason your stylus should be replaced periodically approximat...

Page 12: ...and placed properly z Check the platter is spinning properly z Check whether the stylus cartridge is wore out and need to be changed 3 Noise from the speaker z Vinyl record has little background noise due to its natural acoustic character and minor background noise is consider as normal z Check whether the Vinyl record track is damage or fade out z Do not turn the USB turntable recorder speaker vo...

Page 13: ...sourceforge net To Install Software PC Record 1 Insert the CD that came with your product 2 Click on the Audacity file to open it and then click on the audacity exe to run it Follow the on screen instructions to install the program 3 With the software installed you can record vinyl records to your PC 4 Plug in your turntable to an AC outlet and connect the USB port on the Turntable to the USB port...

Page 14: ...n the record Click the red record button on the toolbar to begin recording from vinyl to PC 2 When the track has finished recording click the orange stop button 3 Drop down the File menu and select the intended music format to be exported as 4 Select where you would like to save the file e g my music name the file and save as the audacity software can not save MP3 directly please install the lame_...

Page 15: ...tarts playing audio at the cursor position If some audio is selected only the selection is played Loop if you hold down the Shift key the Play button changes to a Loop button which lets you keep playing the selection over and over again Record starts recording audio at the project sample rate the sample rate in the lower left corner of the window The new track will begin at the current cursor posi...

Page 16: ...he audio outside the selection Silence the selected audio Undo Redo repeat last command Zoom In Zoom Out Fit selection in window zooms until the selection just fits inside the window Fit project in window zooms until all of the audio just fits inside the window Track Pop Down Menu The Track Pop Down Menu appears when you click in a track s title This lets you access a few special commands that app...

Page 17: ...nto a stereo pair all edits automatically apply to both the left and right channel Split Stereo Track if the selected track is a stereo track a pair of left and right tracks joined together as a single track this operation splits them into two separate tracks that you can modify and edit independently Set Sample Format this determines the quality of the audio data and the amount of space it takes ...

Page 18: ...ces Note that exporting will automatically mix and re sample if you have more than one track or varying sample rates See also File Formats Export Selection As WAV same as above but only exports the current selection Export as MP3 exports all of the audio as an MP3 file MP3 files are compressed and therefore take up much less disk space but they lose some audio quality Another compressed alternativ...

Page 19: ...t Removes the selected audio data and places it on the clipboard Only one thing can be on the clipboard at a time but it may contain multiple tracks Copy Copies the selected audio data to the clipboard without removing it from the project Paste Inserts whatever is on the clipboard at the position of the selection or cursor in the project replacing whatever audio data is currently selected if any T...

Page 20: ...When Snap To mode is enabled the selection will be constrained to the nearest interval on the time scale by default the nearest second So if you click and drag from 4 2 seconds to 9 8 seconds it will result in a selection from 4 seconds to 10 seconds exactly You can change the units that are snapped to using the Set Selection Format option in the View Menu Snap To Snap Off Turns Snap To mode off l...

Page 21: ...hich you can use to put the toolbar back into the main window Float Edit Toolbar moves the Edit Toolbar out of the window and into its own floating window so you can position it wherever you want The menu item changes to Dock Edit Toolbar which you can use to put toolbar back into the main window Float Meter Toolbar does the same thing for audacity s VU meters which you use to set recording levels...

Page 22: ...orting recording and mixing automatically create new tracks as needed But you can use this to cut or copy data from an existing track and paste it into a blank track that track was at a non default rate then you may need to use Set Rate from the Track Pop Down menu to set the correct sample rate New Stereo Track same as above but creates a stereo track You can also create a stereo track by joining...

Page 23: ...ples which sounds like purestatic Any items which appear after these three built ins It is possible for a poorly written plug in to crash Audacity so always save your work before using a plug in Note that any effect that doesn t take any audio as input will automatically be placed in the Generate menu Effect Menu The items in this menu only work when you have audio selected Audacity does not have ...

Page 24: ...on Boost or reduce arbitrary frequencies You can select one of a number of different curves designed to equalize the sound of some popular record manufacturers or draw your own curve Fade In fades the selection in linearly Fade Out fades the selection out linearly FFT Filter similar to Equalization lets you enhance or reduce arbitrary frequencies The curve here uses a linear scale for frequency In...

Page 25: ...ing a plug in effect Analyze Menu Plot Spectrum To use this feature first select a region of audio from a single track and then select Plot Spectrum It opens up a window that displays the Power Spectrum of the audio over that region calculated using the Fast Fourier Transform The graph represents how much energy is in each frequency As you move the mouse over the display it shows you the nearest p...

Page 26: ...he product Warranty is valid only in the country of purchase If you live outside of Australia please contact your reseller for warranty service Mbeat Australia will not process any warranty returns or repairs if the product is taken outside of Australia This Warranty does not cover A Cosmetic damage or damage due to acts of God B Accident misuse abuse negligence or modification of any part of the ...

Reviews: