Mazi HTVR-0410HT Quick Manual Download Page 9

Quick Guide of HD TVI Recorder 

No. 

Name 

Function Description 

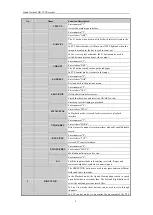
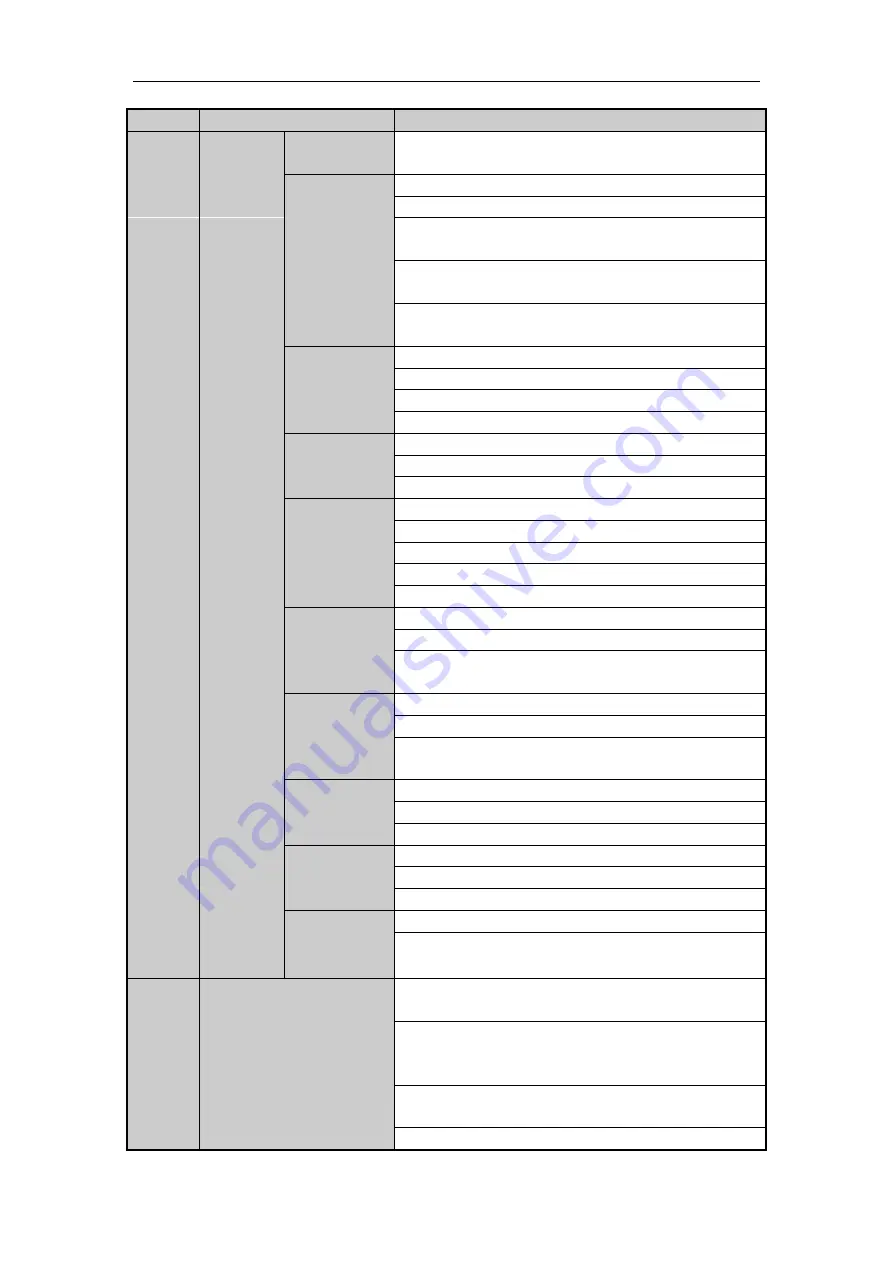
1/MENU 

Enter numeral “1”;   

Access the main menu interface. 

2/ABC/F1 

Enter numeral “2”;   
Enter letters “ABC”;   

The F1 button when used in a list field will select all items in the 

list. 

In PTZ Control mode, it will turn on/off PTZ light and when the 

image is zoomed in, the key is used to zoom out. 

In live view or playback mode, the F1 button can be used to 

switch between main and spot video output. 

3/DEF/F2 

Enter numeral “3”;   
Enter letters “DEF”;   

The F2 button is used to change the tab pages. 

In PTZ control mode, it zooms in the image. 

4/GHI/ESC 

Enter numeral “4”; 
Enter letters “GHI”;   

Exit and back to the previous menu. 

5/JKL/EDIT 

Enter numeral “5”; 
Enter letters “JKL”; 

Delete characters before cursor; 

Check the checkbox and select the ON/OFF switch;   

Start/stop record clipping in playback. 

6/MNO/PLAY 

Enter numeral “6”; 
Enter letters “MNO”;   

In Playback mode, it is used for direct access to playback 

interface. 

7/PQRS/REC 

Enter numeral “7”;   
Enter letters “PQRS”;   

Direct access to manual record interface; manually enable/disable 

record. 

8/TUV/PTZ 

Enter numeral “8”; 
Enter letters “TUV”; 

Access PTZ control interface. 

9/WXYZ/PREV 

Enter numeral “9”; 
Enter letters “WXYZ”; 

Multi-channel display in live view. 

0/A 

Enter numeral “0”; 

Shift the input methods in the editing text field. (Upper and 

lowercase, alphabet, symbols or numeric input). 

DIRECTION


The DIRECTION buttons are used to navigate between different 

fields and items in menus.   

In the Playback mode, the Up and Down button is used to speed 

up and slow down recorded video. The Left and Right button will 

select the next and previous record files. 

In  Live  View  mode,  these  buttons  can  be  used  to  cycle  through 

channels. 

In  PTZ  control  mode,  it  can  control  the  movement  of  the  PTZ 

Summary of Contents for HTVR-0410HT

Page 1: ...HD TVI Recorder Quick Manual...

Page 2: ...ection 11 RS 485 and Controller Connection 12 Specifications 123 Table 1 Specification for HTVR xxxxLT 12 Table 2 Specification for HTVR xxxxHT 13 HDD Storage Calculation Chart 15 Accessing by Web Bro...

Page 3: ...ved including interference that may cause undesired operation EU Conformity Statement This product and if applicable the supplied accessories too are marked with CE and comply therefore with the appli...

Page 4: ...tion Multimedia Interface are trademarks or registered trademarks of HDMI Licensing LLC The products contained in this manual are authorized by HDMI Licensing LLC with the use right of the HDMI techno...

Page 5: ...question or request please do not hesitate to contact dealer This manual is applicable to the models listed in the following table Series Model Type 720p real time HTVR 0410LT HTVR 0820LT HTVR 1640LT...

Page 6: ...than its diameter 4 Connect both the alarm and RS 485 cable 5 Allow at least 2cm 0 75 inch of space between racks mounted devices 6 Ensure the DVR is grounded 7 Environmental temperature should be wi...

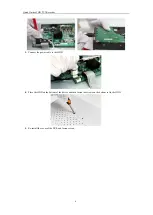
Page 7: ...of HD TVI Recorder 6 3 Connect the power cable to the HDD 4 Place the HDD on the bottom of the device and then fasten the screws on the bottom to fix the HDD 5 Re install the cover of the DVR and fas...

Page 8: ...Receiver Receiver for IR remote controller 3 USB Interfaces Universal Serial Bus USB ports for additional devices such as USB mouse and USB Hard Disk Drive HDD Front Panel of HTVR xxxxHT Description...

Page 9: ...the ON OFF switch Start stop record clipping in playback 6 MNO PLAY Enter numeral 6 Enter letters MNO In Playback mode it is used for direct access to playback interface 7 PQRS REC Enter numeral 7 Ent...

Page 10: ...x fields In Playback mode it can be used to play or pause the video In single frame Playback mode pressing the button will advance the video by a single frame In Auto switch mode it can be used to sto...

Page 11: ...T RCA connector 4 VGA DB15 connector for VGA output Display local video output and menu 5 HDMI HDMI video output connector 6 USB Port Universal Serial Bus USB port for additional devices 7 Network Int...

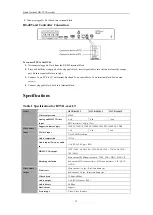
Page 12: ...To connect an AC load jumpers should be left open you must remove the jumper on the motherboard in the DVR Use an external relay for safety as shown in the figure above There are 4 jumpers JP1 JP2 JP3...

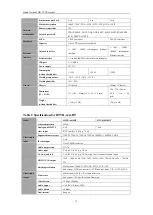
Page 13: ...HTVR 1640LT Video Audio input Video compression H 264 Analog and HD TVI video input 4 ch 8 ch 16 ch BNC interface 1 0Vp p 75 Supported camera types 720P 25 720P 30 720P 50 720P 60 1080P 25 1080P 30 CV...

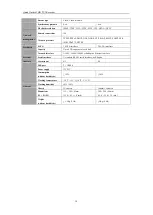
Page 14: ...242 45mm 12 4 9 5 1 8 inch 380 290 48mm 15 0 11 4 1 9 inch Weight without hard disks 1 5Kg 3 3lb 2Kg 4 4lb Table 2 Specification for HTVR xxxxHT Model HTVR 0410HT HTVR 0820HT Video Audio input Video c...

Page 15: ...Capacity Up to 4 TB capacity for each disk External interface Network interface 1 10M 100M 1000M self adaptive Ethernet interface Serial interface 1 standard RS 485 serial interface half duplex Alarm...

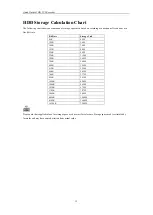
Page 16: ...e Storage Used 96K 42M 128K 56M 160K 70M 192K 84M 224K 98M 256K 112M 320K 140M 384K 168M 448K 196M 512K 225M 640K 281M 768K 337M 896K 393M 1024K 450M 1280K 562M 1536K 675M 1792K 787M 2048K 900M 4096K...

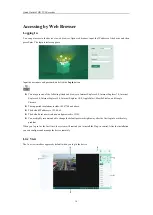
Page 17: ...0 Internet Explorer 9 0 Internet Explorer 10 0 Apple Safari Mozilla Firefox and Google Chrome The supported resolutions include 1024 768 and above The default IP address is 192 0 0 64 The default user...

Page 18: ...e toolbar to start the live view of all cameras on the device list Refer to the following table for the description of buttons on the live view window Icon Description Icon Description Select the wind...

Page 19: ...ve the settings and exit the Edit Schedule interface 6 Click Advanced to configure advanced record parameters 7 Click Save to validate the above settings Playback Interface Introduction No Name Descri...

Page 20: ...s at any time including operation alarm exception and information of device Before you start The Log function can be realized only when the device is connected with a HDD or network disk And make sure...

Page 21: ...r Video Tampering HDD Detect OSD Video Loss Manual VQD Alarm RS 232 Normal Event Tag Smart External File VQD DS 7100 SH does not have the Alarm Camera PTZ and RS 232 functions DS 7200 SH does not have...

Page 22: ...for each channel and the lower left of each screen showing the status of the record and alarm in the channel and the exceptions and events happening to the device so that you can find problems as soo...

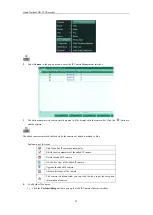
Page 23: ...he camera not added is marked in blue Explanation of the icons Add the online IP camera automatically Edit the basic parameters of the added IP camera Delete the added IP camera Get the live view of t...

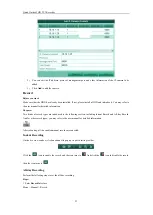
Page 24: ...types are introduced in the following section including Instant Record and All day Record And for other record types you may refer to the user manual for detailed information After rebooting all the e...

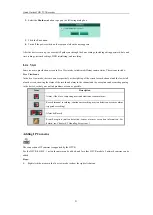
Page 25: ...ick the button in the shortcut operation menu Only record files recorded during the last five minutes on this channel will be played back OPTION 2 1 Enter the Playback menu Left click on the live view...

Page 26: ...hannel or execute simultaneous playback of multiple channels Backup Recorded files can be backed up to various devices such as USB flash drives USB HDDs or USB DVD writers To export recorded files 1 E...

Page 27: ...VI Recorder 26 4 Click Export to enter Export interface 5 Choose backup device and click the Export button to start exporting 6 Check backup result Choose the record file in Export interface and click...

Reviews: