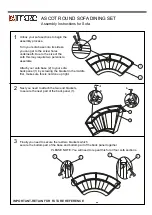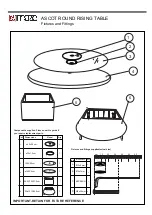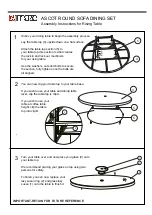
Assembly Instructions
IMPORTANT- RETAIN FOR FUTURE REFERENCE
GENERAL INFORMATION
- For domestic and outdoor use only.
- We suggest you retain these instructions for future reference.
- Keep fittings out of children’s reach and keep children well away from construction area.
- Periodically check all fittings and re-tighten as necessary.
- Do not sit or stand on your table.
- Do not stand on your chair, sofa or stool.
- This product should only be used on firm, level ground. Make sure the legs remain in contact with the ground.
- Ensure any safety locks are correctly located and locked in place for any mechanisms before use.
- Keep hands away from folding mechanisms to prevent possible entrapment or injury.
- Any folding mechanisms should only be used by competent adults.
- The glass used in this product is toughened and complies with BS EN 12150-1:2009
WARNINGS
- We suggest you spend a short time reading through this leaflet
before you start.
- When you are ready to start, make sure that you have the right
tools and plenty of space.
- Unwrap all packaging materials and place the components on
a clean surface to protect it from damage. We recommend that
the packaging is used to protect the surfaces during assembly.
- Carefully check that you have all the parts before starting
assembly.
- Please retain the assembly tools. You will need them in the
future to re-tighten the bolts, or if you want to dismantle the
furniture for storage.
- Please make sure that the product is clean and dry before
putting it into storage.
- We recommend the use of furniture covers to protect your
furniture when not in use. During severe weather conditions,
please move your furniture inside. (eg. High Winds)
- To clean your items, please use mild detergent in warm water.
Rinse with clean water and dry thoroughly. Do not use abrasive
cleaners, strong detergents, bleach, acid or solvents on the
frame parts.
- When cleaning glass panels, use a damp cloth with washing up
liquid or soft soap if necessary. Do not use washing powders or
any other substances containing abrasives since these
substances can scratch glass panels.
DO’S
- Do not stand on your chairs, sofas or stools.
- Do not sit on the arms of your chair or sofa.
- When moving furniture never drag the pieces
across the floor, as this will cause damage to the joints.
- Do not use silicone based furniture polish.
- If the glass is chipped or broken, stop using the product and
consult our customer service team.
- Do not place very hot or very cold items on the glass surface,
unless adequately thick table mats are used to prevent such
items from coming into contact with the glass.
- Do not use glass as a chopping surface.
- Do not strike the glass with hard or pointed items.
DON’TS
ASSEMBLY
Two persons to assemble the unit and lift the unit
into position.
MISSING PARTS
If you are missing any fixtures or fittings for your product
please contact our customer service team.


