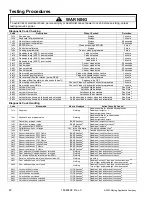


©2003 Maytag Appliances Company
16022498
A – 3
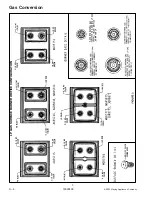
Gas Conversion
2
6XUIDFH %XUQHUV 7R /33URSDQH *DV
`^rqflkW
This cooktop is not removable. Do not attempt
to remove this cooktop. Save the natural gas orifices
removed from the appliance for possible future conversion
to natural gas.
c ^ _ i~W
klqbW
Surface burner orifices are located in LP
conversion kit plastic bag attached to the back of the
range.
a. Remove the top grates and burner caps.
b. Remove each burner head by removing two screws.
(See figure 1)
klqbW
Convert one burner at a time to
avoid incorrect installation.
c.
fjmloq^kqW
Replace these two screws after
removing burner head. The screws will secure orifice
holder and prevent damage to electrode or tubing while
changing orifice.
d. Remove the factory installed natural gas orifices from
the center of the orifice holders using a 7mm nut driver.
(See figure 1). Remember to keep the original natural
gas orifices for possible later conversion to natural gas.
e. Replace the orifice in each of the four or five orifice
holders with the correct LP/Propane gas orifice (see
figure 2).
klqbW
See figure 3 for natural gas orifice size and
information.
fjmloq^kqW
Make sure orifice is secured in nut driver
before attempting to install orifice.
TIP: Insert tape into the head of the 7mm nut driver to
help prevent the orifice from falling into the range.
Tighten each orifice until snug. Use caution not to over
tighten.
f. When orifice change is complete, remove two screws
then re-install burner head and secure with same two
screws.
g. Replace the burner caps and grates using caution
when replacing each burner cap so that electrode is not
damaged.
cfdrob N