background image

3

ENG

Safety Instructions

Before you use the massage chair, please make sure you are familiar with the contents of the entire Operating 

Manual, in particular the safety instructions, maintenance & cleaning instructions and the training information. 

Please also make sure that everyone who uses this massage chair is also familiar with all this information and 

observes it. 

Be sure to follow carefully the maintenance and safety instructions contained in this manual. 

This massage chair may only be used for its intended purpose. Misappropriate use may pose a risk for possi-

ble accidents, damage to health or damage to the massage chair for which no liability will be accepted by the 

distributor. 

Mains Connection


A mains voltage of 220-230V is required for the operation of the device.


The massage chair may only be connected by the mains cable included in delivery to a grounded 16A 

individually fused socket which has been installed by a professional.  


Always remember to first remove the mains plug from the socket if you want to change the location of the 

massage chair. 


Always remove the mains plug from the socket before starting any cleaning, maintenance or other works to 

the massage chair.


Do not connect the mains adapter plug to a socket strip or to a cable drum. 


If using an extension lead make sure that it conforms to VDE guidelines and regulations or the equivalent 

in your country.  


Always lay the power cable in such a way that it cannot be damaged or cause a tripping hazard.


Electrical appliances, such as smartphones, PC, TV (LCD, plasma, tube, etc.), game consoles, etc. trans-

mit electromagnetic radiation during operation and in stand-by mode. Keep these all these devices away 

from this massage chair as they may cause malfunction or interferences. 


For safety reasons, always remove the mains cable plug from the electrical socket when the massage chair 

is not in use.

Training Environment


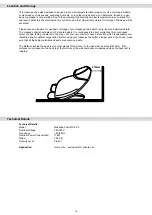
Choose an area for your massage chair that is level, clean and easily accessible. The area should offer the 

largest free space and maximum safety possible. 


Ensure that the area is well ventilated during use and that you avoid drafts. 


The massage chair is not suitable for outdoor use and so it should only be stored and used in a tempered, 

dry and clean room.


The ambient temperature range for the operation and storage of the massage chair should be between at 

least 10° to a maximum of 30°Celsius


Do not operate or store the massage chair in wet areas such as in swimming pools, saunas or bathrooms 

etc.


Make sure that when in operation or when idle that the massage chair is kept on firm, level ground and that 

any unevenness in the floor surface is removed or levelled out.


To protect delicate floors, such as wood, laminates, tiles, etc. from damage such as scratches it is advisa

-

ble to place a 

MAXXUS® floor protection

 mat permanently under the device.


Make sure that the mat is secured against slipping.


Do not place the massage chair directly on pale coloured or white carpets as the feet on the device can 

cause staining.


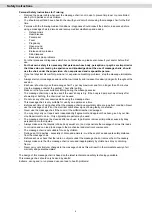
Make sure that the massage chair including the mains cable do not come into contact with hot objects and 

that the massage chair is kept at sufficient distance away from all sources of heat such as heating radia

-

tors, open and fires, ovens and stoves.   

Summary of Contents for MX 8.0

Page 1: ...ENG Massage Chair MX 8 0 I N S TA L L AT I O N O P E R AT I N G M A N U A L ...

Page 2: ...ct 19 2019 MAXXUS Group GmbH Co KG All rights reserved All rights reserved This publication may not be reproduced stored in a retrieval system or transmitted in whole or in part in any form or by any means electronic mechanical photocopying recording or otherwise without the prior written permission of Maxxus Group GmbH Co KG Errors colour and technical modification subject to change reproduction ...

Page 3: ... TV LCD plasma tube etc game consoles etc trans mit electromagnetic radiation during operation and in stand by mode Keep these all these devices away from this massage chair as they may cause malfunction or interferences For safety reasons always remove the mains cable plug from the electrical socket when the massage chair is not in use Training Environment Choose an area for your massage chair th...

Page 4: ...amp such as directly after showering or bathing the chair must not be used Do not use any other accessories while using the massage chair This massage chair is only suitable for use by one person at a time Before each time of using check that the massage chair and electrical cable are in perfect condition Never use the massage chair if it or the electrical cable show signs of being faulty or defec...

Page 5: ...ble when the massage chair is switched on or in standby mode This may cause damage to the massage chair or cause an electric shock Always switch off the massage chair using the main switch and then remove the power cable or the control unit cable The power cable should always be removed when the massage chair is not in use to prevent unauthorized use by third parties such as children Always check ...

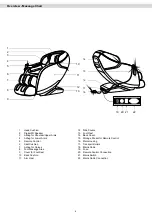
Page 6: ... 4 Airbag for Lower Arms 5 Remote Control 6 Seat Cushion 7 Airbag for Calves 8 Foot Massage Area 9 Cover for Foot Rest 10 Back Cushion 11 Arm Rest 12 Side Covers 13 Foot Rest 14 Back Cover 15 Storage Pocket for Remote Control 16 Main Housing 17 Transport Rollers 18 Mains Cable 19 Fuse 20 Remote Control Connection 21 Mains Switch 22 Mains Cable Connection Overview Massage Chair ...

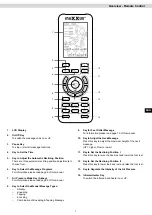
Page 7: ...tion please read page 9 of this manual 8 Key to Select the Manual Massage Types Shiatsu Kneading Tapping Knocking Combination of Kneading Tapping Massage 9 Key for Foot Roller Massage For information please read page 10 of this manual 10 Key to Adjust the Neck Massage Press this key to adjust the maximum height of the neck massage UP higher Down lower 11 Key to Set the Reclining Position I Press t...

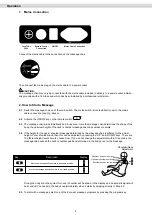
Page 8: ...ght of the neck shoulder massage and the acupressure points 2 4 If the height for the neck shoulder massage determined by the massage chair is different to the actual height of your shoulder neck then this can be adjusted by pressing the UP and DOWN keys There are 10 different height levels here to choose from If you do not change the adjustment within 10 seconds the massage chair will use the nec...

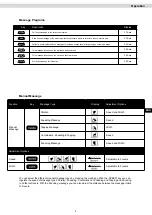
Page 9: ...as Full body massage for relaxation Key Description Display Function Key Massage Type Display Adjustment Options Manual Massage Shiatsu Speed and Width Kneading Massage Speed Tapping Massage Width Combination Kneading Tapping Speed Knocking Massage Speed and Width Adjustment Options Speed Adjustable to 3 levels Width Adjustable to 3 levels Manual Massage You can select the different manual massage...

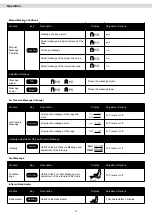
Page 10: ...tion Key Description Display Adjustment Options Air Pressure Massage Air pressure massage of the legs and arms To 3 levels or off Air pressure massage arms To 3 levels or off Air pressure massage of the legs To 3 levels or off Intensity Adjustment of the Air Pressure Massage Intensity On Off of the Air Pressure Massage and adjustment of the intensity To 3 levels or off Foot Massage Function Key De...

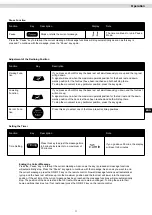
Page 11: ...he back rest have been reached and both will stop there To stop the movement in any particular position press the key again Zero G Func tion Press this key to select one of the three preset reclining positions Setting the Timer Function Key Description Note Time Setting Press this key to adjust the massage time in 5 minute increments to a maximum of 30 minutes If you go above 30 mins the display w...

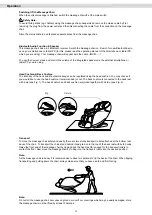
Page 12: ... the neck and shoulder massage can be regulated using the head cushion You may choose if you would like to use the head cushion recommended or not The back cushion is connected to the back rest with a zip see Fig 1 The head cushion and back cushion are joined together with Velcro see Fig 2 Zip Velcro Transport To move the massage chair safely and easily there are two sturdy transport rollers attac...

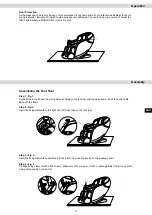
Page 13: ...bly Assembling the Foot Rest Step 1 Fig 1 Connect the air hose and the wiring harness between the foot rest and the base frame Push the extra cable back into the frame Step 2 Fig 2 Insert the fixing elements to the right and left cross tube on the foot rest Step 3 Fig 3 Insert the fixing elements assembled in Step 2 into the mounting hooks on the massage chair Step 4 Fig 4 Fix each fixing element ...

Page 14: ...e it is continuously in direct sunlight as this could cause colour change fading or defects to the cover For your own comfort choose a location which is adequately ven tilated to allow for optimal oxygenation Before using your massage chair after a longer period of non use make sure that all the fixing materials and parts are secure and safe The distance behind the back rest to other pieces of fur...

Page 15: ...All consumers are legally obliged to dispose of old appliances separately from household waste Dispose of the device only with a municipal or an authorised disposal company Here the disposal of this device is free of charge This is the only way to ensure that your old device is professionally disposed of and that nega tive effects on the environment will be avoided Please observe the regulations w...

Page 16: ...0 cm 240 x 100 cm MAXXUS Anti Static Spray Effective against the static charges created in frames clothing and training computers Devices which are located on carpets or synthetic floors will become statically charged MAXXUS Anti Static Spray will deter this Synthetic surfaces treated with MAXXUS Anti Static Spray do not attract dust as quickly and will remain clean for longer MAXXUS Special Foam ...

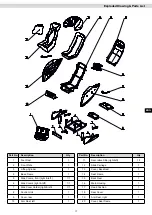
Page 17: ...ht left 1 1 7 Side Cover Holder right left 1 1 8 Control Unit 1 9 Cover rear 1 10 Arm Rest left 1 Part No Description Qty 11 Decorative Strip right left 1 1 12 Slide Carriage 1 13 Cover Back Rest 1 14 Seat Frame 1 15 Back Rest 1 16 Main Housing 1 17 Head Cushion 1 18 Seat Cover 1 19 Arm Rest right 1 20 Cover Seat Frame 1 Exploded Drawing Parts List ...

Page 18: ...period for your training device starts on the date of purchase and applies solely to products which were purchased directly from the MAXXUS Group GmbH Co KG or one of the MAXXUS Group GmbH Co KG direct and authorised distribution partners The warranty covers defects caused by production or material faults and only apply to devices purchased in Germany The warranty does not apply to damages or defe...

Page 19: ...that must be completed Fault Description Please enter a short description of the error as precisely as possible below For example when where and how does the error occur Frequency after which period at what Use etc A copy of the proof of purchase invoice receipt is attached I accept the General Terms and Conditions of MAXXUS Group GmbH Co KG I hereby instruct the company MAXXUS Group GmbH Co KG to...

Page 20: ...Maxxus Group GmbH Co KG Nordring 80 D 64521 Groß Gerau Germany E Mail info maxxus de www maxxus com ...

Reviews: