Maxxair MAXXFAN Plus 4000KI Installation Instructions, Information And Operating Manual Download Page 4

AIRXCEL, INC.  - RV PRODUCTS DIVISION / 

MAXXAIR Ventilation Solutions

 warrants to 

be free of manufacturing defects, regardless 

of ownership for a period of one (1) year from 

the original date of purchase.  

You must keep 

your original sales receipt.

   This 

Limited 

Warranty

  does  not  include  “Acts  of  God,” 

failure  due  to  misuse,  improper  installation 

or accidental / incidental damages.   Please 

call your AIRXCEL / MAXXAIR Distributor if 

you have any questions or need assistance.   

Please have your original sales receipt 

and MAXXFAN Serial Number readily 

available.

    This  limited  warranty  does  not 

cover labor or any freight costs for the return 

of the product to or from AIRXCEL, INC.  or 

costs associated with installation, removal or 

reinstallation of the product.

For WARRANTY INFORMATION on products purchased in Australia or New Zealand,

please visit www.coastrv.com.au • www.coastrv.co.nz

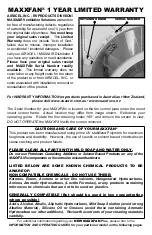
The Serial Number for your MAXXFAN is located on the fan control plate under the round 

insect screen frame.  Actual location may differ from image shown.  Reference your 

operating guide.   Rotate the four retaining knobs 180° and remove the screen to view.   

DO NOT OPERATE the MAXXFAN with the screen removed.

CAUTIONS AND CARE OF YOUR MAXXFAN

®

This product has been manufactured using prime UV stabilized Polymers for maximum 

toughness and durability.  However, the use of caustic or solvent based chemicals can 

cause cracking and product failure.

PLEASE CLEAN ALL PARTS WITH MILD SOAP AND WATER ONLY.

Do not use Petroleum Containing Additives or Solvent Based Products on any of the 

MAXXFAN’s components or its corrosion resistant hardware.

LISTED BELOW ARE SOME KNOWN CHEMICAL PRODUCTS TO BE 

AWARE OF:

NON COMPATIBLE CHEMICALS - DO NOT USE THESE:

Ketones, Esters, Acetone or other like solvents, Halogenated Hydrocarbons, 

Amines, Aromatic Hydrocarbons, (Loctite Formulas), or any products containing 

references to: chemicals that are not to be used on plastics.

GENERALLY COMPATIBLE (But should be used in low concentration 

where possible)

Acids, Alcohol, Alkalis, Aliphatic Hydrocarbons, Mild Soap Solution (avoid strong 

Alkaline Material), Silicone Oil or Greases (avoid those containing Aromatic 

Hydrocarbons or other additives).   Review the contents of your cleaning materials 

carefully.

For additional information regarding your 

NEW MAXXFAN 

Plus

, please refer to the 

INFORMATION AND OPERATING GUIDES for your particular model on the following pages.

SERIAL NUMBER

RETAINING KNOB

MAXXFAN

®

 1 YEAR LIMITED WARRANTY

Summary of Contents for MAXXFAN Plus 4000KI

Page 1: ... ring of your existing roof vent and measure the ceiling opening or verify the opening is large enough by sliding the MAXXFAN interior Garnish trim ring into the opening The MAXXFAN is designed for a minimum roof thickness of 50mm to a maximum of 110mm If your roof thickness is less than 50mm build additional thickness at the ceiling opening using wood or other suitable material Longer Garnish Rin...

Page 2: ...ening with the lid hinge facing the front of the vehicle and centering the MAXXFAN in the opening Make sure the power wires slide to the interior and do not become entangled Using the sixteen 16 screws provided screw the flange to the roof at each raised ring dimple location along the flange Screw into the dimple to pierce the flange making sure not to overtighten the screws to avoid cracking the ...

Page 3: ...all 102mm markers on the outside of the Garnish ring and trim accordingly refer to 6B to the right STEP 7 Complete the installation by placing any excess wiring to the inside of the roof opening and sliding the Garnish Ring into position Fasten in place by using the four painted flat head screws provided NOTE DO NOT probe or tamper with the thermostat sensor or IR sensor shown in illustration 6 ab...

Page 4: ...OPERATE the MAXXFAN with the screen removed CAUTIONS AND CARE OF YOUR MAXXFAN This product has been manufactured using prime UV stabilized Polymers for maximum toughness and durability However the use of caustic or solvent based chemicals can cause cracking and product failure PLEASE CLEAN ALL PARTS WITH MILD SOAP AND WATER ONLY Do not use Petroleum Containing Additives or Solvent Based Products o...

Page 5: ... operate fan with screen removed When removing screen for cleaning turn the MAXXFAN OFF and remove the vehicle 12 volt power to the MAXXFAN When cleaning your MAXXFAN use only a mild detergent solution RAIN SENSOR 4500 4540 MODELS ONLY If the Rain Sensor circuit detects moisture it will TURN OFF the fan and close the lid If ANY key is pressed when the Rain Sensor is still wet the fan will BEEP THR...

Page 6: ...l be reset to 26 C To further adjust the set temperature if desired use the or Arrow keys to adjust at 0 5 C per press The fan will emit a beeping sound to confirm this setting If a previous thermostat temperature was entered the fan will remember this temperature setting and the next time you enter Auto Mode the fan will start ventilating automatically as directed by the thermostat The fan speed ...

Page 7: ...ode close the vent lid and shut off the fan motor THERMOSTAT SET TEMPERATURE TEMP Press this button to increase the Set Temperature for Auto Mode TEMP Press this button to decrease the Set Temperature for Auto Mode NOTE The thermostat temperature range is from 2 C to 37 C To change from Celsius to Fahrenheit on the temperature display press and hold both set temperature keys simultaneously FAN SPE...

Page 8: ...over FRESH AIR RAIN OR SHINE ENJOY your new MAXXFAN in all weather conditions with the NEW FANMATE FEATURING EZClipTM Hardware AVAILABLE IN WHITE BLACK SMOKE Warranty limited to repair or replacement see Airxcel com for details Features a powerful 10 speed fan motor Provides over 900 CFM to keep you cool and comfortable Backup controls at ceiling A MAXXFAN Exclusive Ceiling Fan Mode Flush mounted ...

Reviews: